Classic step-by-step recipe for Armenian mikado cake with photo. Armenian cake "Mikado" real
I tried this delicious cake for the first time at a party and fell in love with it. One day my husband and I went to visit my husband's friend at work. And only on the way to visit her husband, talking about his new friend - an employee, mentioned that he was Armenian. I confess Armenian cuisine I have never tried it before in my life, and I became terribly interested. In addition to my husband and I, there were many guests, and a pleasant hostess named Karina also spared no time in cooking. There were several unusual dishes which I tried for the first time. As expected, the Armenian cuisine turned out to be very tasty, but what struck me the most was the cake that was served for dessert. The name of this cake is “Mikado” and for Armenians it is like “Honey cake” or “Napoleon” for us, that is, the most common cake that is sold in any store. But since I have not been to Armenia, purchased cake I haven't tried it and I don't have anything to compare it to. Tastier than cake than this Armenian cake, I have never eaten in my life!
Having talked with a nice, sociable and very hardworking hostess Karina (as it turned out later, her name is Karina), I could not help but take the opportunity and ask about the recipe for this excellent cake. As it turned out, there are many nuances in the preparation of dough and cream. Cake layers can turn out to be sandy and crumbly or soft and tender rich. The cream is made from fresh or boiled condensed milk, and some add more cocoa to make the cake more chocolatey. It turned out that this cake "Mikado" with a clear Japanese name Karine has been cooking for 10 years, but she never thought about its origin. The cake was taught by her grandmother to cook according to a family classic recipe. Of course, I transferred this recipe in all details to my notebook and decided to bring it to life in my kitchen the same week. Of course, I did not experiment with a new recipe. Cooked according to the classic recipe, as Karine said. It turned out just incredible! Delicate cakes soaked in vanilla-iris cream that melt in your mouth! If you have never tried this cake, be sure to try it, the cake turns out divine the first time!
To prepare the Mikado cake you will need:
- Medium eggs - 3 pcs;
- Sugar - 1 tbsp;
- Oil - 200 gr;
- Sour cream - 200 gr;
- Soda - 1 tbsp. l;
- Flour premium- 4-5 st;
- A pinch of vanilla.
- Oil - 400 gr;
- Boiled condensed milk - 2 cans of 0.5 liters.
For powder:
- grated chocolate.
The classic recipe for the Armenian Mikado cake.
1. Mix sour cream with soda and leave for 30 minutes.

2. During this time, sour cream should foam up and be covered with a cap of small bubbles.

3. Before making the cake, leave the butter in the kitchen so that it becomes soft and manageable. Put the butter in a bowl and mash with a fork. If the oil is easily kneaded, you can work with it.

4. Pour sugar and a pinch of salt.

5. Shuffle soft butter with sugar and a pinch of salt.

6. Add eggs one at a time and beat.


7. Then add sour cream with soda and mix.


8. Add flour in small portions and start kneading the dough with a spoon.


9. The dough does not need to be kneaded for a long time and interrupted with flour, otherwise the cakes will turn out dry. As soon as the dough gathers on a spoon and stops lagging behind the walls of the bowl, roll it into a ball and put it on a floured surface. The dough should be soft and easy to roll out.

10. Divide it into 6 parts.

11. Start rolling out the dough on the table.

12. And transfer the dough to a baking sheet, turning the last one upside down.

13. Flatten the entire pan with your hands or with a rolling pin. Trim the edges.

14. Use a fork to poke holes all over the dough.

15. Bake until golden brown at 180-200 degrees. Finished cakes cool down.

16. Put boiled condensed milk into softened butter at room temperature.

17. Mix well.

18. Lubricate the cakes.

19. As you spread the cakes one on top of the other to make a large, low cake.

20. Sprinkle well with grated chocolate on top.

Now the cake needs to be put in the refrigerator for the night so that it is infused and soaked with cream. The longer the cake stays in the fridge, the tastier it will be. And the mikado cake is stored for a very long time - up to 10 days. finished cake“Mikado” is cut into squares or rhombuses and served with tea or coffee. Enjoy your meal!

Good evening dear sweeties! Known since Soviet times, the Mikado cake is recognized as one of the favorite desserts of Armenia. It is baked for all holidays and celebrations. However, the origin of the recipe is unknown, and the name has nothing to do with the Armenian table at all.
How to cook a real Armenian Mikado cake according to a classic recipe
There are many options for making Mikado, each hostess has her own secret. But the classic recipe with a photo provided here is always taken as a basis. Mikado traditional classic has been for a long time. The cake recipe has been passed down from generation to generation.
Authentic Armenian mikado cake recipe
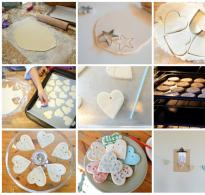
Real armenian recipe Mikado can be reproduced at home. This will take several hours of free time, because the cake layers must be very thin and they will have to be baked long time. I offer a recipe for an Armenian cake step by step, and a photo for each step will help you navigate the cooking sequence.
General list of required ingredients
To create a real Armenian Mikado cake, 6-10 cakes or more are required, so everything here depends on the possibilities and time. From these proportions of the ingredients, you get medium cake, the recipe is designed for 10-12 cakes.

FOR THE TEST:
- 400 gr sour cream
- 6 eggs
- 2 cups sugar 400 gr butter
- 10 cups flour
- a pinch of salt
- 1-2 packs vanilla sugar
- 1.5 tsp soda
FOR CREAM:
- 600 gr butter
- 2.5 cans of boiled condensed milk
- 1-2 packs of vanilla sugar
FOR SPRING:
- 1-2 bars of dark chocolate
The number of ingredients is chosen at the discretion. If you need thin dry cakes, take one amount, if juicy and tender - another.
Cooking the dough
IMPORTANT! We will knead the dough with smooth movements, without applying force and pressure.

Let the dough rest a little, and at this time you need to prepare a cream for a future treat.
Making cream
You can choose any cream - on sour cream, on cream or layer the cake with jam. But most often a cream is made on condensed milk.

The longer the butter is whipped, the softer and more airy the cream will turn out.
We bake cakes and collect the cake
The whole trick of baking a cake is that we turn the baking tray over and heat it up, thus facilitating the task of rolling out the dough.

Classic recipe suggests only chocolate chips. If you create a pattern on the surface of the cake using sour cream or the same cream that the cakes were smeared with and chocolate chips, then without going beyond the traditional framework, you get an aesthetically pleasing dessert.
cake decoration
Generally Armenian cake classic mikado does not require any decorations, except for a thick layer chocolate chips. The beauty of this masterpiece lies in its presentation. You need to cut the cake into identical rhombuses and beautifully put on a dish.

But here, every housewife will do as her fantasy tells her. The design also depends on the future submission. If these are rhombuses, then you can make them in contrasting shades - chocolate and sour cream, for example, as well as two varieties or types chocolate chips. If it will round cake, then you can decorate only the sides with chocolate, and leave the cream color on top.
Cream options

The real Mikado is made with condensed butter cream, but there are a lot of options for impregnation creams. You can choose any one you want.
Butter cream with yolks and condensed milk
This one is easy to prepare. air cream done in a couple of minutes.
We will need:
- 3 yolks
- 100 gr soft butter
- 50 gr sugar
- Bank of boiled condensed milk
Beat the yolks in a homogeneous foam and gradually add the sugar, dissolving it completely. Then we drive in the oil and add condensed milk. The cream is ready.
Chocolate butter cream with boiled condensed milk
The option can be a little more complicated or simplified, it all depends on the preferences of the household.
For the cream you need:
- Boiled condensed milk - 1 can
- Butter soft - 150 gr
- Cocoa or grated chocolate - 100 gr.
Butter is mixed with cocoa or chocolate and pounded to homogeneous mass. You can heat the mixture a little so that everything dissolves faster. Then boiled condensed milk is added. We send the well-mixed cream to the refrigerator.
In conclusion, I’ll tell you a little secret: the longer the cake stays in the refrigerator before serving, the more tender it will become. Its taste will resemble creamy ice cream in a waffle cup.
Share your Mikado cake recipes, because you will surely have something to add to the classic version. I hope you like mine step by step recipe cooking and how to cook Mikado you now know.
I will use a food processor, it is very convenient to whip various mixtures with it. You can also use a mixer or blender. Break the eggs, separating the yolks from the whites. We need yolks for cream, three pieces will be enough. If you want more cream, take 4-5 yolks and increase the dose of the rest of the ingredients accordingly. Beat the yolks with a glass of sugar.

Add 400 ml of milk to beaten yolks with sugar and beat. Then pour 4 tbsp. spoons of cocoa. Once again, beat everything until smooth. Pour this mixture into a saucepan, heat, stirring, to 90 degrees. Then we cool.

We open a couple of cans of boiled condensed milk. If you can't find it in the store, make it yourself. To do this, put the jars in a pot of water and boil for low fire within 4 hours. Beat 500 grams of butter with boiled condensed milk.

cooled chocolate cream in milk, pour into a whipped mass of boiled condensed milk with butter. Beat well, put in the refrigerator. Let the cream harden a bit.

As you understand, we made the cream and put it aside. Now let's get to the dough. Again we need butter. Yes, the Armenian cake is dangerous for the figure, but this is also the secret of its amazing taste! Beat softened butter with eggs.

Next, put the sour cream in a bowl for whipping. We shift the beaten eggs with butter there. We beat. We put the sifted flour, whisking continuously at low speed. When the mixture begins to thicken, transfer the dough to the table.

Knead a smooth dough that should not stick to your hands. Divide the ball into several small lumps. You should get about 10 pieces. Roll into balls of the same size.

Sprinkle the table with flour, take a rolling pin, roll out each ball of dough to the finest state. Just make sure the dough doesn't spread. We cover the baking sheet parchment paper, put the dough there. Bake in the oven at 180 degrees for about 7-10 minutes, until golden brown.
Cake "MIKADO" (Armenian recipe)
Probably every family has dishes that should be present on New Year's table necessarily! Absolutely and without options! We have such a compulsory program» New Year's menu MIKADO cake included!


This is my favorite cake!!! All my family and guests love it!
ABOUT THE ORIGIN…
The Mikado Cake is one of the famous and classic cakes such as Napoleon, bird's milk" etc. And, frankly, I was very surprised not to find his recipe on our forum. But what is not, is not.
This cake is a traditional, very popular and favorite dessert in modern Armenia.
I have already been approached several times with a request to post the recipe for this “Armenian cake”. As I understand it, interest in him OUTSIDE of Armenia appeared after the TV series "The Last of the Magikians". I didn’t watch it, but, as I was told, there Magikyan’s Russian wife tried for many years to cook his favorite “Armenian cake” for him, but she didn’t turn out the same as his mother’s ... Which is not surprising! Not a single daughter-in-law can ever succeed “like her mother”. A priori!
I will say right away that I was not entirely sure that the Mikado cake was of Armenian origin. In fact, I'm not at all sure! And I decided to dig on the Internet. But even there I could not find any information about the origin of this cake.
The word "MIKADO", in fact, is Japanese ... Literally, it is translated as "high gate" or "majestic gate." In ancient times, this was the name of the supreme ruler of Japan. There is an opera with that name, and a game of sticks, and a tomato variety, and even a brand of wine ...
And… CAKE!
Whether he has anything to do with the Japanese emperor, or at least Japan, I have no idea. Most likely, as is often the case, none. In any case, there is nothing "Japanese" in it ...
But, to my surprise, I found that the recipe for this cake is indeed posted on the Internet either by Armenians, or presented as “Armenian Mikado Cake”!
Perhaps it really is of Armenian origin, or maybe not ... But what is absolutely certain, it does NOT belong to the ancient recipes of Armenian cuisine! The recipe is definitely from the Soviet period! In any case, we have been preparing it for 3-4 generations. I've been making it myself for 30 years...
You can buy it in our stores, in any baking department. But homemade, of course, is much tastier!

DESCRIPTION…
In terms of composition and cooking technology, Mikado is a very simple cake, nothing special. And yet, it is VERY tasty! The taste is magical! Caramel vanilla, with light chocolate aftertaste... It makes you want to take another piece from the dish... and another... and another... By the way, comments on the recipes of this cake on the Internet are also full of epithets - "the most beloved", "the most delicious", "delicious", "luxurious", "a masterpiece of the Armenian kitchens" and so on and so forth ...
The cake is sandy, consists of thin cakes layered with cream based on boiled condensed milk ... It is far from fluffy, fluffy and airy! You can’t stick birthday candles in it... Depending on your preferences, it can be fragile and crispy, or it can be crumbly and soft... But in any case, it is incredibly tasty, tender, melting in your mouth...
The cake is not high, traditionally has a square or rectangular shape and is served cut into small diamonds ...
The cake is very "convenient", especially for new year holidays because it is stored for a very long time! Two weeks for sure! And it just keeps getting tastier! Therefore, you can treat guests with a worthy dessert during all public holidays…
In addition, it can (and should!) be prepared in advance, 2-3 days before the holiday! And if necessary, the cakes can be prepared even earlier! And this significantly relieves the most "hot" New Year's Eve days ...
Cooking it is not at all difficult and does not take long at all. Cakes are baked quickly, cream is generally a matter of a few minutes ... I specifically timed it. It takes about 30 minutes to prepare the dough, about 1.5 hours to bake (about 15 minutes to form and bake each cake) and, finally, another 30 minutes to prepare the cream and coating ... Total: only 2.5 hours.
No self-respecting cake can be made faster!
Of course, the cake is high-calorie ... But at least once a year you can afford a piece of happiness?! ..
======================================
VARIATIONS…
In general, there are several options for preparing this cake, both cakes and cream. Of course, every housewife has her own recipe ..
- In dough recipes, the amount of butter, eggs and sour cream varies, as a result of which the cakes are either more rich and tender, or very dry and thin ...
- The number of cakes also varies: from 6-7 (in the case of more rich cakes) to 10-12 (in the case of very thin and dry ones) ...
— Classic variant cream - boiled condensed milk with butter. However, sometimes sour cream is added to this cream, or raw yolks, or custard milk-egg mixture, or generally brew condensed milk with eggs and cocoa on fire ... However, all these variations are necessary for very dry, not rich cakes, for the best impregnation…
- In some recipes, cakes are still hot smeared with hot cream (brewed version), but this also makes sense in the case of very thin and dry cakes ...
- In many recipes, cocoa is added to the cream. Which I don't like at all! Cocoa makes the taste of the cake more “rough”, a delicate caramel flavor is clogged ...
I offer my version of this cake! This is a classic recipe. Without cocoa, with very tender and rich cakes... For many years, the recipe has been worked out, changed, acquired technological nuances...
In my opinion, this is the MOST DELICIOUS option!!!

===================================
FOR THE TEST:
1 glass of sugar (200 ml)
200 gr butter
200 gr sour cream
1 tsp soda (no slide)
4-5 glasses of flour (Flour is always different!!! In consistency!!)
A pinch of salt
FOR CREAM:
400 gr butter (delicious!)
2 cans of boiled condensed milk (thick, rich color!)
1-2 packs of vanilla sugar (or a pinch of vanilla)
FOR SPRING:
1 bar of dark chocolate (delicious!)

This portion makes square cake with a side of about 30-32 cm, consisting of 6-7 cakes (this is about 30-35 pieces, not counting the scraps!), Or a rectangular cake about 30x40 cm in size from 5-6 cakes (this is about 50 pieces) ...
===================================
PREPARING THE DOUGH:
In a small bowl, mix sour cream with soda (do not extinguish soda with anything!) And set aside for half an hour or an hour.


Beat very soft (but not melted!) Butter with a mixer with sugar, vanilla and a pinch of salt.


Continuing to beat, add the eggs one by one.

You will get a fluffy, delicate creamy mass.

Add sour cream with soda, which by this time will also be lush and tender, and beat again briefly.


Now add flour, but not all - about 3.5-4 cups !! Add gradually, in portions, stirring well with a spatula ...


When it will be difficult to stir with a spatula, we shift the dough onto a table, abundantly sprinkled with flour, and knead with gentle, gentle movements, collecting it in a lump. It will take somewhere else 0.5 tbsp. flour.


1 - The dough can not be kneaded for a long time and vigorously! It is enough to collect it into a smooth, soft ball !!!
2 - Do not interrupt the dough with flour! It should be dense, but soft, smooth and plastic. It should be easy to roll out (when rolling, we will add more flour).
Roll the dough into a sausage and cut into 6 pieces. Roll the pieces of dough into balls, rolling in flour, and cover with foil so as not to wind.


- If you have a square baking sheet about 30x30 cm in size, then you can divide the dough into 7 parts. But in the absence of experience or the presence of sacred horror before the phrase "a very thin layer of dough" - it is possible for 6.
- If you have a rectangular baking sheet about 30x40 cm in size, then it is enough to divide the dough into 6 balls.
- In any case, if there are problems when rolling out the first ball (well, you can’t stretch the dough over the entire baking sheet), you can adjust the number of balls: divide one of them into equal pieces and “add” in other parts. Or roll smaller layers as you can ...
ROLLING AND BAKING SHEETS:
1 - We will bake cakes on the BACK SIDE of the baking sheet! For two reasons. Since the cakes are very delicate and fragile, they are easy to break when removed from the pan. A with reverse side baking sheet, they will easily slide onto the table. In addition, it is very convenient to roll out the cakes on the baking sheet itself, and the sides will not allow you to do this! (By the way, I always bake thin cakes on the back of the baking sheet, and sand, and honey, and puff ... It's very convenient!)
2 - We will roll out the cakes on a WARM baking sheet! This greatly simplifies the task of obtaining thin cakes! (This is my know-how…)

We turn on the oven at 180-200C. We put a baking sheet (dry!) in the oven - let it heat up.
We begin to roll out the first ball. (The rest of the balls are still under the film.) Roll out on a table or silicone mat, dusting the work surface well with flour. In the process, we turn the dough back and forth, lift it up and, if necessary, add more flour from below, sprinkle it on top ... In short, we roll it out so that nothing sticks anywhere and does not ruffle our nerves!
Moreover, we roll out NOT to the desired size, but SMALLER - it is easier to transfer the layer of dough onto a baking sheet! Otherwise, the dough will tear - it is very tender!
The dough rolls out very easily. One or two - and a rather plump (so far) layer is ready.

Now take the pan out of the oven. If it's warm, great. If hot, let it cool down. It must be pleasantly warm!
Wet the paper towel vegetable oil and lightly grease the baking sheet, sprinkle with a little flour and shake off the excess. (Do not throw away the napkin yet!)
We transfer the rolled out layer of dough to a warm baking sheet, in the center. You can screw it onto a rolling pin, or you can fold it 2-3 times up and down and unfold it on a baking sheet ...

And now you need to distribute the dough throughout the pan.
You can roll out a little more with a rolling pin, from the center to the edges of the baking sheet, and distribute the very edges, kneading the dough with your fingers ...

And you can do without a rolling pin, just with your fingers, as it were, squeeze the dough to the edges. This is not at all difficult, because the baking sheet is warm, and the dough stretches well ... Do not be afraid, press as you like, from the heart! The finished layer will then perfectly move away from the baking sheet! Just be sure to work from the center to the edges! So that the thickness of the dough is approximately the same! If the edges are thinner than the center, the cake will turn out uneven, and the cakes in the center of the cake will be thick.
If the dough sticks to your fingers, dust it with flour...


As a result, the thickness of the dough will be about 1-1.5 mm, in some places the baking sheet will even shine through (this can be seen in the photo below).
Then you can lightly roll the dough again with a rolling pin to eliminate "fingerprints". Then trim the edges around the entire perimeter with a knife (we don’t cut anything, just slam it with a knife to get more or less even edges).

Pierce the crust with a fork to keep it from bubbling while baking. Do not be stingy - you can do it 10-15 times! (However, this does not always help, and in the oven the cake sometimes still swells with blisters.)

And into the oven. Cakes are baked quickly, in 10-12 minutes. Oven temperature 180-200C. But it depends on the oven. If the cake does not blush for a long time, you need to increase the temperature, if it blushes too quickly, reduce it.
You need to bake until a pleasant, rather saturated orange color! Not pale!!! But not very dark either! And be careful not to burn the edges...
If the cake still swells with bubbles during baking (usually this happens after 5-7 minutes), open the oven, pierce with a fork in these places and lightly slam the bubbles on top with the same fork.

After a few more minutes, when the cake is browned, but not much yet (look at the photo below - the cake is already ruddy, but not yet enough!), You can pull the baking sheet out of the oven and separate it from the baking sheet with a long knife. And put back in the oven until done. (This is done so that the bottom does not burn. But sometimes I don’t do this, I just follow the process carefully ...)


Here the cake is ready! It should be a deep orange color! Even with small patchy lung brown shade...

If you did not separate the cake from the baking sheet during the baking process, then you need to do it now. Then gently “lower” the cake onto a VERY flat surface. As long as the cake is soft enough that it slides off the pan easily.

After a few minutes, it will cool down, settle and harden. And become very fragile! So further it must be handled very carefully so as not to break it!

But you don't have to wait. We leave the cake to cool, and we ourselves proceed to the second cake. Roll out the second ball of dough a little on a table or rug. In the meantime, the pan will cool slightly. We take the same napkin and wipe the baking sheet well to get rid of the crumbs. There is no need to re-wet the napkin with oil!

Lightly dust the baking sheet with flour.

And we repeat the procedure: lay out a layer of dough in the center of the baking sheet, distribute it over its entire surface, roll it slightly, trim the edges ...

We pierce, bake, separate with a knife, remove on a flat surface ...
The cooled cakes along the way can already be stacked on top of each other, only very carefully.
In an hour or so, all the cakes will be ready!


Beat well-softened butter until fluffy and white. Do not rush, it is better to beat the butter longer, at least 10-12 minutes! This will allow you to get a very gentle and lush cream, as well as get rid of the taste of oil.

Only then do we add boiled condensed milk- gradually, 1-2 tablespoons, beating well each time. In the process, add vanillin (better to taste).

The most tender and delicious cream ready!

We divide it (conditionally) into 6-7 sectors - according to the number of cakes. And we begin to collect the cake.
We put the most even and beautiful cake aside (it will go to the very top). Lubricate one cake with cream ...


We cover with a second cake and press a little with our hands over the entire surface! The pressure is adjustable so as not to break the cakes - they are still dry! And only after that we lubricate the second cake.

So we collect all the cakes, not forgetting to press each cake and only then grease with cream!
The last cake can be placed upside down - this way the top of the cake will be more even, but this is not necessary ...
Do not grease the top cake yet! Once again, firmly press the cake with your hands so that the cakes stick together. Pay attention to the edges too! And we put the cake under a small load for a couple of hours ...

After that, you can already lubricate the top with the remaining cream.

It remains only to sprinkle the top with chocolate. Cake "Mikado" does not require ANY additional decoration! Chocolate and only chocolate!
Rub the chocolate on coarse grater. You can rub directly on the cake, you can grate on a plate, and then sprinkle with a spoon. Don't feel sorry for the chocolate! The cream should not be visible!

Leave the cake for 3-4 hours just on the table, with room temperature, and then move it to the refrigerator or to any cold place (in winter I take it out to the cold veranda).
The cake must be kept for at least a day!
It is better to store it in a bag so that the edges do not air out and do not dry out.
Today we will prepare a delicious Armenian Mikado cake, consisting of tender cakes and insanely rich cream! It takes a long time to prepare, but it is clearly worth your time and effort!
A real classic recipe step by step
If you want to try a real, traditional Armenian cake, then this is exactly the recipe you are looking for. It will take a lot of time to prepare it, but the amazing result that you can get is definitely worth it!
For test:
For cream:
How to cook:
- Place sour cream in a small container, add soda.

- Stir and let steep for one hour.

- Remove the butter for the dough beforehand so that it becomes soft.
- Place it in another container, add salt, sugar and vanillin.

- Beat the ingredients until smooth with a whisk or mixer.

- Add eggs one at a time, each time bringing the mass to smoothness.

- Pour in sour cream with soda and beat everything again until a homogeneous consistency.

- Next, start introducing flour in parts, but be sure to through a sieve.

- When most of the flour has been added, transfer the dough to a work surface and add the flour, kneading the mass by hand.

- Roll the sausage from the resulting dough and cut it into six equal parts.

- Roll these parts into balls and place them on a plate.

- Cover with clingfilm and let sit for a bit.
- Heat the oven to 200 degrees.
- Place one of the balls on a sheet of parchment and roll it thinly into a square or rectangle.

- Transfer to a mold or a baking sheet and send to bake for 10-12 minutes.
- Then remove and quickly transfer to a serving platter while the crust is soft and warm.

- Repeat the whole process with the rest of the cakes.

- For cream, take soft butter and place in a deep container.

- Beat it until fluffy for ten minutes.
- After that, add condensed milk in parts, each time whipping the mass until smooth.

- At the end, add vanilla and mix the cream again.

- Next, assemble the cake, smearing each cake with cream.

- At the end, be sure to grease the top of the cake and the sides.

- Grate the chocolate and sprinkle it over the surface and sides of the cake.

- After that, put it in the refrigerator for impregnation for 3-4 hours.

Tip: before baking the dough, it must be pierced with a fork in several places.
Armenian cake "Mikado" with bananas
The next recipe will be sweeter due to the presence of fresh bananas. Very tasty, original. Perfect for tea or coffee!
For cakes:
For cream:
How to cook:
- Transfer soft butter to a small container.
- Add sugar to it and beat the ingredients until fluffy.
- Enter sour cream, eggs and soda, beat again until smooth.
- Now it's the turn of flour, add it in parts through a sieve.
- When you mix a soft ball, wrap it in a bag or film and put it in the refrigerator for half an hour.
- When the time has passed, take it out and divide it into fifteen parts.
- Roll out each on parchment and bake for five minutes at 190 degrees.
- For cream, beat sour cream with condensed milk.
- Peel bananas and puree with a blender.
- Pour into the cream and mix thoroughly.
- Cool the finished cakes, then assemble into a cake, spreading each cake with cream.
- Bake the rest of the dough too, then chop.
- When the cake is smeared on all sides, sprinkle it with crushed crumbs on all sides.
- take away ready-made pastries in the refrigerator for at least three hours.
Tip: To make the bananas feel better, you can cut them into rings and put them on each layer of cream.
How to decorate and serve a cake
Cake decorating - very important point, which directly affects its "appetite". The easiest option for decorating such a cake is crumbs from scraps of cakes. But if you need something more original, then take a decorative sprinkle in the form of large beads. With them it will be brighter!
Now the so-called "naked" cakes are very popular. This is just for that "economical case". Such a cake is cakes smeared with cream. At the same time, the sides of the cake remain without cream, and sometimes the top. Most often, the top of such baking is decorated fresh berries and fruits.
In addition to berries and fruits, "Mikado" can be decorated with fresh flowers, sweets, chocolate, bars, macaroons (French meringue-based cakes), nuts, icing, caramel, honey, cookies, popcorn, marshmallows and various other ingredients.
If you like the classics, use kandurin (dry powder in the form of sparkles). To apply it, take the most ordinary brush. Another simple option is to roll fruits or nuts in caramel and let them harden. This will also be a good decoration!
It all depends on your taste preferences, as well as on what your guests like. In any case, even if the cake is still “naked” and without decor, it will still turn out delicious!
Submission is another story. If the cake is already served in portions, then you can supplement it with chopped fruits or berries. You can prepare a sauce based on cream. Most often, caramel, chocolate, vanilla, strawberry are prepared. Instead of sauce, homemade pudding, whipped cream, a scoop of ice cream, icing, custard can be used.
When baking, you need to take into account that the cake turns out to be incredibly soft, and you can’t lift it in any way, only move it. Be sure to sprinkle the surface with flour, otherwise the cake will stick.
It happens that the cream turns out to be quite liquid. If this happened to you, then put it in the refrigerator for 40-60 minutes. During this time, the oil will freeze again, and the cream will become dense, it can be further used for its intended purpose.
Cake "Mikado" is something very similar to the well-known "Honey cake". There are also cakes, though not honey, but they are prepared in the same way. And the cream is generally identical in places! So if you like "Honey cake", then "Mikado" will be to your taste!