How to make butter from cream with a mixer. How to make butter at home? Homemade butter - how to make from sour cream
Homemade butter recipe
The search for high-quality butter sometimes takes so long that sometimes people doubt whether it is possible to find real butter on sale at all, and not a mixture with an incomprehensible chemical composition. You do not need to study the composition of butter in the store - except for cream and water, there should be nothing else there.
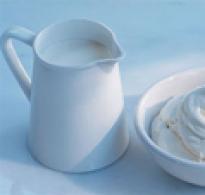
Butter, properly prepared at home, has a special, unique taste and aroma. It can be made with sour cream or cream.
How to make butter from cream
Especially tasty is the butter made from the market separator cream. Such cream has a very high fat content, it has a "spoon" in it. Accordingly, the butter from such cream is obtained with the highest percentage of fat, and the yield of the finished butter is very high. From 0.5 liters of separator cream, an average of 350 grams of delicious butter is obtained.
How to make butter from sour cream
If there is a need to make butter at home with your own hands, then fresh separator sour cream is best suited. When whipping sour cream with a mixer, liquid will separate, especially if it is not greasy. You will need ice water, so you need to send it to the freezer in advance so that it can cool down.
Homemade oil perfectly tolerates freezing, so it can be prepared "in reserve", packaged in portions and frozen. And then use it as needed, taking out the oil in advance from the freezer.
Butter is not as difficult to make at home as it might seem at first glance. The quality of the oil will be no worse, if not better, than the modern store oil. As I mentioned in the previous article on oil, not all oil that is sold in modern stores is. This time I will tell you how easy it is to make homemade butter from whole milk or cream.
Years ago, when we kept goats, one of the foods we made for ourselves was butter. From goat milk, it turned out to be pure white, tasty and aromatic.
The recipe for making butter is simple, but the success and the amount of butter at the output depends to a large extent on the quality of the raw material - cream or milk from which the cream will be collected. Secondly - from the temperature of the cream and good luck.
How to properly collect the cream
How many people, so many opinions, I will describe the way we came to experimentally. In the mid-90s, there was still no Internet in the village, and there was no opportunity to search for special literature. We used those "tools" that were at hand and those "recipes" that worked.
In my case, milk was poured into a glass container and put into the refrigerator (we had three-liter bottles). Usually, after a while (about 6 hours), the fattest part of milk - the cream - rises and becomes clearly visible visually. The amount of cream directly depends on the fat content of the milk. Usually, from three liters of goat milk, 0.5-0.7 liters of cream was obtained. The cream can be harvested for several days and has a good shelf life. I collected this upper part in a separate bowl (another three-liter bottle). Yes, a three-liter bottle - a very popular container was at that time on the farm.
A more professional approach is to use a separator for these purposes - a special device designed for distilling milk and separating it into cream and skim milk. This thing at that time was very expensive, scarce, and not every rural family had it on the farm! Now with the availability of all kinds of "enhancers" of everyday life and life is a completely different matter.
Whipping butter
When the bottle is half full of cream, you can start whipping the cream. The cream should be cooled down to about 8-10 degrees. Colder cream will take longer to whisk (until hand warms up).
Beating is easy. We close the bottle with a tight sealed lid to prevent the cream from coming out. Shake the bottle vigorously until the grains of milk fat are blended into grains. The grains stick together and gradually several large lumps are formed, which can already be collected (either by hand, or thrown onto a strainer), squeezed, rinsed under cold well (or better ice) water.
The liquid left over from whipping cream is called buttermilk... Buttermilk is a highly skimmed milk. It tastes very good, easy to drink, can be used in making pancakes, dough, just drink on a hot day.
Whipping butter in this way is a very good physical exercise for the major muscle groups in the arms. A couple of episodes of your favorite TV series and the oil is ready! The oil yield is small. About 150 grams of butter comes out from 1.5-2 liters of cream. To say that the butter was delicious is to say nothing! Bright white, quickly softening at the temperature of a summer day, sweetish in taste and with a great aroma!
Cow oil, unlike goat oil, is pale yellow in color. The butter yield from cow's milk is slightly lower due to the lower fat content of cow's milk. In general, the tighter the cream, the greater the yield of butter.
Now, to obtain butter from whole milk, it is quite possible to purchase a separator at the equivalent price of 5-6 kilograms of butter;). And a food processor (about the same price) will whip butter out of cream in 5-7 minutes. If you do not have a cow or a goat, and you want to try real butter, it is quite possible to whip the butter from high-fat cream of animal origin bought in the store.
Try it! It is simple and uniquely delicious!
And here is the video "mechanization" of the process of whipping butter :)
DIY butter is not as scary as you thought.
To make butter at home, you will need cow's cream (harvested using a separator) or sour cream (also called “harvested cream” or “harvested sour cream” in the markets). Sweet cream butter will be obtained from separator cream, sour cream butter will be obtained from sour cream. Both will be delicious and suitable both for baking and for preparing ghee (aka Ayurvedic Ghee butter) or brown butter.
There are only two ingredients - cream or sour cream.
If you have a planetary mixer, put cream or sour cream into it, put on the mixing attachment. If there is no mixer, then put everything in a bowl deeper and take a regular hand mixer (you can also use a hand blender, but with a whisk attachment).
Then I wrap the mixer with foil, because during the whipping process, liquid begins to separate from the cream (it is called "buttermilk" or "butter"), and the mixer begins to spray it around the kitchen. If you beat with an ordinary mixer, then as soon as you see that liquid has appeared, reduce the speed.
Photo: lovekitchen.me
As soon as the fat (this is oil) starts to stick to the mixer head or whisk, turn it off. After that, take a sieve, put it in a bowl or saucepan, and throw the butter and buttermilk on it - the latter can be poured into a jar and refrigerated. By itself, it is very useful. I know some people even drink it, but I prefer to make pancakes with it or use it for baked goods.
 Photo: lovekitchen.me
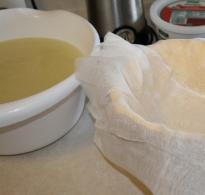
Next, you need to rinse the oil well (if you do not plan to store it for more than a few days, you do not need to rinse it). To do this, place a sieve with oil under a stream of as cold water as possible, rinse well, helping with your hands. Rinse until the water that passes through the oil is completely clear. Collect all the oil into one whole, squeezing as much as possible with your hands.
 Photo: lovekitchen.me
Now you need to remove the remaining excess liquid from the oil and give it a shape. To do this, divide it into the number of parts you need. Then you take one such part, place it in a clean cold jar (I put the jar in the refrigerator first), take it in your hands, and start shaking it - up and down or away from you and towards yourself - so that your oil just hits the walls. Excess liquid will begin to come out of it, and the surface will become smooth. Do this until absolutely all the liquid comes out of the oil. Take out the oil from the jar - it's ready.
 Photo: lovekitchen.me
Then you can use it for its intended purpose, or simply wrap each piece in parchment paper. Already in the paper, with the help of a rolling pin, you can beat it off a little, giving it a more convenient rectangular shape for storage.
From 1 liter of separator cream, I get 700 g of butter. Sour cream is usually slightly less. I also want to say that butter of different colors can be obtained from cream or from different cows - from light creamy to bright yellow.
 Photo: lovekitchen.me
If you do it right, your butter will not crumble when sliced, it will be exactly the same as in the photo below. You can store it in the refrigerator, and if you cook a lot at once, it is better to leave in the refrigerator only what you are going to use in the near future, send the rest to the freezer.
 Photo: lovekitchen.me
There is an easier way to remove excess fluid. After rinsing, place the oil in a sieve or colander, after having lined it with a linen or cotton cloth, squeeze well, put something heavy on top and leave for a while.
Thus, the excess liquid will go away by itself, but the oil will crumble very much when cutting. And it is inconvenient to store it in such a large piece. Therefore, I advise you to use this method only if you need butter exclusively for making ghee or brown butter, and also if you will immediately use it in baking.
 Photo: lovekitchen.me
And about how to make delicious butter from stewed cream, exactly the one that is great to spread on bread, how to cook salty and all kinds of flavored oils from it, and how to heat the butter that I cooked today (or cook Ghee butter) in the oven - I'll show you another time.
Come also to the TSN group.
What is real butter made of? And it consists of only one component - cream. This natural butter, made from cream alone, is almost impossible to find in our stores. Despite the fact that on the shelves of large supermarkets, as a rule, you can find a dozen or more varieties of oils from different manufacturers, it happens that there is not a single natural one among them.
Do you want to get a natural product? Make it yourself. Moreover, cooking oil at home is very simple, easier than you might imagine. For this we only need a mixer and cream. But the cream should be good, preferably homemade and fatty - at least 33 percent fat.
Making natural butter
1. Place the cream in a bowl. Fresh cream is flowing, and cream that has stood in the refrigerator for a couple of days becomes thick.
2. Begin to whip the cream at high speed.

3. At first, there are no visible changes.

4. After one and a half minutes, we will see that the cream thickened slightly and ripples began to form on them, like on water.


5. After another minute, we see that the cream has visibly thickened.

6. The cream thickens even more. We switch the mixer to a lower speed, otherwise the cream will be splashed.
7. The cream begins to gather in lumps, and in some places the liquid - butter bottle - is already beginning to separate from the lumps.


8. The division is becoming more pronounced.

9. And even more explicit.

10. The oil turned out to be yellow, and the oil bottle is transparent.

11. Putting the hard part into a lump.

12. We take out. If our cream has already turned sour before use, then the acid will remain in the butter, and the butter will have a neutral taste.

13. Next, we need to rinse the oil lump well in very cold (just ice-cold) water. We do this by changing the water several times. In the process of this procedure, we just give the shape of the lump.

14. So, from 500 ml of cream you get about 280 ml of butter and 220 grams of butter. The yield will depend on the fat content and quality of the cream. Butter can be used to make dough for dumplings, pancakes, dumplings, bread, and just drink. This is a healthy drink.

15. Here we have got a lump of butter.
Butter is a mass product. Everyone buys it, always and everywhere, except now, because of the leaked provocative information about the composition of store oil, people are more careful in the process of choosing this product. However, bad news for large producers could be good news for entrepreneurs looking to start their small home-based butter production. Of course, starting such a business is easier if you live in a rural area, however, a city dweller can start his own small business by finding bona fide suppliers from nearby villages. Of course, such a product will cost twice as much as a store product, but the standard of living is growing, and the demand for homemade butter remains steadily high. Moreover, although you will have to regularly purchase raw materials, the cost of the necessary equipment is low and can be easily used at home.
Required Ingredients
Butter can be obtained from milk (a cream separator is used) or from ready-made cream. If we are talking about making butter just for yourself or for a family, it is the second method that is beneficial, because buying ready-made cream on the market is easier and cheaper than purchasing a separator. But even in this case, it is worth paying attention to their density. However, this option is not suitable for business - you are unlikely to find a person or even people who will supply you liters of finished and one hundred percent quality product every day.
Consequently, entrepreneurs who are planning to establish butter production need to regularly purchase milk. Even if you yourself live in a rural area and you have cows, they are unlikely to be able to give 100 liters per day, and this volume makes about 10 liters of cream, which, in turn, turns into about 5 kg of butter (these calculations are approximate, since the amount of cream obtained will depend on the fat content of the milk, which, in turn, will depend on the season, period, and the cow itself). Consequently, you will still have to buy products from fellow villagers. Remember, neither a high-quality separator nor the most modern churn will be able to compensate for the shortcomings of raw materials, which means you need to find people who will sell you really tasty, fatty milk. If you live in a city, try to find suppliers in the nearest villages - it is there that you can buy high-quality and inexpensive raw materials (if these same people take the goods to the market, and you buy milk there, the price will be significantly higher).
Milk is essential for the production of "classic" butter. However, you can also use the original recipes. Housewives add peanuts, chocolate, herbs, peppers and even cranberries to the butter. However, such oils are unlikely to be sold en masse, which means that you can add regular and a little chocolate butter and, possibly, a little “experimental” product to your assortment. After that, it will be possible to track the dynamics of demand.
Necessary equipment
For homemade butter production you will need:
- Separator. It is he who is used to obtain cream from milk. Such equipment costs from 3.5 thousand rubles. A home separator does not take up much space (typically about 1.5 times the size of a conventional food processor or multicooker) and is easy to use.
- Milk and cream containers. Normal plastic kitchen containers (they can also be used to cool butter) are best for collecting the cream produced by the separator, while processed milk (return) requires large containers, such as buckets or basins.
- Homemade butter churn. Butter can also be whipped by hand, without any equipment, but it is too laborious for large production volumes. That is why entrepreneurs need to purchase a churn, which can be manual and mechanical. Of course, it is necessary to purchase mechanical equipment, the only drawback of which is that it depends on the electrical network. The main advantages are the speed of the process, shock resistance, vibration resistance. In addition, they are quick to disassemble and the parts are easy to clean. The prices for such machines are different, but the simplest (but at the same time effective) of them can be purchased for 5 thousand rubles. When choosing a churn, pay attention to its capacity.
- Vacuum sealer for home. As you know, oil easily absorbs odors, and this can be avoided by properly packaging products. Vacuum sealers are inexpensive (from 4 thousand rubles) and are easy to use. But oil in sealed containers can be stored even in a refrigerator filled with food.
- Packages for packaging, containers, spoons, knives.
Step-by-step production technology
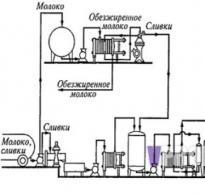
In general, the whole process of making butter at home can be roughly divided into two stages: obtaining cream from milk using a separator and whipping cream in a butter mill. Below you can find detailed step-by-step instructions for each of them.
Stage 1. Obtaining cream from milk
Assemble the separator. This is done according to the instructions. Set the correct level of fat in the cream (the amount of fat should not exceed 35%).
Prepare two containers, a smaller one for the cream and a larger one for skim milk.
Pour milk into a special bowl on the separator (can be found in the instructions).

Watch the containers with cream and skimmed milk, if one of them is full, replace it.

Leave the resulting cream to cool in the refrigerator (it should thicken at least to a thick sour cream before whipping). The turnover will be about 10 times more than the cream, and this product can also be used for additional profit, for example, you can make cottage cheese.

Important! Pasteurization of the cream will get rid of any harmful bacteria, neutralize the "cow" smell and increase the shelf life of the final product. The heating temperature of the cream will depend on the type of butter, so to obtain sweet butter, they are pasteurized at 85-87 ° C, and for sour cream - at 90-92 ° C. Remember, you cannot bring the cream to a boil. If you decide to pasteurize the product, do it after receiving them, and only then refrigerate.
Stage 2. Production of butter from cream
Cream is poured into a special churn container. The drum begins to spin, whipping the cream and separating the buttermilk. If the churn has a buttermilk outlet, substitute a special container, if not, you can manually separate the butter.

Remove the resulting thick lump of oil. If it has not formed (which can also happen for a number of reasons), you can add the cream yourself. Using a mortar, or by hand, as shown in the picture, you need to carefully squeeze the butter from the buttermilk, by hand or with gauze. Buttermilk can also find its own buyer, or you can use it in your kitchen - they make excellent pastries with it, they just drink it (it has many useful properties).

Rinse the oil in cold water, then dispense it into molds. Leave to cool in the freezer.

As mentioned earlier, the oil easily absorbs any odors. To avoid this, you can pack the bars with a home vacuum sealer. The oil is stored at temperatures from +2 to +5 degrees Celsius.

Sales areas
So, you have understood the technology for producing butter at home, calculated the costs and potential profits. But where to market such products?
- Acquaintances and friends. Don't underestimate the effectiveness of word of mouth. Offer to try the first batch of relatives, friends, acquaintances. The first small cubes can even be sampled for free. If your butter really tastes good, rest assured they will return as regular customers and bring their friends with them.
- Markets. This is perhaps the most obvious answer to this question. Such products are most often presented in the markets. It should be mentioned that there you can sell not only butter, but also, for example, cottage cheese from skim milk.
- Your store. There is no need to describe the benefits of such a place to sell homemade oil.
- Middle and upper class restaurants and cafes. Offer your products to try in establishments where the owners and chefs are really interested in the quality and taste of their dishes. Perhaps one of them will become your regular customer.
Conclusion
Of course, producing oil at home requires certain investments, constant purchases of raw materials, which, however, cannot be compared with investments in any other business. Of course, it's worth starting small, gradually expanding your customer base and production volumes. But at the same time, the very process of making this tasty and natural product is not very complicated, but it promises a good, constant profit. If you are interested in this home business, this is already an indicator that you should try your hand in this area.