Cheese business. Financial investments and profit
Oddly enough, but the cheese that we all love to eat can be compared to a person. Just like a person, cheese is born, ripens, gets old and dies.
By the way, like people, there is a hierarchy among cheeses: patriarchs, aristocrats and commoners.
The technology of making hard cheese has hardly changed over the centuries.
In small and medium-sized dairies, where tradition is respected, cheese is still made by hand. At large enterprises, cheese production processes are mechanized and automated, and the equipment is equipped with software control.
The starting ingredient for making any hard cheese is milk. The technology for making different varieties of hard cheese from milk has a lot in common, therefore, before starting to cook cheese, you need to study the general provisions, and then apply various recipes.
1. Pasteurization of milk... As you know, there are three modes of pasteurization:
- long-term, when milk should be heated to 65 ° C and kept for 30 minutes;
- short-term - milk is heated to 75 ° C and held for 20 minutes;
- instant, when milk is heated to 90 ° C and does not stand.
According to various recipes, hard cheese can be cooked using pasteurized milk, fresh milk, as well as steam, that is, immediately after milking.
Depending on what kind of milk you use for cheese making, cheese acquires its own special characteristics and taste.
2. Clot formation. After you add the milk-clotting enzyme or ferment to the milk, a gel forms.
Depending on the temperature at which the sourdough or enzyme was added to the milk, the result of milk coagulation (clotting) will be different.
Depending on the cheese recipe, the resulting coagulum is subjected to various types of processing in order to separate the whey, cut, heated, and stirred. This process is called syneresis.
3. Slicing a bunch... The coagulum is ready to be cut after a period of 25 minutes to 2 hours, depending on the cheese recipe.
To determine the exact time to cut the clot, a clean finger test is performed. This is the traditional method used by cheese makers.
The point of the clean finger test is to dip a finger, probe (spatula) or thermometer into the top layer of the clot and lift it up, causing the clot to break apart, forming a fracture line.
A clear rift with non-blurring edges and green whey at its base indicates that the clot can be sliced.
A soft, irregular fracture line with white whey indicates a weak curd strength. The sides of the fracture indicate the quality of the clot: a granular structure indicates that the clot is too dense.
4. Obtaining cheese mass... As a result of the processes carried out with cheese, a curd mass is obtained. In fact, this is a ready-made cheese, into which you can add various spices, salt, herbs, nuts, etc. at this stage. The cheese mass is either weighed or pressed.
5. Pressing and self-pressing of cheese... At the stage, it is laid out in special forms and pressed.
You can buy molds for cheese in the online store with delivery.
Pressing can take place in several stages and can be different in pressure.
6. Maturation of cheese. At this stage, the cheese should be transferred to a cellar, or some other special maturation room, where it will need to be carefully looked after.
If you prepare brine cheese, then it can ripen and can be stored in the brine later.
In the process of ripening, the cheese must be turned over, sometimes washed, cleaned with a brush. Depending on what kind of cheese is made, you can even smoke it, wipe it with alcohol, sprinkle it with spices and perform other manipulations.
It is important that a certain level of humidity and temperature is maintained in the room throughout the entire maturation process, since the final result depends on this.
You can buy a cheese ripening bag in the online store.
Making homemade, soft or hard cheese at home is an art that can and should be learned. Using natural and affordable ingredients like cottage cheese and milk, it's easy to create a small culinary masterpiece in your own kitchen. This delicate creamy product without preservatives, dyes and harmful additives is an excellent alternative to fabulously expensive imported delicacies. The main thing is to find your own ideal recipe.
How to make cheese at home
Experienced chefs know how to make homemade cheese so that its taste is in no way inferior to its European counterparts. It is prepared from fat cottage cheese, cream and eggs, enzymes and a spoonful of kefir are added to some varieties. The main ingredients are heated over low heat until the whey is separated, which is then drained. The finished mass is thrown into a colander, squeezed or pressed under pressure, stored in closed containers or brine. The shelf life and maturation of cheese differ from those indicated on store labels, although such a delicacy will definitely not stay in the refrigerator for more than a week.
Hard cheese
To make a head of hard homemade cheese, part of the milk is mixed with sourdough, and the rest is brought to 32-33 degrees, and left warm. Sourdough and an enzyme dissolved in water are added to it. The resulting clots are cut into squares and left under the lid. The saucepan is put on low heat, the cubes are heated to 38 degrees for about 10 minutes. Part of the whey is drained, replaced with warm boiled water. The cheese mass is heated to 40 degrees for about 15 minutes, separated from the whey, salted and mixed. After that, it remains to compress, dry and allow to mature.

Soft cheese
Soft varieties can be prepared without the use of special enzymes from natural yogurt, homemade sour cream, heavy cream. Combine the ingredients, add salt, spices, herbs to taste. Some types of cheese can not even be boiled, but simply left in a colander with gauze folded in four. With the help of a weight, which is placed on top for 12 or more hours, excess liquid is removed and given a denser but delicate consistency.

Fused
Homemade processed cheeses are spread on toast, used in cold snacks and other dishes. They are made pure cottage cheese, mushroom, mixed with parsley. Any student can handle a simple recipe that includes cottage cheese, eggs, soda and a little sour cream. The ingredients are interrupted with a blender, boiled in a steam bath for 10-15 minutes, spices and fried mushrooms are added. Poured into jars or molds, sent to the refrigerator shelf. Cooking melted cheese, the most delicate, golden and glossy, often takes no more than an hour.

Homemade cheese recipes
Proven recipes with step by step photos explain in detail how to cook cheese. Including such popular and demanded varieties as suluguni, adyghe, rennet, feta cheese, mozzarella and mascarpone. The secret of an ideal homemade product is very simple - before making cheese, you need to buy quality ingredients, as their taste, aroma and consistency depend on them. It is recommended to add salt to the nearest gram, otherwise it will interrupt the taste of the dish or leave an unpleasant aftertaste.

From milk
- Servings Per Container: 5 Persons.
- Calorie content: 57 kcal per 100 g.
- Cuisine: Indian.
The classic homemade cheese recipe is simple to prepare and requires a minimum of ingredients. Milk, fresh lemon juice and plain water can be used to make an exotic but delicious Asian dish - paneer. This is one of the most popular types of cheese in India, Nepal, Bangladesh, Pakistan. It has an unusual, slightly crumbly texture, does not melt, slightly sour.
Ingredients:
- fat milk - 6 tbsp.;
- water - 0.5 tbsp.;
- lemon juice - 3/4 tbsp
Cooking method:
- Bring homemade full-fat milk to a boil over medium heat, stirring occasionally. Boil for 10 minutes.
- Mix lemon juice with water, gradually add to milk.
- If the main ingredient does not begin to curl, add a little more lemon juice. After 2-3 minutes, remove the pan from the stove.
- Fold the cheesecloth in four, put in a colander or sieve. Let the liquid drain.
- Rinse gently with cold water to remove strong lemon flavor. Knead slightly for a tighter, homogeneous consistency.
- Cut into portions.

From cottage cheese and milk
- Cooking time: 3 hours 30 minutes.
- Servings Per Container: 10 Persons.
- Calorie content of the dish: 141 kcal per 100 g.
- Purpose: appetizer for breakfast.
- Cuisine: European.
- Complexity of preparation: easy.
Homemade cheese is a natural product with a fantastically soft creamy taste and a dense texture that makes it easy to cut with a knife. In order for it to acquire a delicious yellow color, the egg can be replaced with two yolks. It is better to use cow's milk - a ready-made dish made from goat's milk will have a too strong smell, which many consider unpleasant.
Ingredients:
- fresh cottage cheese - 1 kg;
- milk - 1 l;
- eggs - 1 pc.;
- butter - 100 g;
- baking soda - 2 tsp;
- salt - 0.7 tsp;
- greens to taste.
Cooking method:
- Before making homemade cheese from cottage cheese and milk, remove from the refrigerator and soften the butter.
- Fill a large saucepan with a quart of milk. Bring to a boil, stirring occasionally.
- Add cottage cheese, cook for 5 minutes over low heat until the whey separates.
- Discard in a colander, covered with damp, double-folded gauze. Allow the serum to drain, connect the ends of the gauze. Hang it over the sink without undoing the resulting pouch.
- Beat butter with egg, salt, baking soda. There is no need to extinguish it.
- Mix the egg-butter mass with the curd mixture. Add finely chopped dill, parsley or other fresh herbs, stir until smooth. Transfer to a saucepan.
- Cook for 10 minutes on a steam bath, until the mass acquires a viscous consistency.
- Place in a greased container. Press down with a load, put in the refrigerator for 3 hours.
- Remove from the mold, cut.

From cottage cheese
- Cooking time: 4 days.
- Servings Per Container: 8 Persons.
- Calorie content: 194 kcal per 100 g.
- Purpose: appetizer for breakfast.
- Cuisine: European.
- Complexity of preparation: easy.
It will take 4 days to properly prepare a hard curd delicacy. The main trick is how to boil the cheese and give it the desired consistency. To do this, he must mature and become moldy, which will give him a special, delicate taste and aroma. This product can be added to your favorite homemade salads, such as the famous Greek. It will easily compete with feta sheep cheese and other elite varieties.
Ingredients:
- cottage cheese - 500 g;
- butter - 40 g;
- sour cream - 120 g;
- eggs - 2 pcs.;
- cumin - to taste;
- salt to taste.
Cooking method:
- Cover the homemade cottage cheese with a lid. Leave to mold.
- After 4 days, pass the cottage cheese through a meat grinder along with sour cream, caraway seeds, salt.
- Melt butter in a deep container.
- Transfer the curd mass to the butter, heat over low heat. Stir until smooth.
- Beat 2 eggs, add to the curd. Heat again.
- Put on a greased dish, leave in the refrigerator overnight.
- Cut into portions.

Adyghe
- Cooking time: 3 days.
- Servings Per Container: 6 Persons.
- Calorie content of the dish: 60 kcal per 100 g.
- Purpose: appetizer for breakfast.
- Cuisine: Circassian.
- Complexity of preparation: easy.
National Adyghe cheese is made at home from cow, goat, sheep milk. It is widely used in cooking, it is added to vegetable salads, soups, khachapuri, pies, dumplings. Before making cheese at home, it is worth determining how it differs from the classic varieties. This product has a pleasant curdled texture and a unique spicy taste with notes of pasteurization. Moderately salty, may crumble slightly. The second name is Circassian.
Ingredients:
- pasteurized milk - 3 l;
- kefir - 1 l;
- salt - 2 tsp
Cooking method:
- Heat the kefir over low heat until the whey begins to separate.
- Drain the whey into a bowl. Leave to sour at room temperature for 48 hours.
- After 2 days, bring the milk to a boil. Reduce heat, pour in whey.
- After 7 minutes, take out the mass that has floated and separated from the serum. Squeeze through cheesecloth. Salt.
- Hang over a sink in a gauze bag.
- When excess liquid drains, press down with a press. Drain off escaping water. Send to refrigerator.
- After 24 hours, remove the press, cut the homemade Adyghe cheese into portions.

Creamy
- Cooking time: 15 minutes.
- Servings Per Container: 2 Persons.
- Calorie content: 292 kcal per 100 g.
- Purpose: appetizer for breakfast.
- Cuisine: European.
- Complexity of preparation: easy.
Before making a cheese with an unforgettable creamy taste, you only need to buy one ingredient - good sour cream. The fatter it is, the tastier the product will be. It is added to creamy desserts, soufflés, Norwegian rolls with salmon or pink salmon, biscuit cakes and even multicooker cheesecakes. The main advantage of such a cheese recipe at home is that it does not need to be cooked, and the whole process takes a matter of minutes.
Ingredients:
- sour cream 21-25% - 800 ml;
- salt to taste.
Cooking method:
- Fold the cheesecloth in four, place in a deep plate.
- Pour thick homemade sour cream onto cheesecloth. If desired, salt. If you do not add salt, the product can be used for both appetizers and desserts.
- Tie the corners of the gauze, hang the resulting bag over the container. The easiest way is to take a saucepan, put a long wooden spoon on top, and tie cheesecloth to it.
- Leave for 20 hours or a day while the serum drains.
- Transfer to container and refrigerate.

Mozzarella
- Cooking time: 30 minutes.
- Servings Per Container: 3 Persons.
- Calorie content: 67 kcal per 100 g.
- Purpose: appetizer, breakfast, pizza.
- Cuisine: Italian.
- Complexity of preparation: easy.
The picturesque beauty of Italy is not only the Colosseum, spaghetti and the temperamental Celentano. This is also the famous mozzarella cheese, with which various casseroles, salads, pizza, tomato caprese appetizer, homemade lasagna and other dishes are prepared. Real Italian mozzarella is easy to recognize from the photo - it is a small elastic balls immersed in a brine liquid.
Ingredients:
- milk - 1 l;
- natural yogurt - 125 g;
- vinegar 25% - 1 tbsp. l .;
- salt - 1.5 tsp.
Cooking method:
- Warm fresh milk with salt, not boiling. The original product is made only from buffalo or cow milk.
- Add yogurt, mix thoroughly.
- When the milk curdles, pour in the vinegar.
- Fold clean gauze in four, transfer to a colander. Fix over a bowl or saucepan where the whey will drain.
- Drain the milk mixture in a colander. Lift with gauze, squeeze well.
- Form into tight balls.
- Pour the whey into a container or lunch box, dip the balls. Cool down.
- Leave in the refrigerator for a day. The next day, drain the leaven. Store homemade mozzarella in a closed container.

Mascarpone
- Cooking time: 1 hour 45 minutes.
- Servings Per Container: 5 Persons.
- Calorie content: 180 kcal per 100 g.
- Purpose: snack, for breakfast, base for pastry cream.
- Cuisine: Italian.
- Complexity of preparation: easy.
Mascarpone is difficult to confuse with any other product - it has an amazing creamy consistency, it is easily applied to homemade or fluffy American waffles, sweet cakes. You can simply spread a spoonful of cream cheese over your morning toast. Milk of cows or buffaloes is used in the manufacture of a soft delicacy, the home of which is Italian Lombardy. It is added to appetizers, main and even sweet dishes, for example, the most delicate dessert Tiramisu with coffee, cocoa and savoyardi, a photo of which flaunts in the menus of the world's best restaurants.
Ingredients:
- cream - 200 ml;
- sour cream 20% - 800 ml;
- lemon juice - 2 tsp
Cooking method:
- Before making homemade cheese, prepare a kitchen thermometer with a dipstick and squeeze out 2 tablespoons of lemon juice in advance.
- Mix cream with sour cream. Cream can be replaced with fat milk.
- Put the mixture on low heat, stir. Using a thermometer, measure the temperature - it should not exceed 75 degrees.
- Add lemon juice. Make sure that the curdled mixture does not boil. Remove from heat.
- Put a clean, damp gauze folded in four into a colander.
- Discard the mass in a colander, leave for an hour. Wait for excess liquid to drain.
- Squeeze gently - the harder you tamp, the less tender and tasty the mascarpone cheese will be.
- Transfer to a container. Keep refrigerated.

Philadelphia cheese
- Cooking time: 40 minutes.
- Servings Per Container: 8 Persons.
- Calorie content of the dish: 58 kcal per 100 g.
- Purpose: appetizer for breakfast.
- Cuisine: American.
- Complexity of preparation: easy.
Philadelphia soft cheese is adored everywhere, but especially in America, in honor of one of the cities of which this amazing product was named. Rolls, crispy tartlets, homemade pies, berry cheesecakes, marzipan cakes, vegetable gratins, canapes and everyone's favorite rolls with eel are prepared with it. A profitable counterpart to the “creamy foreigner” can be made from ingredients that are easy to find in every refrigerator.
Ingredients:
- milk - 1 l;
- kefir - 500 ml;
- eggs - 1 pc.;
- citric acid - 5 g;
- salt - 1 tsp
Cooking method:
- Mix the milk with a spoonful of salt, bring to a boil over medium heat.
- Pour in kefir. Stir until the milk-kefir mixture begins to curdle.
- Throw the hot mass onto cheesecloth folded in four, leave to drain for 15 minutes.
- Beat the egg with citric acid.
- Mix with the resulting cottage cheese, beat until a fluffy homogeneous mass. Cool to desired temperature.
- Store in a closed container.

Video
What equipment is needed to make cheese at home?
Today we will be told about this by an experienced cheese maker - chief technologist of the Pro Cheese company, silver medalist of the All-Russian competition for the quality of dairy products Irina Vyrupaeva.
So, well-chosen equipment is the key to your success in cheese making! With it, the process of making cheese will bring joy and pleasure. And the most important thing is the desired result! Those. delicious and high quality product.
In this photo you can see my "gentleman's set", with which I started my career as a homemade cheese maker (the picture enlarges when you click).

It would seem that there is nothing unusual in the photo, but this is a necessary minimum in order to make cheese or cottage cheese at home with high quality and comfort on an ongoing basis. This selection is the result of my practical experience.
So, the equipment depicted can be roughly divided into three groups:
- Equipment from the first to the fifth points is needed for the manufacture of simple homemade cheese and cottage cheese;
- From the first to the sixth - for forming more complex self-pressing cheeses;
- Equipment from points 1-4, as well as 7 and 8 is necessary for hard cheeses.
And now in more detail for each item:
- Since we are talking about homemade cheese making for beginners, we do not yet have cheese dairies and pasteurizers.
Their function is performed well by the usual enamelled pan... I have such pots of two sizes: for 8 liters and for 20. I recommend that you immediately take a pan (tank) for 20 liters, because it is more convenient and functional. In an attempt to save money, I first bought a pan for 8 liters, and in the end I still then switched to a volume of 20 liters (well, then, of course, to a cheese dairy;)
An important point! The pan should be made of enameled metal or stainless steel. Aluminum crockery is not suitable for cheese making! Why isn't aluminum suitable? This is a perennial controversy. Experienced cheese makers say that it is not suitable, because aluminum is oxidized. Chemists / physicists contradict them and say that modern aluminum is not subject to oxidation at all. I'll tell you just from my own empirical experience: aluminum is not suitable for cheese making. And the point :) - Milk thermometer. Yes, you can try using a household outdoor thermometer, a baby bath thermometer, or something similar. But this is not only very inconvenient, but due to the inaccuracy of measurements in general, it can lead to the fact that you simply translate products in vain and no cheese will work.
A thermometer is needed when preparing almost all cheeses. You can see this on the example of our recipes for camembert, mozzarella and any other. Starter cultures and enzymes are introduced there at a strictly defined temperature. And in pasteurization of milk without a thermometer anywhere. Therefore, a special cheese-making thermometer for milk on a long stem is simply a must-have item in a cheesemaker's kitchen. - Lavsan bag for cottage cheese and cheese. An almost irreplaceable attribute of a cheesemaker! Especially at the stage when you are just learning. In the process you will understand why :) It is not very expensive, but it saves a lot of time and effort. And the result with him is excellent. Don't mess around with gauze and think it's the same thing. No, they have a different fabric structure (for example, soft curd cheese will simply run away from the gauze). And the gauze "bag" may not work or part. And a product that runs into the sink can discourage you from experimenting further.
- Drainage mat (lies on a white bag). An irreplaceable thing. It drips the whey from the cheese, and puts it in the maturation container. Easy to clean with running water and a brush. In general, 2-3 pieces should always be at hand.
- Form for self-pressing cheeses in the form of a colander. Suitable for making soft cheeses such as homemade (which is the starting cheese for several others). At the same time, the cheese turns out to be of an excellent shape.
- In the background are other cheese molds. In them I make caciotta, vyrupayevsky cheese, camembert, blue cheese and many others. They are of different diameters and shapes, here the choice depends more on your taste and aesthetic preferences. Again, I recommend taking 2 forms of each size. 10 liters of milk yield 1 kg of cheese. These are 2 large forms, half filled with the finished product.
- Molds for pressing hard cheeses. I have them with dimensions for the output of finished cheese weighing 2 kg and 1 kg, the shape of the head is spherical. I actively use both.
- ... Select the size depending on the size of the refrigerator. I use drainage mats for the size of standard containers 15x25 cm. This one just fits 2 loaves of cheese obtained in our molds.
This is the set that allows you to reach a good volume and range of production in normal home conditions, even without the use of automated home cheese dairies. Such a set is quite inexpensive, but it pays off (if you prepare cheese for sale) very quickly.
Making cheese at home is a healthy hobby that, under sanctions, may be the only source of truly delicious cheeses. Moreover, with sufficient enthusiasm and willingness to invest, it can turn into a business that brings a stable income without prohibitive investments.
Pros and cons of home production
Making cheese for sale has its own Benefits:
- Market stability. Cheese will always be in demand. Various varieties, made using all technologies, with pure milk, in good conditions, will surely find their buyers. This demand is especially noticeable recently - imported cheeses are no longer imported into Russia, because the demand for goods from local producers is growing.
- Variability. At home, you can make a wide variety of cheeses - from soft cottage cheese varieties to hard salty ones - and there will certainly be the simplest and most popular option.
- Simplicity. You can start a business with minimal investment - equipment for the production of cheese at home at the initial stages can be made with your own hands, which will not affect the quality of the finished product.
- Availability of raw materials. Milk can be obtained without any particular problems in any corner of Russia - along the way, providing demand for at least one farm.
A plus can also be considered the fact that at home, with personal control, you can produce a truly delicious product.
However, there is such a business and minuses:
- Relatively high start-up costs. Even if you make cheese on home-made equipment, without attracting workers who would have to pay, you will have to purchase raw materials and materials without which you will not be able to start.
- The need for official registration. Any small business should be registered and taxes should come from it to the state. You will need to collect documents, contact government agencies and wait.
- The need to obtain a license. Cheese is a food product. To be eligible for marketing, you need to obtain a license from the state, which confirms its quality. The process of obtaining can be long, requiring the collection of documents and evidence.
The cons, however, are not very specific. Cheese making as a home business requires willingness to invest, specific permits and licenses. The pluses are more pronounced - with the demand for cheeses, there is less chance of going broke.
Planning
Starting your own business is a process that requires a conscious, consistent approach. Before embarking on active action, you should:
- Decide what the cheese will be made from. The most common raw material is cow's milk. Goat and horse milk are considered more exotic. You can go further and start making a product from donkey, camel, or any other milk - but most beginners choose cow's milk. It is easier to get it and the cheeses from it are more common, which means they are more in demand.
- Determine what kind of cheese will be produced. To do this, you need to familiarize yourself with the sales market, inquire about which option will be more in demand. There are four main ones:
- Solid. They are made from whole milk and require a long aging under pressure - exquisite varieties that are in demand among gourmets can be aged for up to a year. Also stored for a long time, if conditions are provided.
- Soft. They are made from both whole and skim milk, do not require as long exposure as solid milk - they can be put on sale in a week. Stored in the refrigerator and not as long as solid.
- Curd. The preparations are simple, they can be put on sale the very next day. They are also stored for a short time, even in the refrigerator. Often supplemented with a wide variety of spices and herbs.
- Fused. They are also easy to prepare, they do not need to be kept under pressure, and they do not need to be covered with paraffin. Most often they act as an additional product that is used to expand the range.
- Determine in what form the company will be registered. For the production of homemade cheese, as a rule, an individual entrepreneur is chosen - this gives some relief in taxes, and for a small workshop, more is not required. In addition, if capacities increase, the staff will be expanded and the turnover will become too large for an individual entrepreneur, there will always be an opportunity to expand it to an LLC.
With the choices made and the market explored, it's time for action.

registration
First of all, you need to register as an individual entrepreneur. This can be done in several ways:
- independently study the list of required documents, collect all of them and apply to the tax office;
- use the portal of State Services, fill in everything you need, certify with an electronic signature and send.
Since those who are just starting their own business, as a rule, do not have an electronic signature, it is much easier to act according to the first option. You need to collect:
- an application in the form of Р21001 (you can take the form in the tax office or on the website of the State Services);
- notification of the choice of the taxation system;
- copy of your passport;
- a receipt confirming the payment of the state fee.
With all the documents you need to contact the tax office, where they will be checked and taken away. The result will be ready in five days. If there were mistakes in the documents, the procedure will have to be repeated.
After the procedure is completed, you should also get:
- License for the production of dairy products. It is impossible to sell cheese without it.
- SES permit for production. To get it, you need to make sure that the premises where the cheese will be produced meets the requirements. The following documents are required:
- evidence that the company is officially registered and pays taxes;
- an agreement with the owner of the premises - or documents confirming the ownership;
- a technological map, which will describe all the equipment used for homemade cheese making;
- a document that will indicate the number of employees and information about whether they have undergone medical examinations;
- floor plan;
- ventilation plan;
- garbage collection agreement;
- certificate of statistics, certified by the seal.
Only after all the documents are ready, the premises have been checked by the SES and all licenses have been obtained, you can start producing cheese.

Arrangement of premises
Even at home, you need to allocate at least two rooms:
- Manufacturing facility... It will house the equipment for cheese at home and will carry out the main production work.
- Warehouse... Cheese storage is a long undertaking. Many varieties need to be aged for several months before they develop their true flavor. To do this, it is necessary to allocate a separate room in which it will be quite cool and gloomy.
The premises should be well ventilated, their decoration should be predominantly natural and not emit substances hazardous to humans. At the initial stage, the equipment that will be used for production may be the simplest:
- Special forms for cheese. The simplest equipment for making cheese at home - any tin cans, in the bottom of which you can make holes, will do. In the manufacturing process, the bottoms are closed with gauze, the cheese mass and another layer of fabric are placed on top. In them, the mass is prepared for spinning.
- Press. Used in the manufacture of hard varieties. Can be purchased from a store or DIY with a pair of sturdy planks and a stick.
- Thermometer. Any sufficiently accurate one that is convenient to immerse in liquid will do.
- Colander. Any large enough size will do.
- Gauze. It is used for spinning.
- Paraffin. It is used to form a protective film on cheese.
- Additional tools. This category includes a pair of pots, knives, bricks, and a long-handled spoon.
When all the equipment for the cheese dairy is assembled at home, production can begin.

Manufacturing process
Manufactured in several stages:
- Pasteurization. At this stage, raw materials are harvested - milk is boiled at a temperature of 90, 75 or 60 degrees. It is on this stage that the characteristics of the future cheese depend - how dense it will be, what its taste will be.
- Curdling milk. It is impossible to cook hard cheese on fresh, because boiled milk should be diluted with sourdough and a special enzyme that will accelerate curdling (it can be done naturally, but it takes longer). This will separate the milk into whey and curd.
- Cutting. When the curd has separated from the whey and floats separately, it is ready for further work. You need to take it out, put it in a separate container and cut it into small cubes with a sharp knife. Mix the result. At the same time, if the clot cannot be removed, it falls apart, loose, breaks up into granules - this means that hard cheese from it, most likely, will not work and the technology was not kept up.
- Sealing. Place the container with the clot in another container with cold water. Start slowly heating the water - so that in five minutes the temperature rises by only a couple of degrees. When it reaches 38, you should turn down the heat so that it does not rise anymore. The clot must be constantly stirred, not allowing it to stick together or break up into separate pieces.
- Cooling down. When the mass becomes dense and homogeneous, you can begin to cool it. First, up to 32 degrees, add salt and spices, then up to 30 and put in a mold covered with gauze, which sets the shape of the finished cheese.
- Pressing. When the form is completed, another piece of gauze is placed on top. A press is placed on top - any heavy board of a suitable shape - and bricks are laid out on it. After ten minutes, the board is removed, the released liquid is drained, and the procedure is repeated until the master is satisfied with the state of the cheese mass. It should be dry and firm.
- Drying. The cheese is removed from the mold and wiped off with a dry cloth. It is important that there are no cracks on it, so that it does not crumble or get wet.
- Paraffin. When a dry crust forms on top and the cheese looks almost ready, you need to melt the paraffin and dip the head in it for 20 seconds.
- Maturation. You should place the finished head of cheese in a cool (no higher than 15 degrees Celsius) dark place for at least 3 weeks. The longer it sits, the more pungent and sophisticated its taste will be.

Drying cheese
Technology
You need to act carefully and consistently - cheese does not tolerate haste and disrespectful treatment.
Depending on how you went through the main stages, cheeses can taste very different. Sharper and more acidic, drier and bland, young or old - the variability is amazing.
Additionally, you can also produce processed cheese - it is unlikely to become a main product, but it can nicely complement hard cheeses.
- Preparation of ingredients. For one bowl, you will need 1 egg, a pound of cottage cheese, butter, half a teaspoon of soda, as well as salt and spices.
- Mixing. Put all ingredients in one container and mix.
- Boiling. The resulting homogeneous mass must be boiled for 5 minutes over medium heat.
- Laying out. Put the mass in a greased form.

Homemade cheese
Staff
Cheese production is a troublesome process. It is quite possible to organize it with the help of one family. Of the workers needed:
- an accountant who will deal with all calculations and, if necessary, monitor the market;
- a public relations specialist who will look for a sales market, negotiate with suppliers and do paperwork;
- two masters who will work directly with cheese;
- a cleaner who will clean up the premises, which is very important, since cheeses are very sensitive to the state of the environment.
If you organize the process correctly, the production of homemade cheese will quickly begin to pay off. Over time, it will be possible to afford more advanced, automated equipment, hire more workers, and expand the premises.
The main thing is that the process is enjoyable and brings truly high-quality products. Then doing business will be as interesting as any hobby.
Cheese is the most valuable food product. And making cheese at home (like) is also a profitable business. This product is always relevant, because it is included in the diet of most Russians. Homemade cheese is much healthier, tastier, and cheaper than one bought at the grocery store. Moreover, it contains absolutely no preservatives and other chemical components. To start your own business, you need to purchase raw materials and equipment. It will be much easier to start entrepreneurs dealing with goats or cows. After all, they can process milk from these animals and, as a result, receive the final product without additional financial costs.
Making cheese at home
Cheese making is a stable source of income that does not require large capital investments. This fact is due to numerous factors. The main ones are:
- low cost of equipment necessary for running a home business;
- the ability to produce a wide variety of cheese varieties at home using the same equipment;
- high demand for all types and varieties of products;
- even a novice entrepreneur can set up a sales market.
Any entrepreneur can learn how to make cheese at home. There is nothing extremely difficult about this. With the advent of experience, a homemade cheese maker will be able to produce elite varieties of such a useful product.
Home-made cheese types
Any cheese, regardless of what type it belongs to, will always be in great demand. Cheese making, as well as, is a stable business. Taking into account the methods of curdling milk, all cheeses can be divided into two main categories.
Each category can be divided into several more subcategories and subspecies. Over time, any homemade cheese maker will be able to become an expert in the cheese industry and learn to understand all types of cheese.
Three kinds of cheese - three kinds of profit
In the functioning of the "cheese business" all varieties of this product have their own purpose and strengths. At home, you can produce three types of cheese:
- Solid. It does not require special storage conditions and is expensive. Such cheeses are stored for several months, and some for several years. The only condition is that the room must be well ventilated with an air temperature of + 12 ° C.
- Cottage cheese. It is a perishable product, but quick to prepare. It can be put on sale the next day after production. To extend the shelf life, it is enough to put the cheese in the refrigerator.
- Semi-solid. This product combines the features and benefits of the above two types. The production of semi-hard cheeses, in contrast to hard varieties, takes less time, while the product itself is stored much longer than cottage cheese. In addition, these cheeses increase the range, which contributes to an increase in the percentage of sales and profit from the sale of finished products.
Features of different varieties allow a business to quickly respond to all kinds of market changes, come up with short and medium-term strategies for the development of home entrepreneurship. The basement, where special conditions are created, complete with hard cheese, is a bank with deposits, a source of stable profit.
Advice: you should not start producing several varieties at once, it is better to limit yourself to 1-3 types. In the future, having evaluated the dynamics and rates of sales, it will be possible to make a decision to increase the assortment.
It should be noted that for the production of different varieties, one main product is needed - milk. In addition, the equipment is used the same (the only exceptions are some types of cheese). Only the recipes and production technologies differ.
Raw material requirements
For the production of cheese, you will need milk, sourdough or rennet. Some manufacturers use dyes to give the finished product a more beautiful color.
The main raw material used to manufacture the product is milk. It can be either goat or cow. It is better to use milk immediately "from under the cow", then the fat content of the cheese will be higher. Although partially removed, it will do. After all, the main condition is the quality of the product, and it depends on the health of the animals.
In order for the mini-workshop to function without interruption, an agreement should be concluded for the supply of milk with the farm. The document must indicate the quantity of products supplied, payment options and quality requirements.
Sourdough is essential for acid formation. In the future, the taste of the cheese will depend on it. Some of its types are sold in stores, others can be prepared at home:
Recipe number 1... To make a starter culture with your own hands, you need to take 0.5 liters of fresh whole milk and place it in a dark place for a day (+ 30 ° C). This raw material is added to milk when making homemade cheeses that do not need a press.
Recipe number 2... You can also prepare sourdough with yeast. To do this, add 120 g of the product to a glass of warm milk. Then remove the mixture in a warm place and leave to ferment for 24 hours. Then you need to drain half of the milk and add fresh milk. The procedure should be repeated six more times over the course of one week. During the specified time, the raw material will mature and be ready for use.
Another main component is abomasum (a product obtained from the stomachs of young animals). Milk begins to curdle within an hour after the addition of enzyme preparations. In stores, they are more often found in the form of tablets and extracts. In addition, you can also see “vegetable” rennet on sale, because most cheese lovers are vegetarians.
Equipment for cheese dairy - price
For the production of homemade cheeses, as well as for the production, special equipment is required. Part of the inventory is always at hand for any hostess, some items can be made by hand. For home production, you may need:
- cheese dairy;
- forms of various volumes;
- Press;
- containers for milk (bottles, buckets and cans);
- thermometer;
- funnels;
- table scales;
- measuring spoons for dispensing bulk ingredients.
The cheese dairy is necessary for curdling milk and separating whey. This process implies the exact observance of the temperature regime for a specific period of time. In modern automatic cheese dairies, curdling takes place without human intervention. The only thing that is required is to set the time and temperature. This equipment is more suitable for small farms. For cheese making at home, small cheese dairies without a timer with the function of maintaining a constant temperature are more appropriate. The price of a cheese making machine depends on several criteria and ranges from 130,000 to 400,000 rubles:
- from power;
- from capacity;
- from the presence of additional regulating devices.
The mini-cheese dairy can process 100 liters of milk per day. And since the goods will be produced in limited volumes, there is no need to create special conditions for the ripening and preservation of the cheese. This means that there is no need to purchase additional equipment.
DIY mini cheese dairy
Some time ago, prices for mini-cheese dairies were sky-high, but with the advent of domestically produced models on the market, prices have dropped significantly. Today they cost a little more than the same usual multicooker or bread machine.
The main advantage of mobile cheese factories is that they can be used to prepare not only homemade cheese, but also cottage cheese, sour cream, and yogurt. In addition to everything else, such a device is compact, takes up little space, does not require complex maintenance and consumes little energy. The cheese dairy requires an ordinary socket and water. Processing 18 liters of milk takes approximately two hours. The output is 2 kg of hard cheese.
If you wish, you can make a cheese dairy with your own hands. For living conditions, a 1.5 kW heating element is quite enough. The dairy must be able to connect to running water. For accurate compliance with temperature conditions, the device should be equipped with a special thermostat.
Molds for cheese at home
Each type of cheese has a special shape that has developed historically. Ripening, ease of handling, and transportation all strongly depend on the shape and size of the product. For example, a soft cheese like Camembert ripens from end to center. And if the product is too thick, then it simply does not have time to ripen to the end, and mold will begin to appear on its surface. If you make hard cheese too small, then it dries faster than ripens.
The purchase of special forms is advisable only when the skills of cheese making have already been acquired. Moreover, they are more appropriate for mass production. For home-scale cheese making, there is no fundamental difference in which form to lay the cheese mass. It can be either rectangular or cylindrical.
In the learning process, you can use homemade equipment. To make a mold for cheese, you need to take a 0.5 liter bucket of mayonnaise and pierce it with a heated knitting needle. Then cut the lid so that when immersed it reaches the middle of the bucket. That's all - the cheese mold is ready.
If the household has a 1-liter can, then you can use it to make the mold. The bottom of the container should be pierced with a nail so that the torn edges of the holes "look" outward. This will prevent deformation of the cheese. The inside of the jar should be lined with a cloth, and then filled with cheese mass and closed on top with a cloth. The mass is ready for spinning. Excess fluid will flow out through the hole.
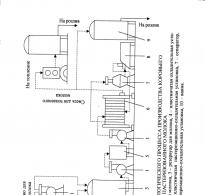
Russian cheese production technology
A wide variety of cheeses can be produced at home. The manufacturing technology of each type is different, although the process uses the same equipment.
The process of making Russian cheese consists of the following operations:
- milk pasteurization;
- adding a special starter culture;
- curd formation;
- curd formation;
- pressing;
- salting;
- ripening.
Russian cheese is made from thermally processed milk with a fat content of at least 50% in dry matter, moisture - 40%, salt - 1.4-1.8%. Cheese weight 11-13 kg. A suitable shape is a cylinder 16-18 cm high and 34-36 cm in diameter. The finished product has a distinct cheesy, slightly sour taste and smell, a dense texture, a pattern of flattened, slit-like eyes. The surface is smooth and without subcrustal layer.
In thermally processed milk add 15-30 grams of calcium chloride per 100 kg of milk and 0.8-1% bacterial starter culture containing aroma and lactic acid streptococci, which play an important role in the maturation of this type of cheese.
Coagulation of the mixture is 20-30 minutes at t 30-32 ° C. The bunch should be dense, so that sharp edges are obtained at the break. Then it should be cut into cubes of 8-10 mm (curd). By the end of the aging process for 10-15 minutes and kneading (30-40 minutes), the size of the cubes will decrease to 6-7 mm. During this time, up to 30% of the serum is removed,
Reheating is carried out at a temperature of 40-42 ° C and lasts no more than 20 minutes. Then the curd is kneaded for 30-50 minutes. This is done to dry out the mass, partially lose the stickiness and increase the acidity. Then another 40% of the whey is separated, after which the curd is sent to molds lined with damp serpyanka (reinforcing material). The mass is compacted and then pressed.
Advice: do not throw away whey after boiling. If you take it back to the cheese dairy, add two liters of milk, a little apple cider vinegar and heat it to t + 92 ° C, then you can get tasty and appetizing cottage cheese, which means the first profit.
Before pressing, it is better to replace the serpyanka with a damp napkin, so the cheese will turn out to be more beautiful. During the first hour, the cheese is pressed under a pressure of 10-15 kPa, after which it is increased to 20 kPa, and then to 30-40 kPa. After eight hours, the pressure is reduced to 20-25 kPa. The total pressing time is 8-12 hours.
The next stage is salting in a 20-22% solution. The process time depends on the acidity, temperature of the product and the brine itself, and increases depending on the weight of the cheese. For example, a 1 kg head takes 10-12 hours. The final step is drying and maturing. Shelf life 4 months in film or paraffin at 2-4 ° C.
Save the article in 2 clicks:
Making cheese, like, is a profitable and promising business that can be organized by anyone without experience and special education. It is more profitable to open this business in a village or village near a large settlement, in a more remote area it is more difficult to bring this idea to life, since you need good sales channels.
In contact with