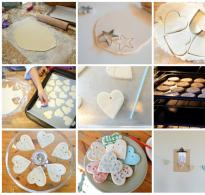
Salt dough crafts. Video and photo tutorials for modeling funny salt dough crafts How to bake salt dough crafts
Modeling has a beneficial effect on the child, his creative imagination, mental abilities, develops fine motor skills of the hands and gives a wonderful mood. In this article, we have prepared a selection of simple salt dough crafts especially for children.
You will need: a glass of wheat flour, a glass of extra salt, half a glass of cold water, a bowl.
Recipe
The finished salt dough should not stick to your hands or crumble. It should be cool and comfortable to sculpt. I recommend watching the video tutorial!
There are two most common ways to dry salt dough. The first way: the finished craft will dry itself. The main thing is that direct sunlight does not fall on it, otherwise it will crack. The craft can be put on a flat surface and wait a few days. The second way: the finished craft is dried in the oven for 3 to 6 hours (depending on the size of the craft). Drying takes place intermittently. One approach is 1-2 hours. For quick drying in one go, set 75-100 degrees in the oven, and then the craft will dry in an hour. At a temperature of 120 degrees, the craft will dry in 30 minutes, but it is better to dry it naturally.
There are two most common ways to color salt dough. The first way: after drying, the finished craft is painted with acrylic paints or gouache using a brush. The second way: food coloring is diluted in water, then added during the preparation of the dough. When the craft is completely painted and dried, it must be covered with a transparent manicure or furniture varnish in 2-3 layers. Each layer must dry before applying the next. In this way, the craft will be preserved
You will need: salt dough, rolling pin, figures for cookies, stars, hearts, etc., cocktail tube, thread or rope for hanging, acrylic paints or gouache, brush, transparent nail polish.
Master Class

Salt dough figures are ready!
You will need: salt dough, gouache, brush, foil, water, permanent marker, transparent nail polish.
Master Class
- Blind the paws of the lamb, forming 4 balls.
- Make a ball of foil, then roll it in the dough so that it is inside. This will be the body of the sheep.
- Attach the body over the legs with some water.
- Blind the head, ears, eyes and horns curls. Attach with water.
- Roll into small flat balls and attach them as wool with some water.
- Dry the craft.
- Paint the sheep with paints and wait until it dries completely.
- Draw eyes, eyelashes and circle the contours of the curls with a marker.
- Cover the craft with varnish and wait until it dries completely.
Salt dough sheep is ready!
You will need: salt dough, rolling pin, stack, toothpick, paints, brush, glitter, clear nail polish, cocktail tube, string for further hanging.
Master Class
- Roll out the dough into a thin layer using a rolling pin.
- Draw a house on the dough, then cut out with a stack.
- Make dots with a toothpick along the contour of the house, window, chimney.
- Make a hole for further hanging with a cocktail tube.
- Dry the craft.
- Paint the house, decorate with sparkles and wait until it dries completely.
- Attach a thread for further hanging.
Salt dough house is ready!
Salt Dough Owl
You will need: salt dough, felt-tip pen cap, stack, paints, brush, clear nail polish.
Master Class
- Roll out a ball of dough.
- Press down on it, making a flat circle.
- Make plumage by pressing with a cap.
- Fold the sides of the circle towards the center.
- Bend the upper part of the circle to the center and form the ears.
- Make the eyes of an owl by pressing the cap of a felt-tip pen.
- Dry the craft.
- Color the owl and wait for it to dry completely.
- Cover the craft with varnish.
You will need: painted salt dough, cookie cutters, cocktail tube, rolling pin, glass, water, clear nail polish.
Master Class

Salt dough curly frame is ready!
Salt dough bear
You will need: salt dough, stack, pva glue, black and pink paint, brush, transparent nail polish.
Master Class
- Blind eyes and nose, paint black and set aside to dry.
- Blind 2 flat circles for the paws, paint pink and set aside to dry.
- Blind the body of the bear in an oval shape.
- Roll up a ball for the head.
- Glue the head to the body.
- Blind a flat ball, draw a smile with a stack and glue it on the muzzle.
- Blind the paws, then glue them and draw the fingers with a stack.
- Roll up the ball and glue the tail in place.
- Glue on the eyes and nose.
- Glue the pink circles on the hind legs of the bear.
- Dry the craft.
- Cover the craft with varnish.
Salt dough bear is ready!
You will need: salt dough, glass, acrylic paints, sequins, brush, hanging ribbon, cocktail tube, dog's foot for printing on dough or your fingers, transparent glue, rolling pin.
Master Class

You will need: dyed salt dough, stack, clear nail polish, toothpick.
Master Class

Salt dough asterisk is ready!
Salt dough caterpillar
You will need: dyed dough, knife, pva glue, toothpick, pendant, transparent nail polish.
Master Class
- Roll out the sausage.
- Cut it into 6 equal parts.
- Roll up the balls.
- Glue 5 balls together.
- Glue the head.
- Blind the nose and eyes, then glue them.
- Use a toothpick to pierce the hanging spot.
- Dry the craft.
- Cover with varnish and wait until completely dry.
- Attach the hanger.
Salt dough caterpillar is ready!
salt dough apple
You will need:
Master Class
- Blind half an apple, make the inside flat, pressing it to a flat surface.
- Blind a thin flat center and glue to the main part.
- Roll up 6 seeds and a stick, then glue to the apple.
- Blind the leaves, then glue them.
- Dry the craft.
- Cover with varnish and wait until completely dry.
Salt dough apple is ready!
Salt dough elephant
You will need: dyed salt dough, pva glue, clear nail polish.
Master Class
- Blind the elephant's body by rolling an elongated ball.
- Blind 4 legs in the shape of plump sausages.
- Blind the proboscis.
- Blind the ears of an elephant in this way: roll up 2 flat cakes, glue cakes of the same shape of a smaller size in a different color to them.
- Blind a small ponytail.
- Blind your eyes.
- Assemble the elephant in the following sequence: glue the legs to the body, then glue the proboscis, then the ears, eyes and tail.
- Dry the craft.
- Cover with varnish and wait until completely dry.
Salt dough elephant is ready!
Dachshund from salt dough
You will need: salt dough, simple pencil, scissors, cardboard, paints, brush, rope, toothpick, foam sponge, clear varnish, PVA glue.
Master Class
- Draw a dachshund on cardboard as shown in the image.
- Cut out the template.

- Roll out the dough to a thickness of 5 mm and cut out the dachshund according to the template.
- Roll up oblong eyes, then glue them.
- Blind the eyelids and glue on the eyes.
- Mark the paws, nose, mouth, ear and body contours with a toothpick.

- Roll it into an oval, then glue it over your ear and smooth the seam with a wet finger. In the same way, add volume to the back of the dachshund and the tail.
- Mark the stripes in different directions around the perimeter of the entire dachshund, in such a way that the stripes resemble wool.
- Dry the figurine.

- Glue a piece of string to the back of the craft for further hanging.
Salt dough dachshund is ready!
Mushroom mushroom from salt dough
You will need: salt dough, light bulb, paints, brush, foil, cardboard, masking tape, superglue, PVA glue, paper napkins, clear varnish, stack.
Master Class
- Tape the bulb over with tape, then wrap it around with dough and dry the workpiece.
- Cut out a ring from cardboard and put it on the light bulb as a base for the hat.
- Form a hat from crumpled napkins, then fix with tape.

- Wrap the hat in foil.
- Roll out the dough to a thickness of 5 mm and wrap around the hat.
- Remove the hat from the leg, wrap the bottom of it with dough and make the strips stack.
- Glue the hat on the leg.

- Blind the handles, legs and nose of the fungus, then glue them on the PVA.
- Blind the caterpillar and glue it to the hat.
- Dry the figurine.

- Paint the figurine, then leave to dry.
- Cover the craft with varnish and wait for it to dry.
Mushroom mushroom from salt dough is ready! I recommend watching this video!
Funny pigs from salt dough
You will need: salt dough, paints, brush, foam sponge, stack, thin string, toothpick, black helium pen, PVA glue.
Master Class
- Roll up 2 balls for the snout and use a toothpick to make the nostrils.
- Blind the muzzle, glue the patch and eyes over it.
- Blind the ears of a triangular shape, glue them, then mark the stripes with a stack at the junction of the ears and head.

- Blind a heart and glue it on the bottom side.
- Make indentations along the edge of the entire circle.
- Use a toothpick to make 2 holes at the top for attaching the rope and 2 holes at the bottom for the legs.

- Roll up the handles and glue them in such a way that they hold the heart.
- Blind the hooves and make holes in them for the rope.
- Dry the blanks.
- Paint the blanks with black paint and let them dry.
- Wash off the paint from the convex parts of the workpiece under running water with a sponge, and wait for it to dry.
The dough is an amazing material for modeling, because children of different ages can work with it. Properly prepared salt dough will help realize any creative ideas and teach children how to make unique crafts. If you want to do salt dough figurines, then we offer you a master class with photos step by step for children from 4 to 10 years old. Spend your leisure time interesting and invent what else you can do yourself from the dough.
How to cook salt dough
Today, many recipes have appeared for making salt dough, which is suitable for sculpting figures. We offer one of the most common recipes that is easy to prepare at home. For this you will need:
- 3 cups flour
- Glass of water
- Two tablespoons of salt

Step by step photo of making salt dough for kids
All these ingredients must be mixed and knead the dough well, like dumplings. If you plan to make thin dough figures for children, then add a little PVA glue or starch to the mixture. These components will increase the strength of products.
Making figurines step by step
First, roll out the dough into a layer of suitable thickness. If you decide to do some modeling with the kids, it's best to use cookie cutters to cut out the pieces from the dough. Even a 4-year-old child can handle this task. After the hearts, Christmas trees, birds and stars are cut out, you can start decorating them. To do this, you can use seeds, grains and cereals. When the salt text figures are ready, they will need to be dried. Dry crafts from dough in the oven or in a natural way.

Photo of figures from salt dough for children
Children 10 years old will be able to perform step by step more complex figures from salt dough. Invite them to take a toy and make a voluminous craft on it. For example, try making a mouse out of salt dough. To do this, all the details are molded separately, and then connected to each other.

Salt dough mouse, step by step photo tutorial
It is enough just to make an owl figurine from salt dough with your own hands. To do this, with the help of a spoon, the test is divided into two parts - the head and torso. Give these parts the desired shape and connect them together.

Photo of an owl from dough
Separately, you can make a collar for an owl from salt dough, for this, small cuts are made on the strip. Fasten the collar to the body of the owl, and then use a knife to highlight the wings.


Step by step we decorate the dough figure
You can decorate crafts from salt dough with paints or gouache. To add shine, the craft is varnished. Some children use beads and beads to decorate salt dough figurines.

Master class with step by step photo: lamb
- This is a fascinating direction in needlework, which is especially liked by children. To make figures from salty text, you do not need to buy expensive materials, all the ingredients can be found in your kitchen. Try to do salt dough crafts step by step and share new master classes with experienced needlewomen.
From this unusual material, you can make various souvenirs, and then also paint them. It is strong and durable and can please a person for many years.
How to prepare dough for modeling
From the dough, it turns out, you can not only bake pies and cakes, but also make wonderful paintings, toys and much more. It is easy to sculpt from it, almost like from plasticine, and the dried toy becomes hard and, unlike plasticine, will not melt in your hands. Salt dough makes wonderful and original surprise gifts, and you can prepare such material for modeling quite quickly. In addition, it will not require you to spend a lot of money - everything you need for this exciting work will surely be in your home.
Of course, the composition of this magical dough is different from the one from which grandmothers bake cheesecakes. There is no single, "correct" recipe, each master uses his own. We will try to stick to one of the directions, but if you want, you can experiment with the proportions of water, flour and salt. Only on your hands there should not be cuts and abrasions, otherwise the salt may get into the wound.
For work we need:
- flour - 1.5 cups;
- salt - 1 cup;
- water - 1 glass;
- dry wallpaper paste - 1-2 tbsp. l.;
- sunflower oil - 1 tbsp. l.;
- utensils for kneading;
- rolling pin;
cutting board or any smooth surface
- a plastic bag for storage.
Operating procedure
1. Pour flour and salt into a container and carefully add water little by little (be sure to first flour, then water, and not vice versa, otherwise lumps may form) and mix. If lumps form in the dough, knead them with your hands. So we interfere with the whole dough until it becomes soft and homogeneous in composition.
2. Add sunflower oil to this mass so that the dough does not stick to your hands, and wallpaper glue - so that the dough becomes like plasticine, bendable and elastic. Mix all this again thoroughly and knead the remaining lumps.
3. Now we take the dough and put it on a cutting board. We roll out the dough several times with a rolling pin in order to completely eliminate the possibility of lumps.
4. Put the dough in a plastic bag and put it in the refrigerator for an hour. An hour later, the dough is ready to go.
During modeling, you should not immediately take out all the dough from the bag - it will quickly begin to dry out in the air. It is better to pinch off the necessary pieces, and close the rest with a bag. If the dough remains after sculpting, you can put it in the refrigerator - it can be stored there for several days.
If your hands are wet, the dough will stick to them. You have to dust them with flour. And in order to fasten the parts together, on the contrary, you need the dough to be wet. To do this, we wet the parts that we want to glue with ordinary water and a paint brush.
After the dough figures are molded, you need to dry them, this can be done in two ways.
Method one- just leave the toy at room temperature to dry for 3-4 days or more - it all depends on the size of the toy and the temperature of the room.
Method two- roasting in the oven. We put the toy on a baking sheet and place it in a preheated oven. The temperature should not be very high, it is better to bake on low heat for 30-60 minutes. The figurine is ready when it acquires a light brown tint, but by no means dark.
It is best to paint the toy with tempera or acrylic paints, as they are the most resistant - watercolor will look pale and quickly absorbed, and gouache will leave marks on the hands.
The finished product, if desired, can be coated with a transparent varnish. And remember, although the toys look strong, they are actually easy to break if accidentally thrown on the floor. Therefore, do not leave them on the edge of the table and in those places where they can be easily broken. And glue the salty figures on the frames and pictures securely, so that they do not fall over time.
DIY salt dough gifts. Step by step master classes
|
Master class on the topic "Salt Dough Pencil". Step by step with a photo. The master class is intended for children of senior preschool age, parents, teachers Purpose: interior decoration, gift. Purpose: Making a souvenir. Tasks. 1. Development of creative abilities. 2. Development of fine motor skills. 3. Education of perseverance, accuracy in work. Materials and tools: salt dough: 80 gr. - white, 100 gr. - green, 20 gr. - pink, 10 gr. - red, 10 gr. - yellow, 5 gr. - blue... |
|
Craft for Easter in kindergarten. Chicken in a salt dough shell. Master class with step by step photos The master class is intended for children of senior preschool age, parents, teachers. Purpose: interior decoration, gift. Purpose: Making decorative decorations for Easter. Tasks. 1. Development of creative abilities. 2. Development of fine motor skills. 3. Education of perseverance, accuracy in work. Materials and tools: salt dough (50 gr. - yellow, 50 gr. - white, 50 gr. - green ... |
|
Do-it-yourself decoupage of the “Dogs” magnet from salt dough. Step-by-step instructions with a photo Author: Pavluhina Vera Alexandrovna, teacher of additional education, MAOU DO Children and Youth Center "Asterisk", Tomsk Purpose: making a magnet of their salt dough. Tasks: - introduce the technology of making a magnet from salt dough using decoupage technique; - convey your experience through direct and commented display of consistent activities; - to increase the growth of motivation and creative activity of master class participants... |
|
Making Christmas tree decorations with the children of the preparatory group. Master class with a step-by-step photo. Christmas tree toy "Mitten" from salt dough. Step-by-step instructions with a photo This toy is a beautiful decoration for the Christmas tree. The Christmas tree toy "Mitten" is made in one academic hour of work, but how much joy and delight it brought to its author, and it is difficult for the teacher-mentor to convey this simply in words. We invite everyone to the master - class! |
|
Salt dough Christmas tree. Dot painting. Master class with step by step photos. Authors: Tsygina Polina, 7 years old, student of the city of masters t / o "City of Masters" MAOU DO Children and Youth Center "Asterisk" in the city of Tomsk and Pavluhina Vera Aleksandrovna, teacher of additional education, MAOU DO Youth Center "Asterisk", Tomsk city The master class will be of interest to children of primary school age, their parents, perhaps younger children and just creative people who love to create jewelry with their own hands. Purpose: tree decorations... |
|
Autumn crafts from salt dough for preschoolers step by step with a photo Master class "Bright colors of autumn" (autumn trees from salt dough) Autumn forest, playing with colors, Weaves wreaths from the crown of trees, Pamper warm days with their sunny caresses. Here is an immense pleasure - Walking along the festive path Along the rainbow maples, probably With a leafy bouquet in your hand. Author of the master class: Denisenko Dina Vladimirovna, teacher of additional education of the municipal government institution of additional education... |
|
Master class "Fairy meadow Gingerbread Man". Modeling from salt dough and plasticine. Step-by-step instructions with a photo for children Author: Kopylova Olga, 8 years old, studying at the GCURS (Y) Republican orphanage boarding school for mentally retarded children. Teacher: Pargisheva Raisa Nikolaevna GKU RS (Y) Republican orphanage boarding school for mentally retarded children. The master class is intended for teachers of additional education, technology teachers, parents, as well as everyone who wants to master the technique of sculpting from ... |
|
Master class "Princess frogs" in the technique of modeling from salt dough. Author: Popova Maya, 9 years old, studying at the State Course of Education (Y) Republican Orphanage Boarding School. Teacher: Pargisheva Raisa Nikolaevna GKU RS(Y) Republican Orphanage Boarding School. The master class is intended for teachers of additional education, technology teachers, parents, as well as everyone who wants to master the technique of salt dough modeling. Purpose: souvenir. Purpose: to make a souvenir using salt dough modeling technique Tasks: Educational... |
|
Do-it-yourself Easter egg stand step by step with a photo EGG STAND "EASTER HEN" Purpose: Use for decorating a festive table. Objectives: Educational: Strengthening the skill of step-by-step work. Master the technique of making a souvenir. Developing: Develop hand coordination, imagination, perseverance. Educational: Cultivate accuracy, encourage the desire to make gifts with your own hands. Materials needed: salt dough, modeling board, stacks, pencil... |
|
Master class of the panel "Three little pigs" in the technique of modeling from custard salt dough. Author: Anastasia Nemchinova, student of the MBU DO DDYU association "Salty Fantasies", Millerovo Teacher: Nazarova Tatyana Nikolaevna, teacher of additional education, MBU DO DDY, Millerovo Master- the class is intended for technology teachers, teachers of additional education, for those who want to master the technique of working with custard salt dough, as well as for those who want to make interior decorations of their own... |
|
Do-it-yourself Easter souvenir from salt dough. Step-by-step instructions with a photo Craft in the technique of modeling from salt dough for "Easter" for children 7-10 years old. Chany, Chanovsky district, Novosibirsk region. The master class is designed for children 7-10 years old. Purpose: making a candlestick for the holiday "Easter". Goal: creating a candlestick "Chicken" from salt dough. Tasks: Educational: to teach children to sculpt ... |
|
Master class with a step-by-step photo souvenir “Baby Timosha” using the technique of modeling from salt dough. Author: Vinichenko Daria, student of the MBU DO DDIU, the association “Salty Fantasies”, Millerovo Teacher: Nazarova Tatyana Nikolaevna, teacher of additional education, MBU DO DDIY, Millerovo The master class is intended for technology teachers, teachers of additional education, for those who want to master the technique of working with salt dough. Purpose: souvenir, gift for a newborn. Purpose: making a souvenir... |
|
Master class "Gift for Mom" in the technique of modeling from custard salt dough. Author: Nazarova Tatyana Nikolaevna teacher of additional education MBU DO DDIY, Millerovo The master class is intended for teachers of additional education, technology teachers, for those who want to make gifts with their own hands. Appointment: a gift for March 8. Purpose: making a decorative cutting board using the modeling technique from custard salt dough. Objectives: Educational: to master the technique of making ... |
|
Crafts in the technique of modeling from salt dough for Maslenitsa for children 7-8 years oldAuthor: Kolupaeva Oksana Grigorievna, teacher of additional education, MBU DO Children and Youth Center "Harmony", b. Chany village, Chanovsky district, Novosibirsk region The master class is designed for children 7-8 years old. Purpose: making a souvenir for the holiday "Maslenitsa". Goal: creating a souvenir from salt dough. Objectives: Educational: teach children to sculpt from salt dough using a template. Developing: to develop accuracy when working with the test. ... |
|
New Year's toy "Cockerel" in the technique of testoplastyMaster class with step-by-step photos on making a three-dimensional craft "Cockerel" from salt doughThe master class will be of interest to teachers of additional education, teachers, children of primary and secondary school age involved in testoplasty 2-3 years old, their parents and creative people who are interested in this kind of art. Purpose: Decorative ornament, Christmas tree decoration, DIY gift. Usage: For interior decoration... |
Dough is an amazingly plastic material for sculpting various figures and compositions: tender, soft. Unlike ordinary plasticine, the dough does not get your hands dirty. With proper kneading, salt dough does not crumble, does not crack, and remains for quite a long time. Although it should be noted that the dough is a rather fragile material with careless handling.

The plastic properties of salt dough have long been known. Our great-grandmothers sculpted figures of various birds and animals from it, the so-called "larks", with which they met spring, bagels, gingerbread "goes", which they presented to their friends and relatives on New Year's Eve and Christmas, on their birthday as a sign of love and respect . Dough products were used as children's toys.
But before turning into children's toys, dough figures had ritual significance. Ceremonies associated with grain and bread, traditional for the peoples of Russia, Ukraine, Belarus, Poland, Bulgaria, and the Czech Republic, have long been known. In accordance with these rituals, in the spring, before the arrival of birds, figured dough products were baked, most often looking like a stylized bird. The figurines were called "larks".
In Ukraine, such dough products were made not only for spring rituals, but also for winter holidays, as well as weddings. The figurines were given together with the wishes of health, prosperity, wealth and good luck.
The art of making dough products has not died even today, and handmade souvenirs are in great demand. This is a wonderful gift for any celebration and holiday. Modeling is enjoyed by both children and adults.
From salt dough, you can make simple figures and products, such as leaves, mushrooms, apples, and quite complex options - trees, figures of animals and people, as well as various multifaceted compositions.
A distinctive feature when working with this material is that no special tools and devices are required during the work. It is best to sculpt with your hands or use primitive tools that are always at hand. It should be noted that products made from salt dough are rather heavy (dense), which does not allow creating compositions of large sizes. Therefore, volumetric compositions and panels should not be very large.
WHAT IS NECESSARY FOR WORK???
There are different recipes for salt dough. For example, in one of them, vegetable oil is added to the dough. However, the products in this case leave greasy prints. Some recipes suggest adding vinyl glue to the dough. With a dough prepared according to this recipe, you need to be very careful, especially if you are working with young children. After all, glue is toxic, and kids love to try everything “by the tooth”. Our recipe consists of 100% ecological and therefore safe materials - water, flour and salt.
FLOUR
Flour is a natural product, and its quality can vary depending on the degree of grinding of the grain, and even on the weather conditions under which the grain ripened. Therefore, in practice, the universal recipe for salt dough has to be slightly adjusted, but this will not cause you any difficulties in your work. For salt dough, inexpensive flours that are not specially processed and without additives, emulsifiers and baking powder are best suited. Indeed, for modeling, the presence of vitamins and trace elements in flour is not important. Wheat flour is best for making salt dough. And in rye flour dough, more pores form, it is more difficult to dry, and it is more solid in modeling. Different types of flour can be mixed, such as wheat and rye flour.
ADVICE. Use an old coffee grinder to grind coarse salt, as hard salt crystals dull the blades.
SALT
Salt is added to the dough solely to protect against mice and harmful insects. Therefore, a large amount of it, in essence, is not required. Too much salt can make the dough brittle and brittle after drying, which leads to the formation of cracks in the product. Salt can be used any, even the cheapest. Coarse salt is easy to grind in a coffee grinder.
It should be noted right away that to work with salt dough, you need a certain temperature regime in the room. The optimum air temperature is 20°C. If the temperature is higher, the dough dries out quickly, it is difficult to process and connect parts.
For test:
- Flour - 2 parts,
- salt "Extra" - 2 parts,
- water (necessarily cold) - 1 part,
- plastic bag for storing dough,
To work with the test you will need:
- a jar of water for wetting fingers and brushes,
- stacks,
- plastic knife,
- modeling board,
- dough rolling pin,
- brushes,
- paints,
- toothpicks,
- garlic (for decoration "hairstyles")
- manicure scissors with rounded ends.
You may also need many other useful things, such as cocktail tubes, food foil, transparent pill boxes, beads, black peppercorns, felt-tip pen caps, and more.
Do not rush to buy everything at once, for a start, the bare necessities are enough. Gradually, more and more tools and various devices will appear. The most important and main tools will be your skillful hands!
Sources:
DOUGH RECIPES
There are many recipes for making salt dough. Perhaps there is no one that suits everyone, you need to experiment yourself and choose the one that is pleasant to work with.
The dough can be stiff or soft depending on the amount of water and flour. If the dough crumbles during kneading, add a little water, if it sticks to your hands, you need to add flour.
Please note that the same volume of different products weighs differently:
- 1 cup of flour weighs about 100 g;
- 1 cup of salt weighs about 200 g.
First recipe
Wheat flour - 2 cups
Extra salt - 1 cup
Water - 3/4 cup
Second recipe
Wheat flour - 1 cup
Salt - 2 cups
Dry wallpaper paste - 1 spoon
Water - about 1 cup
Third recipe
2 cups (about 200 g) flour
1 cup (about 200 g) salt
3/4 cup (about 125 ml) water
To prevent the salt dough from tearing and crumbling during modeling, it must be well kneaded and kneaded until it becomes elastic.
Pour salt into a wide bowl, add water, then flour. Mix everything well. Or, mix the salt and flour well, gradually adding cold water until a homogeneous mass is obtained. The prepared dough should not stick to your hands or crumble. The dough should be elastic and fairly cool. Put it in a container or plastic bag so it doesn't dry out.
It is undesirable to store the finished dough for a long time, because in this case its original color is lost: it becomes grayish. Although such stale dough can be used to decorate details of clothing or small jewelry.
Salted rye flour dough
Rye flour gives the products a warm brown tint of rustic bread.
Dry rye flour products first in air (one week for every 0.5 cm of thickness), and then in an oven over very low heat.
Recipe
- 3 cups (about 300 g) wheat flour
- 1 cup (about 100 g) rye flour
- 2 cups (about 400 g) salt
- 1.5 cups (about 250 ml) water
The weight of rye dough may not correspond to the volume required for a given product, therefore, for the same product, slightly more dough should be prepared from rye flour than from wheat flour.
The elasticity of the dough and the strength of products from it can be increased by adding 1-2 teaspoons of dry wallpaper paste, diluted in a small amount of water or mixed with flour and salt, while kneading, before adding water.
For a dough that works well, use a mixture of wheat and rye flour. Dough made with rye flour alone is too hard and difficult to mold.
Salt dough, left open, dries very quickly in the air, so keep the container with the dough closed. Put the rest of the unused dough in the refrigerator, where it can be stored for a day or two.
Sources:
V. A. Khomenko "Salty dough step by step"
A. Firsova "Miracles from salt dough"
HOW TO DRY THE CRAFTS???
Drying is a very important step in the production of salt dough products. Imagine: you conceived and created something wonderful out of it. And suddenly - as a result of hasty or incorrect firing - the product cracked and everything went down the drain! This is a really big disappointment!
Outdoors at room temperature
You can dry the craft in the open air in a dry place. The thicker the product, the longer it will take. But this method is the most economical.
However, keep in mind that when air drying, depressions form on the surface of the product that comes into contact with the table.
When air drying, moisture evaporates slowly, so drying each millimeter of product thickness requires 1 day of drying.
In summer, use the heat of the sun to dry: place the product ready for drying in a place lit by the sun.
Drying time in the electric stove oven
1 hour - at t 50°C
1-2 hours — at t 75°С
1 hour - at t 100-125°С
0.5 hours - at t 150°С
Larger pieces will take longer to dry.
You can also use another calculation formula: the drying time in the oven of an electric stove on a white baking sheet is 1 hour for every 0.5 cm of thickness at a temperature of 75 ° C. Further, regardless of the thickness:
- 1/2 hour at 100°C
- 1/2 hour at 125°C
- 1 hour at 150°C
- Browning - at 200 ° C strictly under supervision!
Note . The black baking tray heats up more strongly and the temperature is reduced by 25°C during all stages of drying.
The time it takes to dry crafts in the oven is difficult to calculate exactly. All ovens are slightly different from each other. Therefore, in order to reduce the frustration of spoiled work, make several samples, for example, make cakes of different thicknesses and dry them in your oven, changing the temperature.
After drying the salt dough figures in the oven, cool them. While the products are hot, they are very fragile, so handle them very carefully.
When drying in the oven, first turn on only the upper fire and dry the product on it until its surface begins to brown. After that, the product is no longer deformed. Then place the baking sheet on the middle rack of the oven. If you want to give the product a beige tint, use the upper fire a little longer.
If a slight bulge appears on the product or the product swells slightly, then the temperature in the oven is too high, in which case cracks may form on the back of the product.
In the oven (gas or electric stove)
It takes half the time to dry the product in a gas stove than in an electric one.
Example . A wreath in an electric stove is dried to readiness in 6 hours, and it takes only 3 hours to dry the same wreath in a gas stove! By slightly opening the oven door, you can adjust the temperature in the gas stove (on the smallest fire):
- 1 hour - door half open
- 1 hour for a quarter
- 1 hour - door closed
To brown the product until brown, add gas and keep an eye on the product so as not to burn it.
To dry the finished product, carefully, using a wide knife or spatula, transfer it from the work table to a baking sheet sprinkled with flour, being careful not to damage it during transfer.
Dry the craft for two days, first in the open air, then in the oven at a temperature of 50 ° C, gradually raising the temperature, but not higher than 150 ° C. At too high a temperature, the product may swell, sometimes even cracks appear. Swollen crafts cannot be fixed, and cracks are easy to cover up. To do this, dilute a little flour with water, add PVA glue, mix well and apply this mass to the crack, then rub the mixture into it with a stack or finger.
The product must not remain wet. Its readiness is determined by the sound. By tapping the finished product with your finger, you will hear a ringing sound. If the sound is deaf, the product must be dried.
For large products, you can use combined drying: first for several days in the air, then in the oven.
Note. If you start drying the product with the oven door closed, then bubbles form on the surface.
On the heating battery
This method is very convenient to use in winter, when the central heating radiators are well heated. Place the craft on foil or cloth and leave it on the battery until it dries completely.
Combined drying
First, the product is air-dried for several days, and then dried in the oven. This method is especially suitable for bulky products, such as wreaths.
Drying with hot air in the grill
Salt dough products can also be dried and fired with hot air in special ovens. The energy consumption in this case will be insignificant, since several baking sheets can be loaded at the same time. The grill is also suitable for drying dough products, especially since it requires less energy than an electric stove.
Microwave
The microwave oven is not suitable for drying salt dough products.
How to determine if products are completely dry
Tap the product with your index finger. If the sound is muffled, then the inside of the model is damp and it needs to be left in the oven for a while. If the sound is sonorous, then the product is dried. If you have already removed the product from the baking sheet, place it on a kitchen mitt and tap on its inside.
Browning
After you have made sure that all products in the oven are completely dry, the temperature in it can be raised to 200 ° C. Do not move away from the oven and watch until the product acquires the desired shade of brown. After varnishing the product, the brown color will be even more saturated. If certain areas of the product become too dark during browning, cover them with aluminum foil while the entire product continues to brown.
Advice . If you are in doubt about how much more you need to fire the product to get the desired color, smear light and dark places with a brush dipped in water, and you will see how the toasted product will look after varnishing.
1. In order for the crafts to be well preserved, after they are dried and painted, cover them with a transparent liquid varnish. This will reliably protect them from moisture. If you do not like the mirror shine, then use a matte varnish.
2. ATTENTION! Dyed dough products, other than those to which cocoa powder has been added, should be dried at a temperature not exceeding 125 ° C, otherwise their color may change.
Source: A. Firsova "Miracles from salt dough"
SURFACE TREATMENT OF SALT DOUGH PRODUCTS
Even without paint, your crafts can look very impressive. You just need to master a few simple secrets of processing products.
Glazing products with brine and browning
When the product is dried, it can be glazed. After that, the product will sparkle with iridescence of shades from white to golden brown.
Glaze the product for an hour. To do this, with a brush, it is smeared with a strong saline solution (the ratio of water and salt is 2: 1), and then placed in an oven at a temperature of 50 ° C to 150 ° C. When the first layer of the solution dries, the product is lubricated again. The operation is repeated several times. This method gives the figures smoothness. Since salt crystallizes on the surface of the product, it acquires a special noble whiteness.
However, the figurine can be given a different shade depending on the temperature of the oven. At a temperature of 50°C the product remains white, at a temperature of 150°C it acquires an intense beige color. A golden brown shade is obtained at a temperature of 200°C.
Since the "salt glaze" is formed by salt crystals, products treated in this way can be left unvarnished.
Glazing with egg yolk
The figurine can be given an appetizing look of ruddy dough by glazing with a mixture of egg yolk and water. After glazing with salt, the mixture is applied to the product several times and dried at a higher temperature (about 150°C). The oven door must be closed while doing this.
White color
The product will remain white after air drying or after drying in the oven if the firing temperature did not exceed 125°C.
Brown color
Lubricate the products in the last hour of drying at a temperature of 150 ° C with a brush with beet syrup diluted with water.
Baking effect
Products will look like yeast dough buns if, in the last hour of baking in an oven at a temperature of 150 ° C, they are first applied with “salt glaze”, and then brushed with a mixture of milk and water or a mixture of egg yolk and water with a brush. If the temperature is raised to 200°C, the brown color will be darker.
Leaving the oven unattended during this time is not recommended for safety reasons and so that the products do not burn out.
COLORING AND VARNISHING
PRODUCTS FROM SALT DOUGH
Coloring
Finished products can be painted in whole or in part. Products in the color of natural dough look great with minimal use of paints. However, if you want to completely paint the product, it is recommended to use acrylic paints. After drying, they do not stain hands and do not smear.
You can also use watercolors for coloring. To do this, the watercolor is stirred with a brush very thickly with a minimum amount of water and applied to the product so that the paint does not spread. Works painted in this way must be fixed with varnish.
Gouache paints can also be used for coloring. In this case, a little PVA glue should be added to the gouache.
To color the finished kneaded salt dough made from wheat flour, you need to add food coloring to it drop by drop. If the product is monophonic, paint can be added when kneading the dough, and if the product should be multi-colored, then the finished, kneaded dough should be divided into parts according to the number of colors.
Advice
The finished, kneaded dough is divided into as many parts as it needs to be dyed in colors. Then small balls are molded from these parts, in the middle of which recesses are made. Next, paint is dripped into these recesses, after which the dough is thoroughly kneaded until it is evenly colored.
Varnishing
In order for the paints not to fade or drops of water accidentally falling on the surface of the product do not spoil the work, the figures are varnished. Varnishing is used if necessary and at the request of the author.
Apply both liquid and thick varnish. Liquid varnishes do not protect salt dough products well, as they penetrate inside, and therefore the product has to be varnished many times. And yet, use liquid varnish if you want the product to look more ruddy and less shiny. If the composition is liquid, the product must be varnished and dried several times.
Thick transparent varnishes, on the contrary, reliably protect the product from moisture, and they carefully cover the models from all sides. If you don't like a mirror finish, use a matte clear coat. If the composition is thick, it is enough to varnish the product once or twice.
Today, there are many different varnishes in aerosol packaging on sale. Using such varnishes, it is enough to sprinkle the product once, and the colors will sparkle brighter, and the work will be reliably protected.
However, a properly dried product, even with long-term storage, is perfectly preserved even without varnishing.
MANUFACTURING
PRODUCTS FROM SALT DOUGH
Try to sculpt or cut the product immediately on the baking sheet, while the reverse side of the product remains flat and there is no damage when transferring it to the place of drying and firing. Before starting work, moisten the baking sheet with water using a brush so that air bubbles do not form between the dough and the baking sheet. The better the dough adheres to the baking sheet, the smoother the reverse side of the product will be after drying or firing.
Salt dough manufacturing methods
CUTTING WITH BAKING MOLDS
Roll out the dough to a thickness of 0.5 cm with a special roller or rolling pin on a work board or immediately on a baking sheet. Now press any molds into the dough.

To connect the parts of the products into one whole, moisten them in advance with a wet brush, and they will stick together due to the sticky properties of the flour. If you need to overlay parts on top of each other, smear water on the back of the overlay part, otherwise the spreading water spots will change color during drying. And so that you do not doubt a good result, grease the entire product with a brush dipped in water before it enters the oven.
PATTERN CUTTING
Roll out the dough to a thickness of 0.5 cm on a work board or baking sheet. Put the prepared template on the dough and cut out the figure along the edge of the template with a thin sharp knife.


Then carefully separate the template, and moisten the edges of the figure with water with a brush and trim with a wooden stick.


IMPORTANT TO REMEMBER. Templates are best made from thin cardboard with a waterproof coating. Ordinary cardboard may simply stick to the dough. Remove the rest of the dough from the template with a special scraper.
Enlargement and reduction
Draw the selected plots on paper in a cage. If they need to be reduced, take another sheet in a smaller cage. Then move the intersection points of the pattern with the cells and circle the contours. To enlarge the template, redraw it on paper in a larger cage.

MODELING PRODUCTS FROM SALT DOUGH
It is convenient to connect the parts with a brush and water. Water in this case plays the role of glue. Apply a small amount of water with a brush to the surfaces of the parts to be joined and gently press them together, being careful not to wrinkle. If there is too much water, the dough may spread.
There are several basic modeling techniques. At the heart of the manufacture of almost all elements are a ball and a sausage.
Many different small elements are used to decorate salt dough products: flowers, ribbons, berries, leaves, pigtails, etc.
To make the leaves, you need to roll out the sausage, cut it into identical parts-cylinders, which should then be rolled into a ball. Flatten the ball into a cake and form a leaf with your thumb and forefinger. Veins can be drawn with a toothpick.
Roses can be made from thinly rolled ribbon, carefully wound around a toothpick. In this case, the desired size and shape of the flower is formed.
In the manufacture of figures of people, the basis is a sausage, which must be given a conical shape. To sculpt the head, use a ball of dough of the required size. More complex planar elements or figures are best cut from rolled dough according to a pre-made template.
PROCESSING OF PRODUCTS FROM SALT DOUGH
AT HAND
Processing the dough with household items often has an impressive effect. For example, with a comb, you can apply an openwork pattern to the dough, and with the help of various unpretentious gizmos, the surface of the product can be made embossed.

Garlic squeezer. If you use a garlic press, the dough will turn into spaghetti-shaped curls. From them you can make hair, wool and other decorative details for models.

Nozzles for culinary syringe. If you press nozzles for a culinary syringe into the dough, you get decorative patterns from circles, stars and hearts.

Tea strainer. From the dough passed through a tea strainer, the finest “vermicelli” is obtained if very finely ground salt was used when kneading the dough.


Comb. A comb on the dough can print a ribbed longitudinal pattern by pressing the edges of its cloves into the dough. The tips of the sharp teeth of the comb make a pattern of dots.


Leftover dough can be stored for several days in a closed plastic container or plastic bag in a cool place. If the dough is damp and too wet, you should add and knead a small amount of flour in it.
PRINTS AND RAISED RELIEFS
Relief indentations can be made by pressing beautiful buttons, ears, herbs into the dough.

From buttons with a beautiful embossed pattern, you can make original prints. To do this, take a wooden dowel and glue it to the button with universal glue. If there is a loop on the back of the button, drill a hole in the dowel for it. If the button has holes, then fill them with glue at the junction of the button and the dowel.


You can make a special roller on which you cut out a decorative pattern in advance, and then print it on the dough.

To press blades of grass, ears of corn, flowers into the dough, lightly press them against the dough with your fingers. Then carefully roll them with a roller. Use tweezers or hands to remove printed objects.


ADVICE . To make prints clear, the dough must be dense and elastic.
Convex reliefs
If you press the dough into a wooden model or a mold with a recess, you will get convex reliefs. To make the contours of the relief more clear, when preparing the dough, use fine salt.
First lightly flour the mold with a brush, and then press the dough firmly into it. Take the dough out of the mold very carefully.
You can, on the contrary, press the dough with a mold and achieve the same effect. This method is easier. Roll out the dough to a thickness of 1 cm, firmly press the mold into it, after sprinkling it with flour, and then carefully remove the mold. Trim the edges with a sharp knife. Rinse the mold with water and a soft brush. Dry the product at room temperature, but not on the battery.

All kinds of metal firms can be used if the drawings on them are not too deep.

ADVICE . You can make your own plaster molds. They will serve you for a very long time.
LEAF WITH LADYBUG
In autumn, when the artist-nature creates unique masterpieces, it is impossible to resist bringing home a bouquet of colorful leaves. You can save memories of a wonderful time of the year by making a souvenir from salt dough.
Work description
2. Roll the dough into a ball about the size of a chicken egg.
3. On a floured surface, use a rolling pin to roll out the cake to a thickness of approximately 5 mm. The dough can be kneaded into a cake with your hands. This exercise is especially useful for children.
4. Attach a real maple leaf to the rolled out dough and press down to create a veined print. If you don't have a real sheet handy, you can use a template.
5. After removing the sample, cut the product along the contour with a knife.
6. Using a wide knife, transfer the product to a baking sheet to dry.
7. Fashion a ladybug from a small ball.
8. After drying, paint the ladybug with watercolors.

Dough modeling is a fun way to spend time with children. After all, at the same time, they not only sculpt, but also cook: they can experiment with the flour mixture in the process of measuring and mixing the ingredients, and then observe the metamorphoses that occur with the finished product when temperatures change during the drying process.
In addition, crafts made from salt dough are harmless to children, they do not contain allergens, and they can be safely tasted.

Figures made from homemade flour mixture are harder and better preserved than plasticine.
Basic dough recipe
Before you make dough for modeling, you need to imagine what kind of products will be made, whether the dough needs to be dyed, how long modeling will take, which drying mode will be selected.

The basic dough recipe for crafts consists of one part of salt and two parts of wheat flour to which citric acid is added - 2 tsp. 1 cup salt and 1 tbsp. l. vegetable oil. The amount of water added during mixing should be equal to the amount of salt.

Dough preparation method
The test is made in the following order:
- Mix flour with salt and citric acid and pour this mixture into a saucepan;
- Place the saucepan over moderate heat and, stirring constantly, gradually add water until the dough begins to lag behind the pan and can be rolled into a ball.
- Remove from heat and knead the dough with your hands.

Food coloring or gouache must be diluted in water, which is added before kneading the dough.

In the course of work, depending on the required consistency, the salt-flour mixture can be further diluted with water or oil, or flour can be added for hardness.

It is better to prepare the dough in as small portions as possible, right before sculpting, and store it only in a tightly closed container or cling film.

Drying salt dough crafts
In order for DIY salt dough crafts to retain their shape, do not break, and do not crack, you need to choose the right drying mode. You can simply leave the figurines to dry naturally in the air, you can put them in the oven.
There are two different methods for oven drying. The first is to preheat the oven, then turn it off and place the figurines in the heated space. You can also bake products at 100-degree mode, making sure that there is no burning.

A master class on making dough crafts involves, first of all, experimenting with the material: the composition of the dough and its drying mode, so failures in this process are inevitable.
Useful advice: Starting modeling with children, you need to set them up so that the first success, after many not quite aesthetic attempts, becomes a real miracle for them.

It is better to start with simple and uniform shapes, such as, for example, round beads of various colors and sizes. From them you can make garlands to decorate the room.

Then you can master more complex silhouettes - stars, hearts, and three-dimensional figures - New Year's snowflakes, Christmas trees, Easter eggs with patterns, egg coasters, chickens.

You can time the production of figurines for the holidays, or choose more neutral motifs for all occasions, making souvenirs and gifts in the form of stylized horseshoes, suns, stars, airplanes and funny faces.

During modeling, you can use special molds for modeling and baking, and other things, at the prompt of your imagination: garlic crush - to get thin ropes from dough, bottle caps - to cut out circles, plastic parts of toys - to get prints, almost everything What is at hand from a toothpick to wheels from toy cars can become a tool for sculpting dough.
Note!


It is easy to make holes in salt dough, both decorative and for hanging on threads. Holes on flat figures retain their shape when dry.

But when making more voluminous parts, such as spherical balls, in order to make a hole for the thread, you need to pierce the figure with a toothpick or other sharp tool made of wood or plastic and do not remove it until the product dries.

Helpful Hint: To glue the elements of the dough, it is enough just to wet the individual sections and attach them to each other.

From volumetric and flat figures, you can make garlands, key chains, medals and pendants. You can fashion chests and cups for storing jewelry, small treasures and pencils.

Volumetric figures of animals
Volumetric figures of animals are especially popular with children; they can be made in accordance with popular step-by-step instructions that are designed for plasticine and clay crafts.
Note!


You can sculpt from dough without dyes, then paint the finished figure and, after drying, varnish it.

You can also cut out various figures: having made their layout from cardboard, put it on a flat dough previously rolled out with a rolling pin and carefully cut along the edges. Then you can color the figurine, add the necessary texture - roughness, strokes, make eyes, nose or bead jewelry.

A wonderful handmade gift can be a photo frame or a unique candlestick.

Making panels that combine elements of mosaic, appliqué and modeling can captivate both children and adults. For the smallest, the simplest drawings are suitable: you must first draw a silhouette on parchment, then carefully fill it with dough along the lines.

More complex ideas can also be conceived and implemented using beads, cereal mosaics, dried flowers, etc.
Note!


Photo crafts from the dough