How to bake bread at home. Homemade cornbread in the oven
Love to cook homemade cakes? Try creating a loaf of your own bread! A piece of fragrant fresh bread will always come in handy for sandwiches for breakfast or an afternoon snack. So, now we will learn how to bake homemade bread in the oven and get acquainted with the most accessible recipes homemade bread with and without yeast, wheat and rye.
Which raw materials to choose?
Of course, only benign ones. This rule applies not only to the main components, but also to additional ones.
Additional Test Components
As a bread enrichment healthy ingredients take according to your taste:
- chopped vegetables (zucchini, pumpkin, carrots, onion, a variety of fresh chopped greens);
- spices and seasonings (dry spicy herbs, cardamom, turmeric, cinnamon, nutmeg, ginger, coriander, cloves, allspice, Cayenne pepper(not for everyone), mustard);
- seeds (sesame, sunflower, fennel, cumin, dill);
- nuts whole or ground, crumbs can be large or small (almonds, peeled with boiling water, walnuts or pecans, peanuts, brazil, hazelnuts or pistachios);
- add sesame, flaxseed, olive or corn vegetable oil to the dough as fat;
- a little alcohol, just a couple of drops is enough for 1 kg of dough (white table wine, rum, cognac), if you decide to add cognac, be prepared that the bread crumb will turn a little grayish.
These flavoring and aromatic products are added both to the dough during kneading and when shaping the product. It is also possible to apply seeds or pieces of fruit to the top surface before placing the dough on proofing (rising the dough in a warm place before directly Bread at home (in the oven) will be original and individual with any of the above additions.

Homemade bread recipe
So, let's prepare quick bread in the oven. The recipe is quite simple, but it is recommended to strictly follow the recipe so that the yeast in the dough begins to “work” in time and the finished bread comes out fluffy and soft.

Products for the recipe:
- milk - 250 ml, or a mixture of dry milk and water - 2 tbsp. l. per glass;
- Wheat flour (premium) - 500 g;
- or C0) - 1 pc.;
- salt - 1/2 tsp;
- granulated sugar - 1 tsp;
- dry instant yeast - 2 tsp;
- vegetable oil - 7 tbsp. l.
It should be noted that instead of milk, it is quite possible to add plain water or cream of any fat content.
- Take a 2-3 liter saucepan. Pour in the milk and 5 tbsp. l. vegetable oil. Also add sugar and salt. Place the stove over moderate heat and heat until the sugar and salt dissolve. But the mixture should not be too hot, much less boil.
- Next, remove the pan from the stove and add the egg. Stir and add yeast and a few tablespoons of wheat flour. Stir again and cover the pan with a lid. Let it brew for 30 minutes.
- Then sift the remaining flour directly onto the table (or into a wide bowl). Make a well in the center and pour the starter from the pan into it. Knead the dough quickly with your hands. Make sure that the lump is uniform in consistency.
- Then place the lump in a clean bowl and cover with a napkin. Leave in a warm place where there are no drafts. After half an hour, the dough will begin to rise, you need to knead it a little with your hands, that is, lower it. Next time it rises, do the same.
- In the meantime, prepare the bread pan - coat all internal surfaces well with oil.
- When the dough rises again, remove it from the bowl and place it in the pan. Lubricate the top liquid oil. Now you can enter some additional ingredient(see above - "Additional components for the test").
- Place the proofing pan in a warm place for 15-20 minutes. The quality of the finished bread partly depends on how the dough rises now.
- Then place the mold in the oven at 200°C for 40 minutes.
- After baking, gently shake the loaves out of the pan and place on a wire rack to cool naturally for 4-6 hours. Only after this is it recommended to eat the loaf.
Very important! Bread with yeast in the oven will not work without proofing before baking!
Yeast - which one to choose and what is the difference?

Take dry or fresh yeast? What is the difference between bread baked with one of these two ingredients? Nothing at all. Bread in the oven with dry yeast is no different from bread with its fresh counterpart.
There is only a difference in consistency and appearance two types of yeast. Also in the conditions and shelf life. Dry yeast is stored longer; the best conditions for it are airtight packaging. But fresh yeast needs air, but does not store it for long. In some cases, fresh yeast can be frozen, but only for a short time.
Dry and fresh yeast are interchangeable in any recipe - one tablespoon of dry for 25 g of fresh.
Bread without yeast in the oven
This is a dietary and low-calorie version of home-baked bread. This bread is prepared in the oven at home somewhat like a rye loaf. But you can bake it using the same recipe - just replace the rye flour with wheat flour.

Products for the recipe:
- kefir (ryazhenka, yogurt or skim milk) - 1 tbsp.;
- - 1/2 tsp;
- rye flour - 2 tbsp.;
- wheat flour (premium grade) - 1 tbsp.;
- Brazil nuts - 6-7 pcs.;
- salt - 1 tsp;
- yellow raisins - 30 g;
- chicken egg - 1 pc. or 4 pcs. quail eggs;
- granulated sugar - 1 tbsp. l.;
- vegetable oil - 1/2 tbsp.
Quick bread in the oven - recipe:
- Start by sifting all the flour into one bowl. Rye flour does not have strong adhesive qualities, so premium wheat flour is added to it.
- Rinse the Brazil nuts and dry them in a dry frying pan. Then cool and chop with a knife on a cutting board.
- Rinse the raisins in warm water.
- Add an egg and 80 g of vegetable oil to kefir. Salt and sweeten. Beat well. Add nuts and raisins. Add half the flour. Knead so that the structure of the mass is homogeneous. Then add the remaining flour and knead the dough with your hands until it becomes elastic and soft. Try not to knead for too long to prevent the dough from becoming too tight.
- Leave the dough in a bowl or bag for 30 minutes.
- Turn on the oven to the standard temperature for this type of dough, 180-200 °C.
- Prepare it, coat it with oil and place the dough. Immediately bake for 40-50 minutes.
- So, after a while, the bread without yeast in the oven is ready. Remove it from the mold and let it cool well.
Black bread recipe
Be sure to write down the recipe and try making black bread in the oven using our method.

Products for the recipe:
- rye flour - 2 tbsp;
- filtered water - 1 tbsp.;
- sourdough for bread - 2 tbsp. l.;
- flower honey - 2 tsp;
- vegetable oil - 2 tbsp. l.
Quick bread in the oven - recipe:
- Mix all ingredients and knead the dough. Leave the bun with a homogeneous structure on the table for several hours. Just cover with cling film.
- Then transfer the dough into an oiled pan and sprinkle the top of the bun with water. Place in a preheated oven at 200°C. Bake for 45 minutes.
To make high-quality brown bread at home in the oven, you must use sourdough. You can buy it in specialized grocery stores or prepare it yourself.
For rye bread, the sourdough recipe is as follows:
- mix glass rye flour with a glass sour kefir or curdled milk;
- cover the container (not plastic) with clean gauze in several layers and secure with tape or an elastic band;
- leave at room temperature for a day;
- add 50 g rye flour;
- stir and leave for another couple of hours to complete the fermentation process;
- use as intended.
There are many other recipes for sourdough starters. bread dough. Some of them are based on cereals, others are based on sour milk. But they have something in common - ready-made starter must be fermented. To give the dough a weak alcoholic aroma - only such a base is considered the best for making bread rolls.
How to make cooking faster?
A smaller baking volume makes the cooking process faster.
Benign yeast rises quickly and speeds up cooking. For novice housewives, it is better to try baking bread in the oven with dry yeast - these recipes are the simplest.
Process automation. That is, use electric assistant machines. For example:
- grind additional components(seeds, nuts) in a blender or coffee grinder, not by hand;
- mix the dough with special kitchen dough mixing machines (they are similar to a tabletop blender with a bowl);
- Use a slow cooker or bread maker to bake bread.
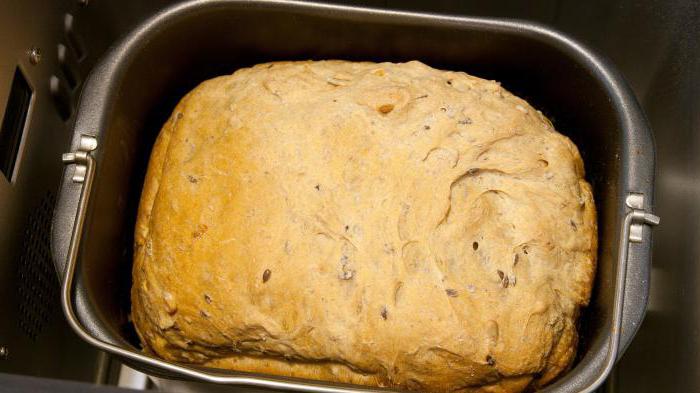
What is a bread machine and how does it work?
A bread maker is a desktop bread baking machine for use in a domestic kitchen. Its advantage is that you do not need to knead the dough, monitor its rise, proofing or baking. The machine will do everything itself. You need to add all the ingredients from the recipe for making bread into the bread machine bucket.
Very important rule! First, pour a little vegetable oil onto the mixing working element of the machine.
Next, you should adhere to the recommended requirements of the bread machine of a certain model. Basically, all bread makers work on this principle - pour in the warm liquid base for the dough, add the remaining ingredients, and add yeast at the end. Close the unit lid and turn on the main work program - it usually lasts three hours. During this time, the machine will mix all the ingredients, knead the dough, wait for it to rise and proof, start baking the dough and cook soft bread. The hostess will only have to cool it on a wire rack.
Cooking bread in a slow cooker
Baking bread in a slow cooker is almost no different from recipes using an oven. The dough is prepared from the same ingredients and according to the same principles. But the baking process changes a little:
- place the dough in the multicooker bowl;
- turn on the baking mode for one hour;
- then turn the loaf over to the other side;
- turn on the same mode for another 30 minutes.
Fragrant homemade bread is ready. Bon appetit!
Baking bread in the oven is not a simple, multi-step, painstaking process. A cook who has mastered it is rightfully considered an ace. Let's try and learn this useful thing.
To bake bread at home in the oven, you need a clear plan of action. First we need to determine what kind of bread we want to see in the oven: Rye bread in the oven, bread in the oven with yeast, yeast-free bread in the oven, sourdough bread in the oven, wheat bread in the oven, bread with garlic in the oven, kefir bread in the oven. But the most important question is whether it will be white bread in the oven or black bread in the oven. Depending on the chosen option, select necessary products, make up dosages, measure out portions.
Bread at home in the oven will only work when all the rules are followed. Sift the flour on time, heat water or milk accurately, knead the dough correctly, etc. It is also possible to bake bread without yeast in the oven, but taste qualities somewhat inferior to the traditional one, although its benefits are not denied by experts. The right recipe Baking bread in the oven at home involves using yeast. Homemade bread in the oven, recipes with photos are presented on our website. Use the advice of experts and you will succeed delicious bread in the oven. Let it be simple bread in the oven at first. The training will do its job, and you will gradually learn how to cook bread at home in the oven. The next recipe you master should be homemade rye bread in the oven. It is very appetizing and aromatic, decorates any festive table. The recipe for rye bread in the oven is worth studying first. Over time, homemade rye bread in the oven will become the highlight of your holidays.
To bake bread in the oven, you need a recipe, because... The dosage of components is very precise. Even the simplest oven bread recipe consists of exact numbers and technological stages. Baking homemade bread in the oven according to strict instructions is a must.
When will you learn to cook your own? own bread, when you are satisfied with your work called “bread in the oven,” you should show the recipes with photos to others. Will be especially useful step by step recipes bread in the oven, as they are visual and understandable for beginners. The best way to remember how to cook bread in the oven is a video.
People who adhere to dietary nutrition, you will be interested in a recipe for yeast-free bread in the oven, bread croutons in the oven. Study our tips, practice, try and you will not only know, but also teach others how to bake homemade bread in the oven.
The taste of bread largely depends on the products, their freshness, quality, strict adherence to the recipe and dosage. Adding components “by eye” is unacceptable.
Liquid ingredients (water, milk, whey) should be warm, and flour should be sifted, because in this way the dough is enriched with oxygen.
Bread pans should be filled halfway or two-thirds full with dough so that it has room to rise. If you bake without pans on a baking sheet, you can place a large one under each loaf. cabbage leaf as they did in old times baking bread in ovens.
Bread should be stored in wooden bread bins, enamel pans, covered with a towel or cloth. But it is better stored in a sealed ceramic container.
You should approach the preparation of bread with special respect, without rushing. At the same time, our ancestors read prayers, asked God for blessings, and only then got to work.
Bread in all its variations is the most widespread product in the world. It is an important source of carbohydrates and an integral part of our diet for thousands of years. Recent studies have shown that people began baking bread at least 30,000 years ago.
At first, hungry foragers used grains as a highly preserved food source. They were ground with stones, diluted with water and consumed as porridge. The next small step was that a simple dish can be fried on hot stones.
Gradually, with the discovery of yeast cultures, baking powder and flour in its modern form, humanity learned to bake lush and fragrant loaves.
For centuries, white bread was considered the preserve of the rich, while the poor were content with cheaper gray and black bread. Since the last century, the situation has changed dramatically. High nutritional value of previously despised upper class varieties bakery products was appreciated. White bread, thanks to the coordinated work of healthy lifestyle promoters, they began to be ignored more.
Exists great amount variations traditional baking, but homemade bread remains the most fragrant and healthy. Ingredients used:
- yeast;
- flour;
- sugar;
- water.
Bread is rich in many useful trace elements, minerals and vitamins, but is very high in calories: 100 g finished product contain 250 kcal.

Delicious bread at home - step by step photo recipe
Delicious homemade bread can be baked not only in a bread machine. And you don’t have to stick to it anymore famous recipes, as canon. For example, bread with fenugreek seeds, sesame and cardamom will appeal to even the most notorious gourmets.

Cooking time: 1 hour 30 minutes
Quantity: 1 serving
Ingredients
- Flour:
- Eggs:
- Milk:
- Dry yeast:
- Salt:
- Sugar:
- Cardamom:
- Sesame:
- Fenugreek seeds:
Cooking instructions

How to make homemade yeast bread - a classic recipe
Baked by this recipe The bread turns out to be truly classic: white, round and fragrant.
Prepare the following products:
- 0.9 kg of premium flour;
- 20 g rock salt;
- 4 tsp white sugar;
- 30 g yeast;
- 3 tbsp. water or natural unpasteurized milk;
- 3 tbsp. sunflower oil;
- 1 raw egg.
Procedure:
- Sift the flour into a container of a suitable size and mix it with salt and sugar by hand.
- Separately, in a tall jar, mix yeast with heated milk or water, add butter.
- Combine all the ingredients and knead the dough; during this process you can add half a glass of flour. It usually takes at least 10 minutes for the dough to become smooth and lumps to disappear. Then cover clean towel and put it in a warm place for a couple of hours so that it rises.
- When the specified time has passed, the dough needs to be “lowered”; to do this, we make several punctures with a wooden spoon or the edge of a knife so that the accumulated dough comes out. carbon dioxide. Then leave the dough for another hour.
- Gather the dough into a ball, moving from the edges to the center. Then place it on a clean baking sheet (it is advisable to grease it with oil so that the dough does not stick) or baking paper. Give it half an hour to proof.
- For golden crust Brush the surface of the future bread with egg and, if desired, sprinkle with sesame seeds or seeds.
- Bake in a preheated oven for about 50-60 minutes.
Homemade bread recipe without yeast
Fluffy bread can be obtained not only thanks to yeast; sour milk, kefir, brine and all kinds of starter cultures are also used for these purposes.
For cooking bread prepare ingredients:
- 0.55-0.6 kg flour;
- 1 tbsp. water;
- 60 ml sunflower oil;
- 50 g white sugar;
- 2 tsp rock salt;
- 7 tbsp sourdough
Procedure:
- Sift the flour through a fine-mesh sieve, add sugar and rock salt. Then add oil and knead by hand.
- Introduce the specified amount of starter into the resulting mixture, add water, knead well until the dough begins to lag behind the palms. Then cover with a clean towel and leave in a warm place for at least 2 hours, so that the dough rises approximately 2 times.
- After this, knead it thoroughly and transfer it to the mold. Choose a dish that is deep enough so that there is still room left after laying out, because the bread will still rise. Leave for another half hour, then place in a hot oven. Flavored bread will bake in 20-25 minutes.

How to bake homemade rye bread?
Rye bread is not baked from pure rye flour, but mixed with wheat. The latter gives the dough softness and pliability. To prepare rye bread you will need the following products:
- 300 g each of wheat and rye flour;
- 2 tbsp. warm water;
- 1 packet of dry yeast (10 g);
- 20 g sugar;
- 1 tsp salt;
- 40 ml sunflower oil.
Procedure:
- Mix yeast with warm water, salt and sugar. We leave them for a quarter of an hour, during which a yeast “cap” forms above the surface of the liquid. Add oil and mix.
- Sift and mix both types of flour, pour into them yeast mixture and knead the stiff dough. Covering her cling film and put in a warm place, leave for at least an hour.
- When the hour is up, knead the dough again, transfer it to the mold and leave it to proof for another 35 minutes, again wrapping it in cling film.
- We put the future rye bread in the oven, where it bakes for 40 minutes. To add flavor, sprinkle the surface with cumin before baking.
How to make black bread at home?
You can bake this bread both in the oven and in a bread machine. The only difference is in the technical features of the cooking process. In the first case, you have to make the dough yourself and knead the dough, and in the second, you just throw all the ingredients inside the device and take out the ready-made fragrant bread.
Black breads, which include the much-loved Borodinsky, are prepared using starter cultures. To bake a loaf of black bread, prepare the following ingredients:
The starter will require a glass of rye flour and carbonated mineral water, as well as a couple of spoons of granulated sugar.
For the test:
- rye flour – 4 cups,
- wheat - 1 cup,
- half a glass of gluten
- cumin and ground coriander taste,
- 120 g brown sugar,
- 360 ml dark beer,
- 1.5 cups rye sourdough,
- salt – 1 tbsp.
Procedure:
- Let's start by preparing the starter; to do this, mix half of the specified quantity flour and mineral water with sugar, cover everything with a cloth soaked in water and leave for a couple of days. When fermentation begins and bubbles appear on the surface, add the remaining flour and mineral water. Leave for another 2 days. Once the starter has fermented, it can be placed in the refrigerator, where it will be better preserved.
- Immediately before preparing black bread, take the starter out of the refrigerator, add a few tablespoons of flour and mineral water to it, cover with a damp towel and leave in a warm place for 4.5-5 hours.
- After pouring out the amount of starter specified in the recipe, you can add it back to the remaining liquid. mineral water and add 40 g of rye flour. After it has fermented, put it in the refrigerator again. In this form, the starter will keep for about a month.
- Now you can start baking directly. Sift and mix the flour, add gluten, pour the starter into it, then add beer, sugar and salt. The resulting dough should be soft and not tough.
- Transfer the dough into a bowl, cover with film, and leave in room temperature for 8-10 hours.
- Then we form a loaf from the dough that has managed to rise, sprinkle it with cumin and coriander on top, transfer it to the mold and leave for half an hour to proof.
- IN hot oven The bread will bake for about 40 minutes.

Delicious homemade bread in the oven without a bread machine - step-by-step recipe
The kefir bread recipe will be a real find for all opponents of yeast baking. Prepare the following foods:
- 0.6 l kefir;
- wheat flour - 6 cups;
- 1 tsp each salt, soda and sugar;
- cumin to taste.
Procedure:
- Sift the flour, add all the dry ingredients, including cumin, mix and pour in slightly warmed kefir.
- Knead the dough into a tight dough.
- Transfer the dough to a greased baking sheet, where we form a loaf.
- Making slits in the top of the loaf will help the bread bake better.
- The baking sheet with the future bread is placed in a preheated oven for 35-40 minutes.
Homemade bread starter
In addition to the rye sourdough described in the recipe for black bread, be sure to try the raisin sourdough, which will be ready in just 3 days:
- Mash a handful of raisins in a mortar. Mix with water and rye flour (half a cup each), as well as a teaspoon of sugar or honey. Cover the resulting mixture with a damp towel and place in a warm place.
- The next day, strain the starter, stir in 100 g of rye flour, dilute with water so that the mixture has a consistency similar to heavy cream, put it back in a warm place.
- On the last day the starter will be ready. Divide in half, use one half for baking, and add 100 g of rye flour to the second. Stir the water again to the consistency of sour cream and put it in the refrigerator.
Friends, hello! Today I decided to talk about baking conditions in electric ovens in the context of working with bread. Despite the fact that almost every recipe contains general recommendations for baking conditions ( temperature regime, moistening at the beginning, etc.), in fact, everything is not so simple when it comes to baking in electric ovens. Everything is different there. A good half of the kitchens are now equipped with them and you can bake whatever you want in them, they are reliable, familiar, stable and have a lot of functions, especially convection is appreciated. But, paradoxically, it is not very suitable for bread and to get perfect bread, you have to constantly fight with it.

Bread in an electric oven, baked under a hood
How an electric oven works, features and disadvantages.
Modern electric ovens usually have upper and lower heaters and one or two “windows” in the back wall of the oven, where fans are located to create convection. Convection contributes to the uniform distribution of hot air and stable heating throughout the oven; the shadows provide high-quality heating both from above and from below. It seems that everything is there to create ideal conditions for baking anything, but not bread. Almost all electric ovens have one sin: the bottom of the baked goods turns out pale, and sometimes it is not baked well at all, while the top can be very brown. For bread, it is very important that the hottest part is at the bottom, this contributes to the formation of the correct pores and the overall shape of the loaf; for ciabatta, this is generally critical, because the hot oven plays a decisive role in the formation of large pores in the wet dough. To do this, in fact, we bake on a stone and heat it for an hour and a half at maximum temperature. And here’s the problem: a cool, expensive electric oven with a million functions, but the bread bakes incorrectly!

Bread baked in convection mode without a stone, the bottom did not brown at all

Bread on a stone and under a hood in an electric oven
Another point is convection. On the one hand, it’s great that it exists, because it’s very important to have an even temperature in all corners of the oven, but bread doesn’t need convection. It is this that leads to uneven temperatures during baking, which is why the bread crust can be undermined in completely unexpected places (from the side or from below, depending on where exactly the fan is located). In addition, with constant blowing, the crust is, in principle, formed incorrectly: the fan blows off all the steam that the bread needs, especially in the first half of baking, the processes of caramelization of sugars in the crust cannot properly proceed, and it begins to darken and become rough early. For the same reason, the cuts do not open, but simply harden, and the volume of the bread is smaller than it could be - all due to the fact that the crust forms too early, loses moisture and, accordingly, elasticity.

crust formed under conditions of sufficient moisture and temperature

Crust formed in convection mode
This is also reflected in the taste and aroma: as you know, properly baked bread not only has a beautiful, thin golden crust, it also smells amazing! But the “wrong” crust has a not very pleasant burnt smell, it’s not appetizing and it’s offensive, especially if you spent the whole day fiddling with the dough on your only day off.
The same problem is inherent in all professional combi ovens (multi-level ovens that have both convection and humidification). It would seem that what more could you wish for: they are capable of creating high temperature inside the chamber, they have automatic steam supply, and you can also regulate the intensity of evaporation, however, the problems in them are the same as in conventional electric ovens. You can turn on the steam, give it 100%, but the crust will still turn out “wrong” due to the constant blowing: convection will disperse all the steam, and bread crust will harden and begin to burn.


baking in a convection oven under a hood and simply with moisture

The difference is noticeable right away, it’s the same bread, just baked in different ovens
The recommended temperature of 240-250 degrees for such stoves and ovens is simply unrealistic, because in less than ten minutes the crust will turn brown, but the bread itself will remain raw inside. I don’t know, maybe there are some other tricks, but in such ovens or ovens I start baking at a maximum of 220 and after 10-15 minutes I lower it to 180, while the total baking time increases significantly. If the gas bread weighs 500-600 grams. 20-25 minutes is enough, then in a combi oven or electric oven it bakes for about 40 minutes.
What to do?
- Turn off convection if possible. You can preheat the oven with it, and raise the temperature to 240-250-265, but when planting bread, it is better to turn off the airflow completely or make it minimal if it is not possible to turn it off.
- Be sure to use a stone, it doesn’t have to be very thick, a thickness of 1.2-1.5 cm will be enough, and heat it well, at least 30-40 minutes.
- Bake under a hood. I know that I have seven problems - one answer, but it’s true, bake the bread under a hood, preferably under a ceramic one, because under it you can bake the bread completely without removing it after 15-20 minutes of baking. A high-quality thick-walled cap, for example, such as the French produce, is good not only because it locks moisture around the bread; when heated, it creates special conditions that are most suitable for bread: it evenly heats up that small closed space limited by its walls, thanks to which and the bread crust is formed perfectly, and the bread itself bakes much faster. Cast iron has a similar effect, but it is more difficult to work with, it is very heavy, and it cools faster than ceramics. Even in the highest quality ovens, the temperature varies in different parts of the oven simply because they themselves are quite large and cannot really heat up evenly.

This is especially true for ovens in which convection is not turned off. Even if you keep the bread under the hood for 15 minutes and then remove it, strong hot air will still lead to the fact that the crust will not form correctly, the cuts will not open as fully as they could in more suitable conditions, and the volume of the bread will be smaller. Ceramics, thanks to its special porous structure, allows you to bake bread completely under the hood, without leading to excess steam, blurring of cuts and a glossy crust.
What to look for when choosing an electric oven
I won’t advise companies and manufacturers, I don’t understand them at all, so I’ll just list what you should pay attention to.
- It is advisable that the oven have two heats (upper and bottom) and modes that allow you to use them alternately (for each heat according to the mode, for example) or all together. If there is a function for regulating the heating temperature of each of the shades - great, take it :)
- It would be desirable to be able to turn off convection. This is probably almost the most important function for bread.
- It is advisable that the door have 2-3 glasses, this will better hold the dough in the oven and heat it more evenly.
Which ovens did I bake in and which one do I bake in?
I baked bread in a variety of household electric ovens, in absolutely murderous gas ovens, in ordinary combi-steam ovens and in complexly programmed super-combi-steam ovens, the cost of a three-room apartment in Kharkov. I baked in electric deck pizza ovens, in professional wood-burning ovens, in Russian ovens, in domed wood-burning pizza ovens and in many other places. I won’t even talk about firewood now - this is definitely a new level for bread and real magic, I’ll talk about what I usually bake with.
I have gas oven and I love it dearly, it is almost perfect: the bread crust in it browns perfectly, and the bottom does not burn, and I always use a stone and a cap. When I first baked in it, I couldn’t believe that this was actually happening, the bread in it was perfect! I was so used to burnt crusts and pale tops, to the fact that the top had to be browned on the grill and baked for 40 instead of 20 minutes, that for a long time, when I took out the next golden brown loaf, I danced with joy. I have a far from new German Kaiser stove; it heats up to a maximum of 240 degrees (therefore almost ideal, but for wet dough this is not enough), and I bought it more than two years ago used, for pennies, for a rented apartment to replace the Soviet electric one, which leaked gas and, it seems, was generally life-threatening. Since then, she and I have had many interesting experiments, adventures and moves, there were offers to change to a more modern electric one, but it seems that we have found each other, and I refuse the offers. This is how we live :) I wish you to find your oven or make good friends with the one you have, inspiration and delicious bread!
P.S. Thank you very much for the photo support to Irina Tereshkina, Vera Anisimova and Elena Kosova!
Today we will talk about the simplest wheat bread. The recipe is based on GOST. The recipe at first glance is quite simple. However, it is not always possible to bake bread successfully the first time. You need to be patient and practice a little. However, even the most humpbacked, tough or poorly risen specimens are usually happily eaten. There is something so fun and life-affirming about baking homemade bread. I will provide a detailed recipe and detailed explanations of how to bake bread in the oven, from personal experience. I got this bread right the first time. I had little experience: by that time I had only managed to master baking loaves of bread near Moscow. I decided not to retake the bread and show the photos that I took then on a point-and-shoot camera. I hope they will inspire you with confidence that you can bake this bread at home. You just need to strictly follow the instructions, and everything will definitely work out.
Ingredients:
(this is how many products are needed for bread in general)
- 500 g flour
- 335 g water
- 2 g yeast
- 7 g salt
How to bake bread in the oven
They usually try to bring the home baking process as close as possible to production technologies. Of course, rarely does anyone succeed in reproducing the same factory method of kneading dough and baking bread. But simply observing the exact weight of the products and the time required for fermentation of the dough and dough gives excellent results.
Beginners are always surprised: why do you need to spend so much time? Why can’t you use more yeast to make the dough rise faster? The answer is simple: in order for the taste of bread to turn out the way we are used to, it is necessary for fermentation of the individual components of the flour to occur. Gradual oxidation gives that unique richness of taste that every self-respecting baker strives for.
In general, baking homemade bread is fuss-free. Let's be patient and do some witchcraft. First, let's put the dough on.
Here is its formula:
- 350 g flour
- 195 g water
- 2 g yeast.
We measure out the clearly indicated products and mix everything with a spoon. The dough will be quite thick. But it is on this kind of dough that this bread turns out the most delicious. Cover the bowl with a lid and place in a warm place for 5 hours.
When the dough rises, we begin kneading the dough.
Add:
- 140 g water,
- 150 g flour,
- 7 g salt.
The dough will be sticky. We are not afraid. Knead long and gently. Knead the dough with your hands as much as you like. Stretch, but never tear. I usually knead the dough with my hands for at least 15 minutes. I like this activity. If it is easier for you to use a mixer with spiral attachments, then this is not forbidden. But reduce the kneading time by at least half.
Roll the dough into a ball, place in a greased bowl, cover with a towel and let rest for another 45 minutes.
Usually this dough is made into a round hearth bread. But for beginners, I would advise using the form. This way nothing will leak. And you are guaranteed to receive a neat loaf or loaf. For a loaf, you can use, for example, a small liter saucepan without a handle. A rectangular cake pan will suffice for the loaf. It needs to be lubricated vegetable oil, lay out the dough and put the bread to proof. That is, let him rise for the third time, now in shape.
Unfortunately, it is impossible to predict how long it will take you to proof. This usually takes me about two hours. But there were times when even an hour was enough. How to check that bread can be put in the oven? It's very simple. Lightly press the side of your finger into the risen dough. If the dent does not straighten out immediately, the bread needs to be baked. Do not let the bread proof for too long, otherwise the top dome-shaped crust may fall off.
Bakery
It is best to bake this bread with steam. Place an empty container without a handle on the bottom of the oven. Preheat oven to desired temperature(240 degrees). Boil a kettle of water. Before putting the bread pan in the oven, pour boiling water from the kettle into the pan.
The bread bakes for 45 minutes. The first 20 minutes at a temperature of 240 degrees with steam. Then you need to open the oven (careful! Don’t get burned by the steam!) Remove the frying pan with water. If all the water has boiled away, just wait literally a minute for the steam to evaporate. Switch the oven temperature to 180 degrees and bake the bread for another 35 minutes.
Remove the mold. Cool the bread in it for 10 minutes. Then take it out and let it sit for another hour.