How to fix damage in the shell of a sea mollusk. Rapan - primary processing, cooking technology
Shells can serve as a wonderful reminder of warm days at the beach, or used to brighten up your home interior or an upcoming decor project. If you are collecting shells scattered on the beach, then for better storage it is very important to clean and polish their surface, both from the outside and from the inside.
Steps
Part 1
Collect shells- Understanding whether there is animal tissue inside the shell or not will influence the choice of how to clean it. For example, if there is animal tissue in the sink, then you will need to get rid of it.
Collect shells in the place you like. It can be a city beach or a place where you were during your vacation. Seashells can be purchased at a craft store or online.
Do not pick up shells that contain living marine life. Be respectful of nature and do not use shells with living beings inside. A shell is considered still alive if there is any living thing inside it.
Determine if the shell is alive. A living shell is a shell with animal tissue attached to it. This differs from a shell with a living being inside in that the being in the living shell is dead. A dead shell is dead if it does not contain animal tissue.
Part 2
Removal of organic tissue from shells-
Boil the shell to get rid of the animal tissue. Boiling or boiling the shells will soften the organic matter and make it easier to remove. You will need a saucepan and tweezers, or any other tool used by dentists, to get rid of animal tissue. To clean sinks by boiling, you must:
Bury the shell in the ground. This method of cleaning may take longer, but many choose it because it reduces the risk of damage to the shell. Boiling and freezing, as well as mechanical removal of organic matter, can damage the shell. You can bury the shell in a safe place where it will be protected from damage and will be cleaned of animal tissue in a natural way. Ants, beetles, and other insects will eat the animal tissue, thus cleaning the shell. To clean the shell by instillation, you need:
-
Freeze shells. Freezing kills any remaining animal tissue inside the shell, making it easier to remove. To clean the sink by freezing, you will need:
- Place the shells in a bag or zip-lock bag. You may need several bags if you have a lot of shells.
- Pour enough water into the bag to completely submerge all the shells.
- Place the bag in the freezer.
- Leave the bag in the freezer for a few days.
- Remove the bag from the freezer and let it completely defrost.
- Remove organic tissue from shells.
Part 3
Cleaning dead shells-
Soak the shells in water for a week. Water will dissolve all the dirt on the surface of the sink, and by the end of the week it will shine with cleanliness.
- Change the water every day. Changing the water regularly will keep the shells even cleaner.
- You can also boil the shells after a week of soaking to ensure that all animal tissue has been removed from the shell.
-
Use bleach to clean shells. Bleach will remove any dirt, growths, and animal tissue from your shell. But some shell collectors warn that bleach can affect its color, and the smell can be permanently absorbed into its porous structure. To clean shells with bleach:
- In a saucepan, mix water and bleach in equal proportions. The resulting liquid should completely cover all the shells.
- Soak the shells in this solution. You may notice a flaky, skin-like film peel off the shell. This is the periostracum, or organic shell cover.
- Immediately after peeling off this coating, you can remove the shells from the solution. With a toothbrush, you can remove its remnants.
- Rinse the shells well and dry them thoroughly.
- Rub the shells with baby oil to restore their shine.
-
Use toothpaste to clean the surface of the shells. Toothpaste is a less aggressive alternative to bleach. To clean seashells with toothpaste, you will need:
- Apply a thin layer of toothpaste to each side of the shell.
- Leave the shells like this for at least 5 hours so that the paste is properly absorbed into the surface. You can leave the shells like this for the whole night to be sure that the paste will do its job.
- Once the paste has become sticky or hard, depending on the thickness of the layer you applied, take an old toothbrush and a glass of warm water. Then carefully clean the shells. Make sure you clean out any small cracks and get to any hard to reach places.
- Rinse all the toothpaste off the surface of the shells thoroughly, even if you have to rinse them thoroughly under running water after brushing. This will help to get rid of grains of sand and other particles in the paste, as well as roughness and sharp fragments, leaving the surface smooth and with a minimum of imperfections.
-
Warnings
- Some shells (especially kauri) can be ruined rather than preserved if bleach or other cleaning agents are used to clean them. If you have found a shell that is special to you, then before starting treatment, you should determine its type in order to choose the right approach for cleaning it. You can also experiment with shells of the same species that you don't like so much.
- Some shells do not tolerate boiling. This is especially true for soft and fragile shells. If you are afraid of damaging the shells, then you should give preference to boiling rather than boiling.
- Don't burn yourself when pulling the shells out of the boiling water. Always wear protective gloves.
- Bleaching sometimes discolors shells. So if you don't want to "bleach" the shells, then you can adjust the amount of bleach in the solution (you can always add more bleach if needed).
- Always wear safety goggles and gloves when handling bleach.
Rapan - primary processing,
cooking technology .
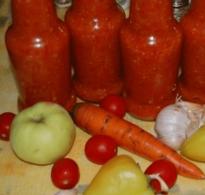
Rapan is a gastropod mollusk.
A few years ago, rapana was mined exclusively
because of the beautiful shells. To date, the main
Rapans are harvested for meat. The meat of the rapana
Properly prepared it is considered a delicacy. For food
not the whole mollusk goes, but only its leg.
Like most seafood delicacies, rapana meat
contains a large amount of mineral elements
easily absorbed by the body, in particular iodine, phosphorus,
potassium, iron.
The main sign that the rapana is alive is
tightly closed sink lid. Otherwise,
eating rapana meat is not recommended.
Rapan shells are raised from the seabed dirty
overgrown with algae, silt and moss, here they
must be washed and cleaned, and then proceed to
further actions.
 Primary processing of rapana or how to get live meat
rapana from the shell?
There are two ways here:
1 way- Shells with live rapana are necessary
to freeze. At home, this can be done in
freezer of a conventional household refrigerator.
Freeze completely, usually about 3 hours.
Next, take out the shell with meat and completely thaw.
Then we stick an ordinary fork deep into the sink with its
the inside of the lid and rotate the fork along
spirals, extract the contents of the shell. Using
this way, the meat is usually completely extracted.
Next, we separate the meat of the rapana from the insides.

The edible part of the meat of the rapana is considered to be the leg, with the help of
which the snail is attached to the surface. leg well
we wash from mucus and black plaque
2 way- Rapana in the sink must be boiled in
water for three minutes. Further meat can be easily
remove from the sink. But there is one drawback here -
cooking in this way, the meat is saturated with juice and
shellfish enzymes. The meat acquires a peculiar
color, smell and taste. Black plaque at the same time also
gets absorbed into the leg and is quite difficult to remove. This
option available for hiking conditions.

At home, you need to do it differently. sinks
rapana pour boiling water and leave to cool
water, after which we begin to gut. Shell fork
we take out the body of the mollusk. Now the rapano meat is ready for
further application.
You can cook many different dishes from rapana meat..
The main thing in cooking rapana meat is
minimum heat treatment no more than five minutes. At
longer cooking, the meat of the rapana coarsens, becomes
hard as rubber.
Boiled rapana meat can be cut and stewed with onions
in vegetable oil. Delicious marinated in
during the day, rapana meat with lemon juice. Rapan meat
cut into small pieces, filled with dry table
wine and stewed for five minutes and you're done
great dish.

Marinated rapana meat in lemon juice is good
suitable for barbecue. We string marinated meat
on a skewer and quickly fry over hot
coals, constantly turning.
Rapana meat, peeled and boiled for three minutes,
Can be packaged and frozen for
further use in cooking.
Comes to catering establishments
frozen rapana meat.
We prepare frozen rapans - for one
kilogram of rapana meat, you need to take 800 ml of water
add vinegar and salt to taste. Cook the meat until it
will become soft, the main thing here is not to digest. Ready meat
cool and then use as intended.
Rapan in sauce with mushrooms.
Cooking technology:
Boiled rapana meat, pickled cucumber and fresh
cut mushrooms into thin slices. Boil
potatoes and circle mode. Onion cut into strips,
cut the carrot into circles, finely chop the garlic.
On a heated oiled pan, spread
carrots, onions, champignons and fry at
continuous stirring, 5 minutes before ready
add finely chopped garlic. In prepared
products add boiled rapana meat, potatoes
mix all the ingredients. Add salt and pepper to
taste. Season with sauce and the dish is ready. When applying
sprinkle with chopped herbs.
Sauce: fry the flour in a pan until golden brown,
add sour cream, bring to a boil, add cream,
Bring Tabasco sauce back to a boil
Add lemon juice, salt and pepper to taste.
In the article, we reviewed primary processing of rapana and
basic moments cooking technology.If article
you liked it and it turned out to be useful for you leave
your comments.
Receive articles in your mail by leaving your e-mail.
See you soon.
How to wash shells from limescalePlace the shell for several hours in a 25% solution of acetic acid (1 part essence, 2 parts water), then remove the remaining plaque with a soft brush. A small amount of limescale can be removed with citric acid. To do this, it is enough to rub the place of plaque with a small slice of lemon, then rinse with warm water.
- You can also use Silit Bank to remove rust and lime deposits

How to clean shells and get rid of the smell
Even the most beautiful sea shells smell disgusting if there are rotting remains of a mollusk inside. Shells are extremely diverse in size, shape, color, but in terms of cleaning they are divided into living and dead. The dead have nothing left inside. And the living have not yet been completely cleansed of animal tissues, even if they are long dead.
When cleaning dead shells, immerse them in an aqueous solution of bleach (1:1). How much to keep in it depends on the type of mollusk and the number of shells. The minimum time is 30 minutes, but if the shells are very dirty or you want to bleach them white, keep longer. Before removing them from the solution, make sure that the periostracum, the leathery exfoliating covering of some shells, has come off. Then rinse well with clean warm water.
If sea acorns or the like remain on the surface, scrape it off with a knife.
- If the lip of the sink is chipped, round off the sharp edges with a file or sanding disc.
- If you want the shell to shine, grease it with a thin layer of mineral or baby oil.
When cleaning live shells, you can use any of the following methods to get rid of the residue that rots inside.
Bury shells in the yard. Dig up after one or two months. Insects, bacteria, worms, larvae and other living creatures will eat everything that needs to be got rid of during this time.
- Deep freeze. Put the shells in a plastic bag, fill them with water and put them in the freezer for several days. Then let it thaw at room temperature. After that, it will be easy to pick up the remnants of the flesh and pull them out.
- Put the shells in boiling water for 5 minutes. Take out one at a time with tongs, take it with gloves or a towel so as not to burn yourself and pull out everything superfluous from the inside.
- A foul-smelling but effective way to clean shells is to "fry" them in the microwave. The time depends on its power and the size of the shells. Start with 30 seconds and add 10 if the initial time is not enough. When removing shells from the oven and removing the soft remains of shellfish from them, use tongs and be careful not to burn yourself.
If something still remains inside, put the shell in the yard - let flies, ants and other insects feast on it. When the rotting flesh is done with, treat as described above for dead shells. Soak in bleach and rinse thoroughly.
Upon completion of processing, the shells are oiled or varnished.

It's all about seafood, which we often bring from vacation, decorate the interior of our house with them, use them to make decorative compositions. And now I want to talk to you about the gifts of Christ. I invite you to visit the pages of the site xdari.ru, here you will find a map of Orthodox Churches, where you can order trebs online online: magpies, prayers, submit notes and much more. The Map of the Temples will also help you provide assistance to the Temples themselves, it contains information about the geographical location of the Temple, its description with a link to the full article about the Temple.

1:512
Place the shell for several hours in a 25% solution of acetic acid (1 part essence, 2 parts water), then remove the remaining plaque with a soft brush.
1:786A small amount of limescale can be removed with citric acid. To do this, it is enough to rub the place of plaque with a small slice of lemon, then rinse with warm water.
1:1116You can also use Silit Bank to remove rust and lime deposits.
1:1266 1:1276
2:9
How to clean shells and get rid of the smell
2:105Even the most beautiful sea shells smell disgusting if there are rotting remains of a mollusk inside. Shells are extremely diverse in size, shape, color, but in terms of cleaning they are divided into living and dead. The dead have nothing left inside. And the living have not yet been completely cleansed of animal tissues, even if they are long dead.
When cleaning dead shells, immerse them in an aqueous solution of bleach (1:1). How much to keep in it depends on the type of mollusk and the number of shells. The minimum time is 30 minutes, but if the shells are very dirty or you want to bleach them white, keep longer.
2:1151 2:1161
3:9
Before removing them from the solution, make sure that the periostracum, the leathery exfoliating covering of some shells, has come off. Then rinse well with clean warm water.
3:322 3:332If sea acorns or the like remain on the surface, scrape it off with a knife.
- If the lip of the sink is chipped, round off the sharp edges with a file or sanding disc.
- If you want the shell to shine, grease it with a thin layer of mineral or baby oil.
When cleaning live shells, you can use any of the following methods to get rid of the residue that rots inside.
3:1063 3:1073Bury shells in the yard. Dig up after one or two months. Insects, bacteria, worms, larvae and other living creatures will eat everything that needs to be got rid of during this time.
- Deep freeze. Put the shells in a plastic bag, fill them with water and put them in the freezer for several days. Then let it thaw at room temperature. After that, it will be easy to pick up the remnants of the flesh and pull them out.
- Put the shells in boiling water for 5 minutes. Take out one at a time with tongs, take it with gloves or a towel so as not to burn yourself and pull out everything superfluous from the inside.
- A foul-smelling but effective way to clean shells is to "fry" them in the microwave. The time depends on its power and the size of the shells. Start with 30 seconds and add 10 if the initial time is not enough. When removing shells from the oven and removing the soft remains of shellfish from them, use tongs and be careful not to burn yourself.
If something still remains inside, put the shell in the yard - let flies, ants and other insects feast on it. When the rotting flesh is done with, treat as described above for dead shells. Soak in bleach and rinse thoroughly.
3:32153:9
At the end of the shell treatment, oil or varnish!
3:136 3:146
Here are some more tips written by Irusha
4:742 4:752Somehow she brought shells from the sea and, in order for them to dry, put them on a stone in the sun, a bunch of ants immediately ran up, after two days it remains only to rinse the shells)) You can still boil them in a strong solution of citric acid, lime upon arrival home the raid will be cleared.
4:1270 4:1280 4:1284 4:1294I can also give advice from my own experience: in order not to overpay for excess baggage, send the shells you have collected to yourself as a parcel, I have done this more than once) Then it is very nice to receive a gift from yourself from your vacation in the mail)))
4:1718 4:9| Souvenir in a marine style |
Sea in a glass. |
How can you effectively and relatively safely clean the sink itself? After all, from the seabed we get it all in silt and algae, with a limestone coating ...Initially they are
And we want to have
Plaque on the shell dissolves perfectly in vinegar. You can lubricate the rapana with vinegar essence (70%), rinse with a brush after ten minutes. And you can soak in vinegar for several hours and also clean with a brush.
Be very careful with vinegar! The shell dissolves in it! You need to carefully monitor the reaction and wash off at the right time!Another method that was found on the World Wide Web is to soak in a chlorine solution. Keep it for so long until the top coating from the shell begins to rub off with your fingers.
I have personally tried both options.
1. I don’t have vinegar essence, I just poured vinegar into a jar and put a shell there, after 3 minutes it became a hole). It became interesting to me and I didn’t get it, the upper curl just melted before my eyes in a couple of minutes! An amazing sight, just magic, I advise you to watch) After all, the shell is very thick and durable, but then it just disappears ..2. I soaked the shells in a domestos solution. They lay there for 4 or 5 days, the top layer (and they were very dirty !!) dissolved, rubbed off, as promised. But! After drying, the shell became like white paint painted....
I think that if you open it with varnish, the color will appear ...As for the shells, an even bigger problem is to clean it from the inside. One way or another, a shell is a living creature, and if you get it from the bottom, it often deteriorates and an unpleasant smell appears.
To be honest, I don’t know the upper part, I have never had to clean it, but I have come across the inside. In the summer, when we rested in a camp by the sea, we put the found shells in an anthill for a couple of days. They ate away the entire inside and we only had to wash it well.
Now the following methods are still known, though I haven’t tried the last one:
1. Using a special knife (a long process, I tried to do it with an ordinary knife).
2. Freeze the whole shell, frozen meat comes out well.There were no problems with getting the insides at all, but with the consequences ....)
They boiled shells for me, but the inner surface cracked a little ...
They say that after freezing everything really separates well ...
But those who caught shells did not know the last way ... Now I have cleared the rapans of moss, they are so white and clean ... BUT they stink terribly!
Moreover, half of the shells themselves do not have rapans inside, but they all stink ..
The smell clearly comes from the outer ear of the shell, which is near the entrance, it is large and mussels lived in it, and they stink ... it’s impossible to get them out of there, no matter how I use knitting needles, an awl and tweezers.Here are my rapanki lying on the street, in the rain for a week, but still smelly, I feel that they won’t get into the house (
Sister advises to open with varnish, and just pour varnish into those smelly ears to block the smell, how do you smoke, something will come of it?