Bake sourdough bread in the oven. Homemade sourdough bread
For beginners, we recommend starting a starter for rye bread first. There are many ways to prepare it. Below is a simple and effective method how to make rye sourdough. The only thing you need is rye flour, water and time (but don't worry - the starter is made from rye flour It will take too much trouble; preparing it is not a labor-intensive process).
What are the benefits of sourdough bread?
With this type of baking, fermentation of yeast and lactic acid bacteria develops in the dough. During this process, we are talking about the anaerobic decomposition of the organic substances of the flour into simpler compounds with the participation of bacteria that metabolize sugars and disaccharides into lactic acid and other products. There are effects of acidification of the dough, proliferation of lactic acid bacteria, aeration, as well as the production of carbon dioxide with the help of enzymes. During the fermentation process, the dough receives a large number of lactic acid. Everyone knows what additional lactic acid bacteria provide?
- Lactic acid bacteria present naturally in the intestines of healthy humans.
- Lactic acid inhibits the growth of pathogenic microflora, including the activity of staphylococci.
- Lactic acid prevents the spread of unwanted bacterial flora, inhibits diarrhea, constipation and indigestion.
- Lactic acid bacteria in our body are destroyed by antibiotics, alcohol and processed foods. food products. This causes abnormal processes of digestion and absorption of food.
- Lactic acid is found in fermented vegetables such as cabbage, cucumbers, apples, beans, bread and fermented drinks.
- Lactic acid bacteria present in bread starters will effectively help eliminate nitrates, nitrites and other carcinogenic compounds.
- They stimulate immune system and affect the functioning of the entire body.
- Such products will help restore beneficial bacterial flora in the human gastrointestinal tract.
- Such products can maintain freshness longer, even up to 10 days.
Rye sourdough recipe
Preparing rye sourdough will take about 5-6 days. Some bakers bake already on the third day, but it is better not to rush and let it mature well, it will be very different. Usually on day 6 you can already bake.
How to make rye sourdough – day by day
Day I
You will need:
- 50 g (about 5-6 tablespoons) water,
- 1 liter jar (the jar must first be thoroughly rinsed and scalded with boiling water).
How to make rye sourdough for bread?
The proportions of flour and water are approximate, they do not need to be measured precisely, this is not so important. The ratio of flour to water should be approximately 1:1 - that is, one serving of flour to approximately the same amount of water. Mix flour and water in a jar. The consistency should be quite dense. Cover the jar with cloth or gauze (so that air can pass through it) and let it stand in a warm place for 24 hours. The temperature at which we store it should be between 24 to 27 degrees Celsius. Rye sourdough for bread without yeast will increase the volume and bubbles will appear.
Day II
- rye sourdough from the previous day - separate half, the rest should be thrown away,
- 50 g (about 5 tablespoons) rye flour,
- 50 g (about 5-6 tablespoons) water.
On the second day you will need half of the previous day's starter, some flour and water. And, as before, mix the ingredients and let sit in a warm place for 24 hours, covering the jar with a cloth or gauze. Our rye sourdough without store-bought yeast will gradually grow and ferment.
Leaven rye dough– day III, IV, V, VI
Repeat the procedure every next day using the same proportions of flour and water. Before adding a new batch of flour, you need to take half of the previous portion and add flour and water in the same quantities as before.
On the third day, rye sourdough at home will clearly increase in volume, will have a lot of bubbles, its color will change and the smell will become more sour.
Sometimes you can even smell acetone, but this is not a sign of failure. On the third day, by and large, you can already bake. However, it is better to wait until 6 or 7 days.
Every day the yeast-free rye sourdough matures more and more. After a few days, our product of symbiosis of yeast and bacteria will change color from gray to yellow-brown. On the sixth day we have a fairly stable product suitable for baking. Sourdough for rye bread at home has a pleasant sour smell. You can compare it to the smell balsamic vinegar
. Be careful, if mold appears on the surface, do not hesitate to throw everything away; this product cannot be used.
Day VII On the seventh day you can easily bake homemade on sourdough that is already mature enough and working correctly. When starting to experiment with baking, it is recommended to bake simple bread from rye flour.
Sourdough storage
Finished product diluted in accordance with the proportions indicated in the recipe. As a rule, this is not a large amount and there is quite a lot of starter left in the jar. How to store bread starter? If you want to use it for next baking it should be stored in the refrigerator. There are several basic rules to follow when storing so that it does not spoil:
- The less starter in the jar, the better. It should be stored in the refrigerator in small quantities. Ideally, there should only be a few tablespoons left in the jar. With the rest you need to bake something or just throw it away, or give it to someone who is interested in this topic.
- Provide air access. The vessel or jar just needs to be covered with a lid, but loosely. Even in the refrigerator, air must flow to it.
- Activation before baking. Before using the starter, it must be fed again. You should remove it from the refrigerator and add about 100g of flour and about the same amount of water and stir. After about ten hours it will be ready for use. You should also remember that if you need more starter, it is better to add more flour and water just for feeding, you do not need to store a large amount of starter in the refrigerator.
- Long-term storage. The starter can be stored and used regularly for quite a long time. Of course, provided that it does not sit in the refrigerator for several months without feeding, that is, without adding flour and water.
This delicious bread ears from wholemeal rye flour. It is especially suitable for those who are just starting their adventure with yeast-free baking. It does not require kneading, just mix all the ingredients with a spoon. Moreover, it can be modified in many ways, depending on the taste you can use various additives, For example:
- sunflower seeds,
- pumpkin seeds,
- caraway,
- sesame,
- flax-seed,
- etc.
Sourdough rye bread recipe
Ingredients
- – 4-5 large spoons,
- 300 grams of rye flour,
- 300 grams wheat flour,
- 500-600 ml warm water,
- 1 large tablespoon of salt,
- 10 grams of sunflower seeds.
Sourdough rye bread in the oven - preparation
Mix two types of flour (it is better to sift), add water, salt and leaven. Add most of the seeds, reserving a little to sprinkle on the top. Knead everything thoroughly to make a smooth dough. Knead the semi-finished product with a spoon until it is quite sticky. If necessary, add more water or flour if the dough is too thick or too thin.
Place the dough in a 35 x 12 cm tin lined with baking paper, wrap tightly with plastic wrap and leave to rise for 4-6 hours (or until the dough has clearly risen almost to the edge of the tin. The dough can also be served overnight and Place it in the refrigerator overnight to let it grow there. At a lower temperature, it will grow slower and take longer.
Before baking, spray the top with a spray bottle and sprinkle with sunflower seeds.
How to bake sourdough rye bread in the oven
Heat the oven to a temperature of 240 °C. Place the pan in the oven and bake first for 10 minutes at 240 degrees Celsius, then reduce the temperature to 200 degrees and bake for about 1-1.5 hours. The bread is ready when you tap the bottom and hear a dull thud.
Useful tips for baking sourdough rye bread:
- This recipe for sourdough rye bread in the oven calls for a viscous dough that can be stirred with a spoon, it should be thick and sticky. It should not be too thick, otherwise the product will crack. baking time, and after baking it will crumble.
- When placing the dough into the pan, press it down well using a spoon or with wet hands to avoid empty air pockets inside.
- Such a large loaf should be baked for 1.5 hours, but not less than an hour. It should also be noted that these proportions are presented for a mold with dimensions of 35 cm x 12 cm. If you are using smaller molds, it is important to reduce the proportions.
- The proofing times given in the recipe are only approximate and depend mainly on the temperature at which the dough rises. The dough grows faster in summer, slower in autumn and winter.
- If rye yeast-free bread the sourdough doesn't want to grow because it's too cold, you can help it a little. The oven should be heated to a temperature of 50 degrees and immediately turned off. Place the pan in the oven, wrapping it in cling film, and let rise. After about two hours, the oven can be reheated to 50 degrees and turned off.
- The problem of baking paper sticking can be avoided by removing the paper from under the bread after about 1 hour of baking. Remove the product from the mold and remove the paper, provided that it is so baked that this will be possible.
- When you remove the paper, place the loaf in the oven again, but without the pan. Baking on rye sourdough
- can be prepared without baking paper, no matter in what form it is baked. To do this, the mold can be well greased with oil or lard and sprinkled with something, for example, bran.
The loaf should not be cut until it has cooled completely; it is preferable to cut it better the next day after baking. Freshly baked bread is moist and sticky in the middle.
These products can also be baked in a bread machine. In addition, sourdough rye bread also turns out great in a slow cooker. The choice of modes depends on the model of the bread machine and multicooker. In a multicooker, proofing can be carried out using the “yogurt” mode, if your model has it, or by turning on the heating briefly, but be careful, the starter will die at high temperatures.
Sourdough rye bread in a bread machine recipes
Using a homemade bread maker, you can easily prepare yeast-free bread. It is very convenient to proof the dough in a bread machine using the programs provided by the manufacturer; the machine itself will take care of the required temperature conditions, and you will not need to constantly monitor the temperature, as happens in the oven.
Yeast-free rye bread with sourdough recipe
- Ingredients:
- 400 g of sourdough;
- 400 g of rye flour, you can also use a mixture of wheat flour and rye flour, then the bread will look much better, since 100% rye bread is quite heavy and the taste is not for everyone;
- 160 ml warm water;
- a teaspoon of salt;
- a spoonful of sugar (you can use honey);
tablespoon rast. oils
Sourdough rye bread in a bread machine - preparation Rye bread is baked in a sourdough bread machine, just like regular bread
by leaps and bounds. We put all the ingredients in the bread machine bucket in the order provided by the manufacturer. At the end, rye sourdough is added to the bread machine. To bake bread, you can use the “gluten-free” program or the program for rye bread. The program should last approximately 4 hours. You can also bake with rye sourdough.
wheat bread
Yeast-free rye bread with sourdough recipe
- Whole grain wheat bread with rye sourdough in a bread machine
- 300 ml warm water,
- about 200 g of sourdough,
- 470 g whole grain wheat flour,
- 1 tablespoon olive oil,
- 1 tablespoon sugar,
We put all the ingredients in a bucket and set the program “bread from flour” coarse» size M or medium. The mixing, rising and baking time should be about 4 hours, depending on the bread machine you need to select the appropriate program.
Thus, if you have already mastered rye bread without sourdough with yeast, you should try baking rye or rye-wheat bread on sourdough. This is not a labor-intensive task at all; growing and feeding it will not take you too much time.
The bread turns out simply gorgeous!!! People have forgotten the taste of real bread. What we eat from stores is just ugly and has no taste, incredible taste, when bread can be eaten simply by itself, without adding it to soup or porridge.
In this recipe, I show the process of baking wheat sourdough bread in full and with all the stages. It may seem long and laborious. Not really! If you have a bread machine, this is 10 minutes maximum of your personal time. This wasted time consists of two processes:
- add 3 ingredients to the starter;
- After 1-1.5 hours, put the products into the bread maker.
But there will be a lot of photos so that a beginner can bake delicious bread the first time.
And of course one more thing: of course you should already have sourdough!!!
Stage No. 1 – revitalizing the sourdough
Since the starter is stored in the refrigerator, it needs to be revived before baking bread. To do this, take the starter from the refrigerator. I got the leaven from a friend who got it from the monastery. She's real drunk.

sourdough from the refrigerator
Pour it into a non-metallic container and add:
- 1 dessert spoon honey
You can add a spoonful of sugar, but honey has excellent fermentation properties, and this is what we need. BUT you will succeed with sugar too.

add a dessert spoon of honey
Add 5-6 tablespoons of RYE flour. You won't succeed with wheat flour. You will add wheat flour to the bread and it will be white, but you only need to add rye flour to the sourdough.

add rye flour
And lastly, pour 1 glass of warm water. The water should be warm, not hot.

pour a glass of warm water
Mix everything well with a wooden spoon. Why wooden? This is what was written in the recipe from the monastery and this is what I do. Apparently so as not to damage the bacteria...
Now the starter should stand for 1-1.5 hours in a warm place. There is no need to place it specifically near the oven, just in a cool place. During this time it will ferment and rise a little. This is what it looks like after 1.5 hours. It may not be very visible in the photo, but it is so foamy.

ready-made starter
Stage No. 2 - placing products in the bread machine
Now that the starter is ready, put the ingredients in the bread machine.
For our bread you need:
- sourdough – 1 cup (250 grams),
- wheat flour – 4 cups (610 grams),
- warm water – 1 glass,
- deodorized sunflower oil – 2 tablespoons,
- salt – 1 teaspoon,
- sugar – 1 tablespoon.
Pour/pour all this into the bread machine and turn on the “bread baking” mode. I didn’t take a photo of the bookmark because it’s all simple and not very visible at the bottom of the bread pan.
After 3.5 hours we have ready bread. You see a hole at the bottom of the bread - this is from the bread machine knife. The weight of the finished bread is 750 grams. If you want a looser bread, add a little more starter – 1 cup + 1/4 cup….
The bread in the photo is not quite snow-white. This is because I added 3 cups of wheat flour and 1 cup of rye flour. I like this better. The bread fits perfectly, soft, fluffy and very tasty!!!
If you have any questions, write in the comments and I will definitely answer.

bread for hop starter recipe
I started baking rye bread about two years ago. The first bread was kneaded from pure rye flour. It was difficult and sticky, but with the help of flour I shaped it into a cavorga, left it to proof for many hours, and then put it in the oven. I baked it for a long time, about 50 minutes to be exact. It's a pity that there are no photos. It was something. Terrible, uncooked, stone. Dasha didn’t give the chickens biscuits.
But I had the starter and I didn’t want to give up. I really wanted to revive the preparation of sourdough rye bread, as my grandmother did in the village.
So, we take the starter out of the refrigerator (it’s called a starter) and begin to “revive” it. To do this, leave it for an hour at room temperature, then add 3 tbsp. spoons of rye flour, mix, cover with a lid with holes or gauze and place in a warm place. I placed it near the battery. After 3 hours, the starter has risen well and you can start kneading the dough.
Prepared everything you need:
I do this according to the established scheme. The basis is always the same: flour and sourdough, and the rest can be changed. But this way I succeed more successfully.
Sift wheat and rye flour:

I pour the starter into it:

The starter has risen almost to the brim, so I keep it in a liter jar.

The sourdough turned out good and there was a lot of it. 1.5 cups would have been enough for me, but I ended up with 2 cups and left another 100 grams for the “starter”. Closer view of the starter:

You can see how it bubbles. For those who need lean bread, then you can also add a glass of warm salted water and knead the dough.
I will make the dough with butter. This way the bread will taste better, will not go stale for at least a week, and will not cause any bread disease.
Melt the butter (a mixture of oils) in the microwave. It turned out like this:

Dissolve salt and sugar in a glass of warm water. We add little salt, so this is the norm for our family. If I don't put any salt at all, no one will notice. Therefore, for those who like it saltier, adjust the amount of salt. Sprinkled the mold with flour.

Mix the dough. First, mix everything with a spoon, and then with your hand. You don’t need to knead for a long time; thanks to the mixture of flour and butter, the dough kneads quickly and comes off well from your hands.


I folded the edges and gave it the shape of a flattened bun. The view from below is a little strange, but finished product everything will be smooth:

Turned over and sprinkled with flour:


4 hours have passed:

You can still wait for the rise, if you have time, or you can already load it into a preheated oven. I also selected the baking mode through trial and error.
I place the pan with bread on this stone:

It's made of clay. Handmade. I don't remove it from the oven. I place the pan on it and don’t worry that the bottom will burn and the top will be raw. You can put a metal container with water. I did this before when there was no stone. I preheat the oven to 230 degrees Celsius. When the temperature is set, I load the pan with bread. During baking, the temperature is kept at 230 degrees. I bake for 35 minutes.


35 minutes have passed. Let's take a look in the oven just in case. But the smell of bread speaks for itself.
This is how the loaf turned out:

And this is the view from the bottom:

I wrap it in a towel and put it on a stand to cool.

Bread weight 1kg 200g. This is not a light loaf like in the store, but a weighty loaf.
After the bread has cooled, I cut it in half for clarity:

Here's a closer look:

In principle, rye bread is baked like wheat bread, the only difference is in the flour. Here is my wheat bread recipe: my wheat bread recipe.
And if anyone is interested in how to make sourdough from scratch, here is my sourdough recipe: my sourdough recipe.
I indicate the time from the beginning of preparing the starter until it comes out of the oven.
Cost: this is the cost of one loaf (loaf).
Cooking time: PT08H35M 8 hours 35 minutes
Approximate cost per serving: 30 rub.
Ingredients for cooking
In order to bake delicious homemade bread, we will need:
- Flour from whole grain– 100 g.
- Rye or wheat flour of the 2nd grade – 100 g.
- Mature sourdough – 30 g.
- Water – 1 glass.
The secret to good dough is any coarse flour: whole grain, coarsely ground, with bran or germ. In order for sourdough bread to come out great in the oven, it is important to avoid wheat flour premium, which is emasculated.
How to prepare the dough?
So, the flour should not be emasculated. It is better if half of the total quantity is of one variety, and the remaining part is of another. Housewives can combine different combinations, the quality of the bread will not suffer from this. First, beat the ripe sourdough into a fluffy foam, then add flour and mix everything thoroughly. It is necessary to maintain a sufficient amount of time for the mass to rise well. So, if you plan to bake in the morning, leave the dough in a warm place overnight. For evening cooking, you can make the batch before leaving for work in the morning. The complete preparation of the dough is influenced by temperature factors, as well as the grade of flour.

Ripening time for high-quality dough
To make the bread rise faster, housewives place the pan with the dough in a warm place on a low-heat stove or in an oven that maintains a temperature of no more than 32 degrees. Under these conditions, the bread rises completely in 6-8 hours. When there is no way to withstand such temperature regime and the dough arrives at a temperature of 22 degrees, its complete ripening will take place in 9 hours. If you adapt to the given conditions, then preparing delicious sourdough rye bread in the oven is as easy as shelling pears.
What should be the volume of the resulting mass at the first stage?
Few novice bakers know how many times the initial volume of dough increases. The dough should rise exactly 2 times. If at first it is difficult to navigate purely visually, you can use a container with measuring marks. In the future, everything will go intuitively. If the process seems quite complicated, you can try baking sourdough bread in the oven without dough.
Kneading dough
The second stage of the whole process begins. So, to prepare sourdough bread in the oven, let’s move on to the actual kneading. We take the following ingredients:
- Ready dough.
- Water in the amount of 1 glass.
- Bread flour – 450 g.
- Dry yeast - 0.5 teaspoon.
- Salt - 2 teaspoons.
First breakup
Many bread makers have a bowl that covers plastic cover. Therefore, for pre-fermentation, you can leave the dough right there. The first proofing time is 50 minutes, during which the mass rises well. The swelling of the base and an increase in size are noticeable to the naked eye. After right time will be maintained, you can proceed to the next stage of kneading, using salt and vegetable oil. To properly prepare sourdough bread in the oven, the recipe for which is given here, you need to stir the salt until completely absorbed, and only then pour in 2 tbsp. spoons of butter. The dough is ready when it completely leaves the sides and bottom of the bowl. The resulting bread mass looks quite impressive thanks to whole grain flour or bran flour.
The final stage of proofing
But that is not all. The resulting mass needs to sit a little longer before going to bake. Now you practically know how to cook sourdough bread in the oven, there are very few manipulations left. And if at first it may seem that this process is quite labor-intensive and time-consuming, it is not so. Having filled your hand, you can later bring the dough kneading to automaticity. So, our bread mass needs another 20-30 minutes of rest, during which you can drink a cup of coffee, check your children’s homework, or watch the latest news. We will carry out the process of forming a loaf on a smooth surface, lightly dusted with flour, using a special scraper. For the final stage of proofing, a bowl or salad bowl covered with a layer of parchment paper is suitable.

Inventing a proofing cabinet
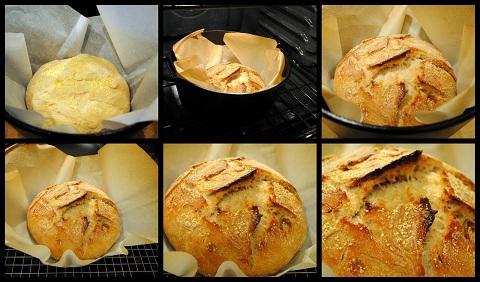
In the kitchen of an ordinary apartment, any dark, enclosed space can be used for the final proofing. A microwave works well, you just need to put a glass of boiling water inside. Sourdough bread in the oven, detailed description which you have carefully studied, will not turn out well baked unless cuts are made in a random order on the surface. But first, the future loaf is lightly sprinkled with flour. Experienced bakers use proofing under film. However, if the housewife takes up baking bread for the first time, it is better not to experiment.
Place the loaf in the preheated oven
From the moment the cuts are made, the bread should be placed in an oven preheated to 300 degrees. We will immediately reduce the temperature to 220 degrees. Of course, the oven must be turned on in advance. The baking container must have a lid. The workpiece itself is transferred there directly with the paper. To ensure rich, rather than dry, sourdough bread in the oven, the recipe recommends sprinkling the mixture with water several times before closing the lid. To do this, you can use a spray bottle. Baking time with lid - 15 minutes. Then remove the lid and leave in the oven until fully cooked.
Eating healthy and showing love to your family
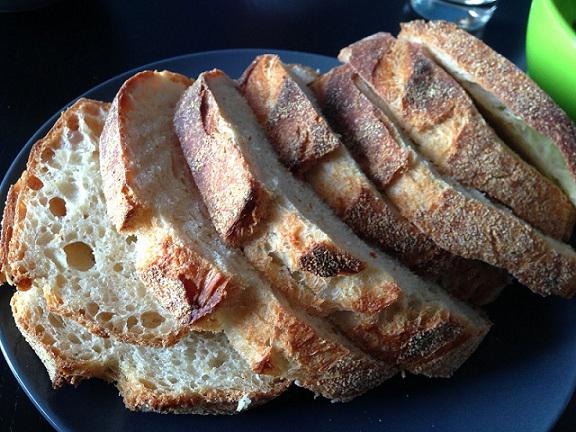
No aroma can compare with the smell of freshly baked homemade bread. Household members will be confident in the absolute love of their mother and wife. Anyone who inhales the unsurpassed smell will be intoxicated by it. And when it comes to cutting the beautiful loaf, an elastic crumb with large pores will appear. Taste qualities received culinary masterpiece so excellent that the family will ask their hostess to bake homemade bread again and again. After this perfect taste not only a gourmet, but also a completely undemanding person will not want to return to the store option. This delicious bread is worth learning how to bake.
The question arises: “Will the strong half of humanity be able to please their family, at least in their leisure time, with delicious aromatic bread?” Yes, men are great cooks, but they usually don’t like fiddling with dough, considering this process quite tedious. We believe that sourdough bread in the oven, the recipe for which is presented in this article, will become a specialty for housewives.
Alternative baking method
Now the reader is aware of how to bake sourdough bread in the oven, the recipe with photo has been studied. A logical question arises in itself: “Are there alternative ways baking? Skilled bakers, honing their skills, experimenting, are in search of best options to create this indispensable component on the table. Thus, many craftswomen have adapted a deep round tool for this task. Chinese frying pan with a convex bottom, called a wok. However, traditional, albeit more time-consuming, is baking in the oven on a stone. This method is similar to what our ancestors used when sending bread to
The starter takes several days to mature, but we only make it once. Then we simply feed it and keep it in the refrigerator until the next baking.
Leaven:
Glass of rye peeled flour and about half a glass of warm water. The dough should have a consistency similar to pancake dough. You can (but not necessarily) add a pinch of dry yeast to speed up the process.
Place in a warm place, cover, but leave a gap so the starter can breathe. Stir once or twice a day. After a few days, the starter should smell sour and bubble, the dough will become more liquid.
Then you can feed the starter for the first time. If it separates, just stir it. Add about a glass of rye flour and half a glass of water (so that the consistency of the dough remains similar to pancake dough), mix and leave for a day in a warm place (preferably 25-26 degrees). It should bubble actively.
Now let's prepare the dough.
This is also a slow process:
1. Take a glass of flour, half a glass of warm water, 100 g of sourdough. Cover, leaving a gap for air, and place in a warm place for 6-8 hours.
2. Add a glass of flour, half a glass of warm water, mix, leave for another 6-8 hours in a warm place
3. Add another glass of flour, half a glass of warm water, and leave for another 3-4 hours in a warm place.
4. Separate 200 grams ready dough into another container and put it in the refrigerator - this is our starter for the future.
If you do not use the starter for a long time, feed it once a week with flour and water. To bake the next loaf, repeat steps 1-4.
I bake very porous bread in the bread maker(I don’t like dense bread):
To the remaining dough I add flour, warm water and 1 teaspoon of salt (I select the amount of flour and water by eye, about 2.5-3 cups of flour and half a cup of water). I add a handful of crumbly rye or wheat bran. I mix everything and dump it into the bread machine.
We bake it like regular bread. If there is a mode for choosing a dark or light crust, then set it to dark.
The same bread can be baked in the oven, but it needs a form, because otherwise the dough will simply spread. If there is no mold, then it is better to make denser bread:
For 500 g of prepared dough, take a kilogram of rye flour, a teaspoon of salt, and about a glass of warm water to get a medium dough, approximately like for buns or pies.
Mix flour, salt, preliminary dough, and only then, slowly add water. There is no need to knead for a long time, just make sure that all the ingredients are mixed and there are no lumps.
Posting ready dough on a baking sheet lined baking paper sprinkled with flour, cover with a towel (you can sprinkle flour on top of the dough) and let rise.
The oven must be preheated to maximum. Before baking, generously sprinkle the loaf with water; during the first ten minutes of baking, repeat this procedure several times, sprinkling not only on the bread itself, but also on the walls of the oven.
So - warm up at 250 degrees, start baking at 220 degrees (15-20 minutes), then reduce the heat to 200 degrees and finish baking for about an hour. Readiness can be checked by sound: the crust hardens and, if you tap on it with your fingernail, there should be a dull sound.
Remove the loaf from the oven and cool.
You can cut it after it has cooled completely.