Crafts with salted dough on the theme of paska. Master class on modeling salt dough: Easter decoration
Why do we love holidays? Probably because it’s nice to prepare for them: think about gifts, set the table. But there are special, bright celebrations in our lives, such as Easter. On Easter, people give each other small Easter gifts: painted eggs, Easter cakes, baskets, Easter souvenirs. Children love to prepare crafts for Easter with their own hands; they are so interested in taking part in the preparation and work. We have selected the most interesting master classes for children and adults from a variety of crafts.
We offer Easter crafts made from the simplest materials, the purchase of which will not break your pocket; they are always available in any regular store.
This interesting basket for eggs can be easily made from a disposable plate, wooden clothespins and tape.
Cut a disposable plate with scissors:
Glue the sides together and seal the top with paper or tape. Separate the clothespins and glue them with Moment glue. We secure the top with a thin braid.
We cut strips of paper into the bottom and make a handle from cardboard. Decorate with a bow or several.
We print out the bunny template or draw it on a sheet of cardboard or thick paper. We paint on both sides, glue and place a beautiful Easter egg in the paws.
We make chickens from disposable spoons, cotton pads, and colored paper.
You can make the same funny bunnies:
More Easter-themed crafts: unusual egg plates. How beautiful they will look colorful eggs on such an original plate! Cut out 4 legs and a bunny's head from white paper and decorate the face. We put clothespins on a plate and glue paper paws to them. Place chopped white paper on the bottom of the plate.
We make a plate with chicken in the same way. Differences: yellow paper and the size of the paws.
DIY gifts for Easter
There are so many ideas for gifts for Easter, you’ll get tired of choosing. I would like to hope that our master classes will help you in your choice.
From paper
An Easter basket for the upcoming holiday can be made from an ordinary paper bag. Or from beautiful wrapping paper, maybe you have leftover candy boxes. There are many options. Multi-colored ones will look original in such an interesting basket. easter eggs or tasty treats.
To work you will need:
- Paper.
- Scissors.
- Ruler.
- Hot-melt gun or regular paper glue.
- Pencil.
If you took a bag for work, you need to cut off the bottom of it. Cut the side. Using a ruler and pencil, draw the paper into strips 3 cm wide.
We bend all the strips in half along the entire length.
We begin to weave a basket from the strips, as in the photo.
To prevent the parts from getting tangled, glue the strips to the top of the basket, then cut it all off. Glue the handle and glue the top of the basket.
We will make an interesting chicken stand for Easter eggs as a gift. There are several recipes for making dough.
Recipe for wheat flour dough:
- Flour - 2 cups.
- Extra salt - 1 glass.
- Cold water - 250 grams.
- Bag for storing products.
- 1 tbsp. spoon sunflower oil.
Recipe for products made from rye flour:
- 3 cups (300 gr.) wheat flour.
- 1 cup (100 gr.) rye flour.
- 2 cups (400 gr.) fine salt.
- 250 ml water.
Rye flour gives the figures a warm bread color. To prepare any dough, mix flour and salt, then pour in gradually cold water and mix again. The degree of readiness of the dough can be determined as follows: if the dough stretches and sticks to your hands, it means there is a lot of water in it. Therefore, you need to add more flour.
To work you will need:
- The dough is salty.
- Stack.
- Vegetable peeler.
- Toothpick.
- Manicure file.
- Black peppercorns.
- Paints, brush.
- The varnish is transparent.
- Garlic press.
Roll out the flatbread to a thickness of 0.5-0.7 cm, this will be the chicken’s nest itself. We make the side parts of the nest using a garlic press. We form a “straw” by moistening it with water.
Leave the work to dry for 1 day so that the dough holds its shape well in the future. Let's start sculpting the chicken. We sculpt the body blank. We need the chicken as a stand for an egg, which means we need to make a recess under easter egg. Let's take it round shape, make a notch, sculpt the breast and neck of the chicken. Use a vegetable peeler to feather the breast.
Insert a toothpick into the chicken's neck, leaving 1.5 cm. Connect the nest and the chicken's body. Roll out the dough, make wing blanks 1 cm thick. Draw the plumage with a vegetable peeler, attach it to the body of the chicken, moistening it with water.
Next, our task is to give the chicken a beautiful tail. We take an oval cake 0.7-1 cm thick as a basis. We make the plumage with a vegetable cutter. We trim the edges of the tail with a knife to resemble the pattern of feathers. Make the cuts neat, smoothing them with your fingers. Attach the tail to the chicken's body. Place something under your tail, such as a ball or an apple. After the product dries, remove the apple.
Roll into a round ball for the head. We shape the scallop using fingers and a stack, giving it the desired look.
To make the eyes, you need to mark their location. Make dents for the eyes with a stack. Next, use a vegetable peeler to make dents so that the eye becomes shaped.
Insert a peppercorn instead of the pupil. We make a beak and sculpt it to the head.
We fasten the head and body by putting the head on a toothpick. Fastening small strip head stability test. Decorate the chicken neck with dough feathers. You can make “earrings” for the chicken from pieces of dough.
We sculpt chickens in the same way. Don't forget to wet the parts for better fastening.
We leave the product to dry for 1-2 days, placing them in a distant place, maybe even on a closet. After a day or two, when the chicks and chickens have hardened, we finalize the work: we plant the figures on leaves, moistening the centers with water. Leave it in the air for 1-2 days. We dry the products first in air, and then put them in the oven at a temperature of 50 degrees for 1 hour. After drying, paint and cover with clear varnish.
Another option: dough figures: we make Easter bunnies, hens, chicks. You can make refrigerator magnets out of them, or you can make pendants on willow branches.
Most quick option gifts - multi-colored paper napkins and ribbons. Wrap the boiled egg in a napkin and tie with a ribbon. Can be replaced with corrugated paper.
This funny and interesting Easter chicken can be crocheted.
To work you will need:
- Yellow yarn, 100% cotton or 50/50,
- Some orange and white yarn.
- Hook number 3.
We start knitting from the body. First 7 rows:
1st - 8 sc in an amigurami loop
2nd - knit 2 sc in each loop (16 sc)
3rd - 1 sc, 2 sc, and so on (24 sc)
4th - in every third loop add: 2 RLS, 2 RLS (32 RLS)
5th - in every 4 p. add: 3 RLS, 2 RLS (40 RLS)
6th - in every 5 p. add: 4 RLS, 2 RLS (48 RLS)
7th - in every 6 p. add: 5 RLS, 2 RLS (56 RLS)
15th - knit the 5th and 6th stitches together (40 sc)
16th - we knit 2 rows without decreasing (40 RLS)
18th - knit the 4th and 5th stitches together to decrease (32 RLS)
19th - no decreases (32 RLS)
We fill the chicken with cotton wool or padding polyester.
20th - knit every 2nd and 3rd stitch together (16 sc)
21st - knit every two loops together (8 sc)
Cut the thread and carefully sew up the hole.
Wings (2 wings):
- 1st - dial 7 air. loops with yellow yarn, 1 sc in the second loop from the hook, 4 sc, 3 sc in one loop, 4 sc, conn. p.
- 2nd - 1 VP, 4 RLS, two times 2 RLS in one stitch, 3 RLS in one loop, two times 2 RLS in one loop, conn. p.
- 3rd - 1 VP, 1 sc in each loop
- 4th - 1 VP, 1 connection. p. in each loop
We knit the paws with orange yarn:
- 1st - 2 VP, 6 sc in the second loop from the hook (6 sc)
- 3rd - increase in every second stitch (18 RLS)
- 4th - row without changes (18 RLS)
Beak (1 piece)
1st - cast on 5 VP, 1 sc in the 2nd loop from the hook, half-dc, 1 dc, and 1 dc2h
Eyes (2 parts)
- 1st - 6 sc in amigurami loop (6 sc)
- 2nd - increase in each stitch (12 sc)
- 3rd - increase in every 2nd stitch (18 sc)
- The beads are different (colors are indicated next to the diagrams).
- 2 meters of thin fishing line or nylon thread.
- 2 beading needles.
We start weaving from the central row from number 1 to number 2, then we perform each part separately at different ends of the fishing line, using the table.
In the egg weaving pattern, notice the double rows (12 and 13 at the top, 13 and 14 at the bottom). For a chicken-shaped keychain in the upper part, first weave the right wing (numbers 5 to 9), and then the left wing (numbers 10 to 16). Next, we move on to the design of the head (numbers 17 to 40).
What would Easter be without Easter cakes, Easter eggs, souvenirs and angels? You can make these original Easter angels with your own hands from regular pasta. Pasta can be anything: stars, cones, spirals, vermicelli. Such angels can be hung on a willow branch or placed in Easter basket.
To work you will need:
- Pasta.
- Ribbons or sticks.
- Hot-melt gun or Moment glue.
- PVA glue.
- Balls from salt dough.
Use a glue gun to connect the head (dough ball) to the body. Next, glue the ribbon to the back. We select wings from pasta and glue on top of the braid.
Thickly coat the angel's head with PVA glue and lower it into small vermicelli or stars. This is the "hair" of an angel.
For hands, use openwork pasta. Apply glue thickly on the sides, near the wings and glue.
We paint with either simple golden paint or spray paint.
If you want to insert them into an Easter basket, insert a stick inside the pasta body and glue it, the crafts are ready.
24 August 2015
Every year, in the spring, Orthodox people look forward to Happy holiday Easter. According to the rules of the First Ecumenical Council, Orthodox Easter occurs on the first Sunday after the spring full moon (after or on the day of the vernal equinox). So Easter in 2016 is celebrated on May 1, and in 2017 on April 16, in 2018 on April 8. They begin to prepare for decorating the house in advance.
We dedicate this master class to Easter and invite you to easter decor for home with your own hands. A decorative teapot and painted eggs will become a symbolic decoration. The execution technology is accessible even to beginner “sculptors”. Sculpt we will create a three-dimensional composition with Easter motifs made from salt dough. The recipe is quite simple, follow the description and you will succeed!
You can read more about working with salt dough in this article. In it you will find answers to many questions.
Materials: flour – 300 grams, salt – 400 grams, potato starch – 2 tablespoons, water – 150 milliliters, foil, food coloring.
Execution steps:
- the dough is kneaded according to the recipe;
- modeling a teapot and eggs;
- baking salt dough.
The process of making an Easter composition
1. Add salt to cold water. Stir until half the salt grains dissolve.
2. Add flour and knead into a tight dough.
3. Place the dough on a cutting board and sprinkle starch on top. Starch is mixed into the dough; it ensures the elasticity and smoothness of the surface of future products.
4. The dough is divided into three parts, food coloring is added. To ensure that the dyes are evenly distributed throughout the dough, first the paint grains are dissolved in a few drops of water. Then the concentrated colored liquid is combined with the dough.
5. The dough is wrapped in film and placed in the refrigerator. You can start working in just an hour.
6. First, Easter cakes are made. Roll the foil into tight, thick cylinders; they will become the base of the toy baked goods. Cover the foil evenly with the orange dough and align the edges. The cakes should be perfectly shaped.
7. From white dough sculpt sugar icing, cover the top of the Easter cakes with it. They form uneven picturesque “drips” of the glaze. Eggs can be sculpted from dough of any color, because in the future they will have to be painted purple-red.
8. To make a teapot, you will have to put in more effort. The base is made of foil compressed into a ball. Then the side walls and lid of the teapot are sculpted. A rigid frame is needed for the handle and spout. Nails are inserted into the base of the teapot at different angles. They should pierce the foil and stick to it. One nail is enough for the spout. The handle is made from two nails. They are inserted parallel, and the edges are connected with thin wire, which can be bent into shapes.
9. The lid of the teapot is decorated with flowers, leaves, and small bird figures.
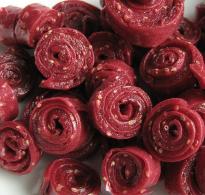
10. To make a flower, you need to roll out a thin strip of dough and then roll it into a spiral. You will get a cute little rose. The flower is placed on the lid of the teapot, then carefully pressed in the center with a wooden skewer. The rose will take an inclined position and firmly attach to the form. Use a skewer to lift and bend the petals, giving them direction. Instead of a skewer, you can use nail scissors.
11. The figures are baked in the oven for two hours., the door is not closed completely. The minimum temperature is set.
12. Baked Easter cakes do not need to be painted; they turn out very similar to the real thing. Easter baking. Eggs are painted acrylic paints, and a floral ornament is painted on top with a thin brush.
13. Teapot coated with a light blue tone. A floral theme is chosen for the drawing. The tonal range should be soft pastel.
14. The Easter composition will look great on an embroidered napkin.
Decoration Houses for Easter has become a mandatory attribute in every family. Someone does textile birds, beaded eggs, dolls. Our interior composition made from salt dough will be able to be outside the house, for example, on the street, veranda.
Especially for the site Handicraft Lessons denis_707.
In Bulgaria, for example, on this day, hundreds of large and small clay pots, decorated, are thrown from the upper floors to commemorate the Easter victory over evil. Any passerby can take a shard from a broken pot for good luck. And you can make such an Easter pot from salt dough. How? Let's figure it out now.
Easter crafts made from salt dough: Easter eggs
Salt dough lends itself to all sorts of shapes. After baking, the dough becomes hard and can be stored for years. Crafts made from salt dough can be painted, which makes the process of working with it even more fun, especially.
We will need:
- a batch or two of salt dough (recipe below)
- rolling pin
- ruler (to measure the thickness of the dough)
- knife or molds
- spatula
- plastic tubes (for holes)
- parchment paper
- spray or acrylic paint
- pens with paint
- transparent varnish for coating
- ribbon
How to make salt dough: 1 cup flour + 1/2 cup salt + 1/2 cup water. Mix to dough consistency. Roll out and cut out the “eggs”. Using tubes, make a hole for the ribbons. Line a baking sheet with parchment and bake the salt dough craft for 2 hours at 120 degrees.
Cool and decorate as you wish.
Salt dough crafts for Easter: the tomb of Jesus Christ
We will need:
- 4 cups flour
- 1 1/2 cups salt
- 2 glasses of water
- 1 tablespoon oil
This one - great way tell the children. This salt dough craft should be baked for several hours at a temperature of 120C degrees. Then cool a little before adding a cross and small figures of people to the installation.
Crafts made from salt dough for Easter: Easter bunnies
The dough for such bunnies is prepared according to classic recipe: 1 glass fine salt+ 1 cup flour + 5 tbsp. l. sunflower oil + water. We knead and step by step we make our crafts from salt dough for Easter: we start with the body - for it we will need the most big piece salt dough. Next we sculpt the ears.
We pinch off small pieces of dough for all the details we need - tail, paws, nose - whatever you want.
Any holiday can be called good reason indulge yourself in a creative activity. This also includes various crafts made from salt dough for Easter. The dough is a very flexible material, pleasant to the touch and absolutely harmless. It’s easy to work with, and most importantly, you can sculpt almost anything.
Materials
Dough:
- flour – 1 glass;
- salt – 1/2 cup;
- cold water – 1/2 cup.
Materials for working and decorating crafts:
- glue;
- round/oval plastic ball;
- brush;
- acrylic paints (orange, red, white):
- rhinestones, decorative butterflies and ladybug;
- glitter;
- corrugated strips for quilling (green and yellow).
Stages of work
To make an Easter egg from salt dough with your own hands, first we need to prepare the dough, then decorate it.
Making an egg
Preparing the dough for a decorative Easter egg is not difficult: mix flour, salt and water in specified proportions. The mass should be plastic and not too crumbly, otherwise the egg and its elements will not hold their shape.
From specified quantity The test mass will yield several eggs: 3–4 depending on their size. The dough should be divided into two parts (large and small) for one Easter craft: the base should immediately be painted orange.
This can be done without a brush by adding paint while stirring the ingredients. It is also possible to use food coloring.
First, you should take a larger piece and stick it around a plastic ball/oval, which you can take, for example, from Kinder Surprise. Thanks to the inner plastic part, the egg will be light and the entire shape will be easier to preserve.
At this stage of work, the dough needs to be rolled in your hand until it takes on the desired egg shape, correcting any unevenness.
Egg decor: flowers, butterflies and rhinestones
While the salt dough Easter egg is drying, move on to the other set aside part. You need to make three balls from it - future flowers.
We turn the balls into thin pancakes.
Gently roll the dough pieces into buds with your fingers.
It is better to paint flowers with a brush; it is advisable to apply the paint in 2–3 layers. Two pieces are red, one is white. Attach a bouquet to the side of the egg.
You can decorate the stem with rhinestones; we also add the spirit of butterflies and a ladybug.
A little sparkle would be appropriate as a decoration Easter crafts from salt dough. The product must dry completely, for which it can be put in the oven or placed on a radiator for a couple of hours.
Easter egg tray
The work will look complete if you make an egg stand with your own hands. So, what and how to make a suitable support from? It can also be made from dough, but the quilling elements also look original here. If you use wide corrugated strips, you won't need a special quilling tool.
Taking the yellow stripe by the edge that hides inside, you need to make a traditional tight roll.
It is important to do row after row without releasing pressure. The end is secured with glue.
The resulting circle needs to be slightly bent to one side to obtain a bowl-like shape. The hole should be the same size as the egg you made earlier.
We twist the green strip for quilling in the same way, only we make the roll as loose as possible.
Place the yellow piece in the green one. Then we place the Easter egg itself made from salt dough in the resulting stand.
We told you how to make an Easter egg from salt dough. For this you will need dough traditional recipe and a little imagination. The result can be very diverse - the egg can be three-dimensional or flat, bright and colorful or a neutral shade, decorated with rhinestones, beads or even fabric and ribbons - it all depends on your imagination.
And of course, making Easter crafts is useful entertainment not only for adults, but also for children, contributing to the development of their imagination, thinking and fine motor skills.
Useful video on how to make an Easter bunny from salt dough
Easter crafts made from salt dough can decorate the Easter holiday in the best possible way, making it warm and joyful. An Easter egg made from salt dough on a stand will best help convey the mood of this have a wonderful holiday. Dough crafts do not require much time to make, and the pleasure of modeling and coloring is simply indescribable. The kids are delighted, and so are the parents!
Crafts from salt dough: DIY Easter eggs
The master class of this craft will allow you to cope with the task without difficulty.
You can, of course, roll the entire egg from the dough. It will just take a very long time to dry, it will be quite heavy and may crack and swell when drying. Salt dough gives a high result if its thickness in the product does not exceed 7 cm.
Therefore, it is best to make Easter eggs - dummies on a frame. IN in this case the best option is an empty eggshell. To prepare it, you need to make two small holes in a raw egg with a sharp object - maybe a darning needle, or the tip of a knife. The inside of the egg is blown onto a plate to be used as food.
Now you should start preparing the mass for modeling. Cup regular flour(without impurities), half a cup of finely ground salt is poured into a bowl and mixed. Water is added little by little to the mixture and everything is mixed immediately. Then the dough is kneaded on the table. It should have the consistency of dumplings.
An empty shell is placed on the rolled out pancake.
Then the entire frame is wrapped in dough, the seams are smoothed out with fingers dipped in water, and the surface is leveled by rolling the egg on the table. At one end, you should make a puncture in the dough shell in the place where the shell has a hole, otherwise during baking, the air that has increased in volume from heating will cause an unsightly swelling.
From a thinly rolled piece for modeling mass, letters, flowers, berries, leaves are cut out with a sharp knife - everything that the master’s imagination suggests. Having moistened with water the side of the future bas-relief with which it will be attached to the main part, the sculptor carefully applies the applique in the right place. Using fingers dipped in water, carefully smooth out the seams so that there are no cracks.
You can emphasize the border of the bas-relief using a knife. The point should be applied with the flat side - the sharp part should be directed directly to the line where the bas-relief rises above the plane.
You can bake an egg in regular oven, but it is preferable to do this in the microwave. The mode should be set to “defrost”, time – 1 minute. This will be a test firing. To prevent the egg from becoming deformed, it is best to place it in a cup with flour. Then, at the point of contact with the plane, dents do not form on the egg.
After checking, you can putty: use pieces of soaked dough to fill the resulting unevenness and cracks. If, after all, swellings have formed, they can still be cut off with a knife or scissors so that the “repair” area can be covered with a wet mass.
Now you can “burn” the egg in a microwave oven in the usual way, but it is better to do this in several steps for 2 minutes, checking the result each time.
After “baking,” the egg is painted with watercolors, acrylics or gouache. After drying, you can coat the product with regular colorless wood varnish or spray it with hairspray.
Modeling on the theme “Easter” involves making an egg stand. It is most convenient to perform the stand in three stages. First you need to form a cup. For this, the master can take a plastic cap from an air freshener or dichlorvos. First you need to lubricate it with oil: Vaseline, sunflower, margarine. Then you need to carefully cover it with a thin layer of rolled out dough and smooth out the joints.
After spreading the dough in an even layer, you need to cut off the excess with scissors. The lid should protrude slightly above the dough. It is possible to make a “roller” along the edge of the “glass”; you can decorate the stand with a bas-relief.
The “cup” can now be placed in the oven with the bottom up. After 1 minute of “baking” in the “defrost” mode, the part is removed from the cabinet, and the mock-up lid is easily removed.
The leg rolls out of small piece dough, attach the moistened end to the bottom of the cup, the attachment point is smoothed with wet fingers. The part is again placed in the oven, which is turned on to “defrost”. Place the part with the leg up and “bake” for a minute.
For stability, a piece of dough covered with dough should be attached to the leg of the stand. metal cover. Don’t forget to moisten the attachment point and carefully smooth the seams! It is better to dry the product upside down for the first time.
After the last baking (at normal temperature), the stand-glass is painted with watercolors, gouache or acrylic paints and varnished.
This decoration can last as long as you like: a year, two or longer. But you need to remember that this product is fragile and should not be dropped. And it is not recommended to wash the egg with the stand with water.