Loaf of bread for a wedding. How to bake a wedding loaf, recipes step by step, master class
Vika DiA solemn event - a wedding is associated with ancient folk traditions. Bachelorette party, bachelor party, ransom, bridal bouquet, wedding loaf originate in the depths Slavic epic.
Wedding bread is a good symbol of every wedding. According to tradition, relatives on the groom’s side should bake a loaf of bread for the wedding. A clean married woman with a strong family and healthy children is selected in advance. It’s great if the groom’s godmother bakes the loaf. The energy of a prosperous person leads to harmony and wealth in the new family. Bread is baked on the wedding day; the married man must put it into the oven. The baked pie is hidden from the evil eye to the moment of submission. The mother-in-law should serve the loaf to the newlyweds after arriving from the registry office or the wedding on an embroidered towel (long towel), giving a parting speech.
According to signs, newlyweds who have tasted bread and salt are not afraid of family troubles and adversity!
Whoever bites off the larger piece will have power in the house
Wedding cake decorations are also traditional. Spikelets symbolize wealth, doves - love, swans - fidelity, braids - fertility. And the round shape of the loaf itself - sun symbol.

Photo of a loaf at a wedding
The best recipes for making loaf for a wedding
Below is a step-by-step recipe for a wedding loaf at home.
Required Products:
- 1.2 kg flour;
- 500 ml milk;
- 5 eggs;
- 150 gr. Sahara;
- 2 teaspoons of powdered sugar;
- 1.5 teaspoons of vanillin;
- 400 gr. butter;
- 3 packets of yeast;
- 4 tbsp. spoons of honey;
- 1 tbsp. spoon of salt;
- grease for golden brown crust: 1 egg, 1 spoon of milk, 1 spoon of melted butter.
Let's start cooking:
- Beat sugar and eggs.
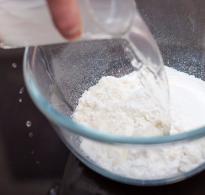
- Combine milk, heated to 36 degrees, with whipped mass, butter and salt, mix. Add yeast, stir again. Add sifted flour. Sifting enriches the flour with air and affects the quality of the future product.
- Knead the dough thoroughly until it no longer sticks to your hands.
- An indicator of good kneading is a homogeneous, smooth dough. Place in a warm place, cover with cellophane or a towel to prevent it from drying out for 1.5-2 hours.
- Knead the risen dough again. Separate a fourth part for decorations, and form a ball from the larger part. Add a raisin or a coin for good luck to the newlyweds.
- Line a baking sheet with parchment paper and place the dough on it. Give it a round shape. Turn on the oven at 200 degrees. Be sure to place a bowl of water on the bottom of the oven. Let the oven preheat and let the dough rest for another 10 minutes.
- Brush the surface of the product with the prepared mixture to form a golden, glossy crust.
- Prepare your decorations. To do this, roll out the dough into a thin layer, cut out swans, leaves, flowers, and berries with a knife or molds. Braid your hair from the dough, place along the edge of the loaf. To keep the jewelry securely, moisten it with water.
- Place in the oven.
- Check the product after 30 minutes of baking. Rotate to ensure even baking. Residence time in the oven is up to 50 minutes.
Take a dish, cover it with a towel, remove the baked bread from the oven onto the dish, cover the top with a towel or napkin, let cool. Sprinkle with powdered sugar or vanilla sugar.
We invite you to familiarize yourself with a master class on making a loaf of bread with your own hands:
A video of preparing and decorating a loaf for a wedding will help you visually create your own culinary masterpiece!
It is also possible to bake a loaf of bread in an electric oven.
Bakeries offer to order for a special event, but it is possible to prepare a loaf of yeast dough at home, the main thing is maintain proportions ingredients and put effort into kneading.
Here a simple recipe for baking loaf with dry yeast:
- Melt 50 gr. natural butter. Separate the whites and yolks of 4 eggs.
- In 6 tbsp. spoons of milk at room temperature, stir 2 teaspoons of sugar, add 10 g. dry yeast (1 sachet), beat 4 yolks thoroughly with 3 tbsp. spoons of granulated sugar, combine with yeast mixture.
- In a separate bowl, beat 4 egg whites with 1 teaspoon of salt until foamy. Combine ingredients: pour 4 tbsp into a dish. premium wheat flour, add egg whites, butter and yeast mixture, mix thoroughly. Knead the dough until it stops sticking to your hands.
- Separate a fifth of the dough for decorations, form the rest of the dough into a ball, and place on a baking sheet lined with parchment paper.
- Make decorations and place them on the base. Sprinkle with water, let stand for 3 hours in a warm place, not allowing it to dry out. Cover with cellophane or a towel, sprinkling periodically with water. After 3 hours the dough will rise. Preheat the oven to 200 degrees in advance, place a container of water on the bottom, bake until golden brown on the bottom tier.
- As soon as the loaf reaches the desired blush, reduce the temperature to 180 degrees, cover the top of the loaf with foil, move it to the middle tier, and bake for another 1 hour.
- Carefully remove the bread, brush the crust with sweetened water, place on a plate, cover the bottom and top with towels.
After the loaf has cooled, meet the newlyweds.
Cooking and baking a loaf is not difficult: it takes 4-5 hours, of which 3 hours the dough rises on its own!
Subject to the rules of kneading, the time of raising and resting the dough, the wedding cake will be soft.

Photo of loaf dough
To amaze the wedding guests, we bake a festive two-tier loaf. Take all the products from the list above in double quantity.
Divide the dough into 3 parts:
- to the bottom;
- upper tiers;
- decorations.
We bake both parts at the same time on two baking sheets. After 30-40 minutes, when the crust is browned, use a knife to remove the top from the bottom with a diameter equal to the top part, lubricate with water, install the second tier. Place in the oven until done.
Decorating a loaf at home - manifestation of fantasy and skill! Be sure to make a stand for the salt shaker in the center.

Photo of wedding loaf decoration
To make spikelets for a loaf:
- Roll the sausages 2 cm thick, cut them, simulating ears of wheat.
- Cut out the leaves from the rolled out thin sheet.
- Bunches of grapes are small balls.
- Making swans from dough is easy. Roll 2 sausages 6 cm long and 1.5-2 cm in diameter. Stretch the dough to make a small ball at the beginning (the head), a graceful neck in the middle, another ball further (this is the body).
- We form the eyes, beak, wings, tail, and bend the neck.
For step-by-step design, see the video recipe for a wedding loaf at home with your own hands:
You can make decorations from white dough. It will be unleavened dough like for dumplings or protein dough.

Photo of decorating a loaf at home
White dough recipe to decorate a wedding loaf:
- 1 glass of water,
- 3 cups flour,
- 1 teaspoon salt.
Need to: sift the flour, add salt, water, knead. Roll out into a thin layer and cut out decorations. Place on the oven-prepared item and bake.
Protein dough for decorating loaf:
- 4 squirrels,
- 400 gr. flour.
Need to: sift the flour thoroughly blend in a blender with proteins. The dough will become elastic. Now make jewelry from it. They will remain light in color when baked.
Why does the loaf settle after baking?
Cooking tips:
- Opening the oven early for the first time. Place the bread in the oven; you can open the door no earlier than after 20 minutes.
- Preheat oven 10-15 minutes.
- Be sure to sift the flour. This is 40% success. The point of sifting is to enrich the flour with oxygen, then it will react better with the yeast.
- Don't be lazy to knead thoroughly. It’s hard physical work, but the quality and splendor of the cake depends on the duration and intensity of the kneading.
These are the reasons why the donkey loafs. In order not to lose face on the eve of the celebration - bake a trial version. This way you will take into account the nuances and on the eve of the event you will bake an elegant baked product.

Wedding loaf at a celebration
DIY salt dough loaf
In order to prepare salt dough for sculpting, you need to prepare:
- 1 tbsp. fine salt;
- 2 tbsp. flour;
- 8 tbsp. l. sunflower oil;
- 250 ml water;
It is necessary to first stir all the dry ingredients in a deep container, then pour in the sunflower oil and water. If you want the dough to acquire a certain color, then carefully stir in carrot or beet juice. The dough will be soft and pliable!

Photo of salted dough for making a loaf
To decorate a loaf with your own hands, remember that a braid or ornate strand around the edge is a must. This decor looks elegant, symbolizes happiness and wealth, and prevents the baked goods from blurring. Weave it from separate bundles and place it along the edge. The surface of the upper part of the loaf is filled with dough figures.
When decorating a loaf with modeling, in addition to traditional symbols, the following are used:
- stars;
- flowers;
- birds in the nest;
- rings;
- cones;
- blades of grass;
- bunches of grapes;
- viburnum berries;
- thin braids;
- flagella;
- stripes.
Elegant loaf for a wedding- a symbol of a new family, joy and prosperity, gives newlyweds unforgettable moments that will be remembered for a lifetime. Be sure to decorate such a special event with it.
20 June 2018, 10:08 Lyudmila Domashnyaya, Konstantin Larkov | 09.10.2015 | 35533Lyudmila Domashnyaya, Konstantin Larkov 09/10/2015 35533

I’ve been baking black and white bread myself at home for a long time, but I still don’t know how to decorate the loaf. My son is getting married soon, and I decided to bake one of the main attributes of this holiday myself. As it turns out, it’s very easy to sculpt beautiful patterns on the top of a flour product.
It’s a great thing when baked goods please not only with their taste, but also with their appearance. An intricately decorated loaf can become the main “hero” of a holiday table or an unforgettable gift for people dear to you. However, you can decorate homemade buns, bread and any other baked goods with dough decorations.
Loaf dough
First you need to bake the base. It's not difficult to make. Prepare the following products:
- a bag of dry yeast weighing 8-10 g;
- 1 tbsp. warm milk;
- 1 egg;
- vanillin;
- 80-100 g butter;
- 2-3 tbsp. flour;
- 0.5 tbsp. Sahara;
- 1-2 tbsp. l. sunflower oil for greasing the baking sheet;
- 1-2 tbsp. l. milk or drinking water diluted with sugar, or 1 beaten egg for greasing the loaf.
Take 1 tbsp. warm milk and pour it into a deep bowl. Add 1.5 tbsp. l. sugar, add yeast and mix everything thoroughly. Now add 1 tbsp to the resulting liquid. flour. The dough should be the same consistency as for pancakes. Leave it alone for 1 hour.
After this time, put softened butter, vanillin on the tip of a knife, an egg, 1 tbsp. flour, add the remaining sugar. Knead soft elastic dough. Leave it in a deep bowl for another 1 hour. The size of the container should be chosen taking into account the fact that the dough will rise and double in volume.
While you have time, start making “decor”.
Decoration of a wedding loaf
For this you will need: unleavened dough (like dumplings), mixed with flour, water and salt. Adjust the number of components at your discretion - the dough should be tight and elastic. Also prepare a rolling pin, knife and glass for cutting out circles.
Let's look at how to make basic elements out of dough.
1. Do you want to make a salt shaker from the dough on the top of the loaf? Nothing could be easier! Such figures are used to decorate special loaves – wedding loaves or those with which guests are greeted.
Cut a long, not very wide strip from the rolled out dough. Cut it lengthwise into 3 parts without cutting all the way through (photo 1). Weave the strips of dough into a braid (photo 2).
On one side of the braid, cut off a little dough, making the edge pointed. On the other side, cut a small triangle in the middle (photo 3).
Now align both ends so that they connect without gaps (Photo 4).
2. Now let's make a chamomile. Cut out a circle from the rolled out dough (photo 5), make several deep cuts along its edges at a distance of 0.5 to 1 cm from each other.
Lightly press the edge of each sector with your fingers, giving it a petal shape (photo 6).
Roll a small piece of dough into a ball and place it in the center of the workpiece in the form of a chamomile core (photo 7).
In a similar way, you can make two parts and place them on top of one another - you will get a three-dimensional flower. You can make even more details by reducing the diameter of the circles.
3. To make a cornflower, cut out a circle from the rolled out dough, make 5 cuts along the edges, dividing into 5 parts. In this case, one part should be twice as large as the rest (photo 8).
Then lightly pinch the larger section at the base (Photo 9).
Make shallow cuts on the base in the form of a mesh (photo 10), and on the petals - shallow dots and dashes-patterns (photo 11).
4. The next figure is called “aquilegia”. Cut out 5 circles from the rolled out dough, fold each in half (photo 12).
Connect the ends of the resulting semicircles (photo 13).
Place the petals close to each other on a flat surface so that they touch in the center (photo 14).
Roll a small piece of dough into a ball and place it in the center as a core (Pic 15).
Now form a ball from the yeast dough, place its shape, and decorate the top with the figures you just made. Don't forget to brush the dough with beaten egg or milk and sugar. Bake the loaf at 180°C. When it browns, remove from the oven.
Ceremonial ritual bread can be decorated not immediately, but 15 minutes before it is ready. In this case, the figures are guaranteed not to blur and will be lighter than the main product. It is best to attach them using a raw egg.
My loaf turned out to be small, but fabulously beautiful. If you want to bake a larger product, increase the amount of ingredients.
It is difficult to meet a wedding that did not include a traditional loaf. It can be purchased ready-made, ordered from a bakery, or baked at home. It is most preferable to make your own wedding cake, since during the entire process you can fill it with positive energy and program it for further well-being. So, how to bake a beautiful loaf for your wedding with your own hands?
The sacred meaning of this pastry
Since ancient times, the loaf has been perceived not as ordinary food, but as something mystical, containing a sacred meaning. It was used in some rituals and celebrations. To do this, the loaf was made in the shape of the sun, from wheat flour and decorated with certain figures and symbols that carried a certain meaning.
The loaf occupies an important place in the wedding ceremony. He served as a talisman for the young family, protecting them from possible troubles and misfortunes. In addition, it was presented to young people as a symbol of fertility, good luck and future family well-being. Fortunately, the tradition of presenting newlyweds with a wedding loaf has survived to this day.
Wedding cake making traditions
In order for the cake baked for the wedding ceremony to bring prosperity and prosperity to the house, the following conditions must be observed when making it:

Required ingredients for the dough
To prepare the loaf dough, you need the following ingredients:
- premium wheat flour - 1.5 kg;
- fresh chicken eggs - 10 pcs;
- white sugar - 1 cup;
- dry yeast - 20 g;
- cow or goat milk - 0.5 cups;
- butter - 100 g;
- salt - 2 tsp;
- ground cinnamon (to taste).

All ingredients must be fresh and of high quality. The recipe for making the dough is quite simple and does not require special skills. The dough kneading process itself takes approximately 30–40 minutes.
Step by step recipe
Today there are many different recipes for loaf. They differ mainly in their ingredients and their quantity. Below is the most popular and affordable recipe that you can use at home.
Step-by-step instructions for preparing dough and baking a loaf:

Decoration Features
The remaining part of the dough must be rolled out thinly and the decoration cut out from it. To do this, you can use a regular kitchen knife or special molds.
Dough decorations have the following meanings:

To make complex and massive jewelry, it is recommended to watch any special master class that can be found on culinary sites on the Internet.
However, if you do not have certain skills or abilities, you should not be too clever with the decor. In this case, you can make small and light decorations that will give the wedding cake a beautiful appearance.
Decoration from dough “Leaves” - video
It is quite possible to bake a loaf for a wedding so that it turns out to be tasty, fluffy and beautiful. To obtain a similar result, it is recommended to use the following tips:

The tradition of presenting it to newlyweds has not changed over the past few hundred years. The wedding cake is placed on a special towel, and a salt shaker is placed in the middle or salt is poured into a special depression made in advance in the dough.
Most often, the bride embroiders the cake towel herself, decorating it with special symbols of everything she wants to see in her family life.
The pie is served after the wedding ceremony or registration at the registry office. It is usually presented by the groom's mother. Before this, the parents wish the newlyweds a happy family life and prosperity.
The bride and groom thank you for the rich treat and congratulate you, kiss the loaf three times and take a bite from it. It is generally accepted that the one who bites off the largest piece will be the head of the family.

The remains of the wedding cake are distributed to the guests. It is believed that if someone did not try this treat, then they were not at the wedding at all. As a rule, a two-kilogram pie is enough to feed about 60 invited guests.
One piece of the wedding loaf is left, dried and hidden in the house. It is a talisman that protects the family from various misfortunes and unexpected troubles. It is stored throughout its life in a place inaccessible to other people, children and animals.
Baking a loaf at home can take a lot of time and patience. We remind you that its production should be trusted exclusively to married women who are in a successful marriage and have children. They will fill the wedding cake with the energy of family happiness and prosperity, and will also attract success and prosperity to the newlyweds’ home.
Carefully clean the room in which you will bake the loaf, put on a clean dress and only with bright thoughts and an open soul begin baking the wedding loaf!
Prepare the main dough for the loaf:
First we awaken the yeast. Crumble the yeast into milk (100 ml), add 2 tbsp. sugar and 3-4 tbsp. Stir the flour and place in a warm place. When the yeast foams, breathes and rises like a cap, you can knead the dough.
Scramble the eggs in warm milk (200 ml), add salt, remaining sugar and melted butter, pour in the yeast, stir. Don't forget to add vanilla.
The flour must be sifted twice and then gradually added to the milk-egg mixture, stirring with a whisk. When you add all the main flour, your dough will be lumpy, sticky and very soft. Now comes the most time-consuming, but extremely important part, kneading the dough. Sprinkle 50g of flour on a clean table, lay out the dough and start kneading it. You need to knead like this. You grab the dough from below and pull it towards you, fold it in half. You grab the dough again, but turning it 90 degrees towards you, pull it back in the same way, fold it in half and continue kneading it in this way. As you knead, the dough will become more uniform, smooth and less sticky. If necessary, dust the table with flour, but do not add excess. The dough should be kneaded for at least 30 minutes. You say it’s long, but it’s long, say it’s difficult, but it’s not easy, say it’s possible in a food processor, I’ll answer it’s possible, but not for a loaf. You need to give a piece of your heart to the loaf, because we cook for children so that they are happy and share your loaf on difficult days.
The dough has been kneaded, it has become very elastic, smooth and practically non-sticky, transfer the bun to a large pan, wrap it in a blanket and leave it in a warm place to rise.
While the dough is rising, you need to start decorating the holiday bread.
Knead the dough from the proteins and flour until it becomes homogeneous and smooth.
Let it rest for 10 minutes and start making jewelry.
These can be roses, cornflowers, daisies, spikelets, leaves, swans and whatever your heart desires.
Decorating dough dries out very quickly, so keep it in a bag or under a bowl, cutting off small pieces of dough to work with. Place the completed decorations on the board, covering with a damp towel.
While you are preparing the decorations, you need to knead the main dough once and, after rising again, dust the table with flour and collect the dough into a bun.
Separate one third of the dough from the bun into a braid along the edge of the loaf, and from most of the dough roll into an even bun, place it on a baking sheet, first covering it with baking paper in two layers and greasing it with vegetable oil.
Now we do everything quickly, confidently and with a creative approach. From the dough that we separated into a braid, we roll out two or three flagella, weave a braid or rope, and place it around the bun. If you don’t get an even braid the first time, you can divide the dough into equal pieces weighing 30g. and roll into balls. Place them around the bun and place the future loaf in a slightly warm oven. To prevent the loaf from breaking during baking, use a pastry brush to moisten its surface with water, preventing a crust from forming.
When the loaf has tripled in size, grease its surface with a mixture of yolk and 1 tbsp. water. Place decorations over the entire surface of the loaf; they stick very well to the yolk. Then all decorations must be greased with protein. Where you want to make it more ruddy, brush it with the yolk mixture. Secure decorations that are voluminous, like roses, with toothpicks, otherwise they will slip and fall during baking.
Preheat the oven to 190 degrees, place a container of water below and only then send the loaf to bake. To prevent the dough from breaking, spray the oven walls with water and close it immediately so that the steam remains inside. It is advisable to repeat the moistening a couple of times at the beginning of the baking process, and when the loaf of color appears, reduce the baking temperature to 160 degrees. If the top of the loaf starts to get too brown, cover it with foil and continue baking until it's nice and brown.
The loaf is baked for 1-1.5 hours. Focus on your oven.
Place the finished loaf on a wire rack or towel, cover with a towel and cool.
All you have to do is wait for that happy day when your children get married and give them a loaf of bread, with a piece of your soul and warmth from your heart.
An excellent solution is to create a wedding loaf with your own hands. In this way, you can emphasize the individuality of the event, remember and honor the traditions associated with this process. The main thing is that the preparation of the treat itself carries a good message, the product is made with love and a good mood.
Basic moments
The tradition of baking a wedding loaf came to us a long time ago and is firmly rooted. But lately, more and more often, people are trying to relieve themselves of the responsibility of preparing treats with their own hands; they order the product from pastry shops. However, the decision to bake a loaf yourself is symbolic. No one will have such a unique and original delicacy. In addition, the cooking process itself has certain mysterious and spiritual moments that unite people and create the right atmosphere for the entire holiday.
There are certain nuances that should be taken into account when preparing a wedding loaf. Here are the main ones:
- Providing such an important process as preparing the main wedding delicacy is necessary for successfully married women who have been happily married for a long time. You should not take part in cooking while diluted or empty. That's what tradition says. We also recommend that you read.
- The best time to bake a wedding loaf with your own hands is the eve of the holiday. The dough will be fresh and tasty.
- You can rely on the skills of experienced housewives or watch a master class. Follow the step-by-step guide, rehearse in advance and calmly and easily bake wedding bread on the appointed day.
- The size of the baked goods is associated with the family’s position in society and their status. Therefore, a do-it-yourself wedding loaf is made large and weighty, several floors high. After the newlyweds have tried it, they distribute pieces to all the guests who want it. For single girls and boys, receiving such a treat was considered a sign of an imminent wedding. Some spouses decide to take the wedding loaf to church. You can also make mini-copies of the main treat for children and special guests of the holiday who were unable to attend.

Decoration options
Decoration for a wedding loaf can be done in different ways. If you immediately attach it to the main round of dough, then all the beauty may end up with unclear contours. It is better to add decoration 10 minutes before the end of baking. This way, it will have time to bake and remain crisp and beautiful.
There are several options for how to decorate a wedding loaf. Each of the elements contains a mysterious meaning and symbolism:
- A dough braid made in a circle symbolizes the sun, and with it prosperity for the young couple. Making the element is not difficult: take three flagella of the same thickness, fasten them in the shape of a braid and apply them to the very edge of the delicacy.
- Viburnum berries. Clusters of fruits have long symbolized the love and wealth that a new family promises. You need to form small balls from the dough, cut them in half, leaving only hemispheres for decoration. Secure them to the surface of the wedding loaf using a toothpick in the shape of clusters. You can also sculpt leaves and attach them side by side. It's simple: make a diamond shape and use a knife to make small cuts along the edges. Leaves, in turn, speak of youth and freshness in relationships.
- Wheat. Ears of corn are the easiest to make. You just need to mold the flagellum, on one side it should be thicker, on the other thinner. Place it on the wedding loaf and carefully use a skewer to make grooves that repeat the pattern of ears of wheat. This pattern symbolizes fertility and prosperity, which is very important for starting a family life.
- Beautiful roses. Flowers are a sign of love and devotion. They can be secured throughout the free space, on top or on the side of the product. Roll out several identical thin circles of dough. The first one is rolled up, the second and subsequent ones go around it. The petals need to be bent back a little, this will make the flower more beautiful and more voluminous.
- An important point and at the same time a kind of wedding decoration is the recess for salt. It should be clearly in the middle of the product, small and neat. When a loaf is brought out to the newlyweds, they first take turns plucking a piece and then dip it in salt. Then they feed each other. It is believed that this is the last time when the spouses eat a pound of salt, now a happy and sweet life awaits them.

Tricks and subtleties of cooking
How to bake a wedding loaf at home so that it turns out not only beautiful, but also tasty - every housewife should know this. There are various tricks and tricks, following which it will be very difficult to spoil the impression of the delicacy.
- To make the decorations on the loaf look contrasting with the main product, after baking, grease the round loaf with yolk and the top with egg white.
- To obtain darker elements, rye flour is mixed into the dough.
- Decorative elements can be made from salt dough. It is pliable and molds well. Flowers, figurines of swans, and wedding rings are created from it.
- In order for the figures to stick well to the product, they need to be lubricated with water, and the surface of the treat is also lubricated with it.
- Large elements, such as roses or swans, can be secured to the base using toothpicks.

We cook ourselves
There are simple and delicious recipes for preparing a wedding loaf. Having mastered this technique, you will be able to create similar treats for any occasion with your own hands. The following are recommendations on how to prepare a wedding loaf step by step.
Approximate composition of products:
- flour – 7-8 glasses;
- dry yeast – 20 g;
- softened butter – 100 g;
- milk (you can take water or a mixture of water and milk) – 0.5 cups;
- eggs – 10 pcs;
- salt and sugar to taste, cinnamon and citrus zest if desired.

Recipe:
- The step-by-step recipe says that you first need to prepare the dough. To do this, warm the milk a little, but do not boil.
- Add a couple of tablespoons of sugar and dry yeast (10 g).
- Stir and gradually add flour. The consistency of the resulting dough is like pancakes. The dough is left warm for an hour. It needs to be sprinkled with flour and covered with a napkin to prevent wrinkles from forming on the surface.
- Separate the whites from the yolks. The latter are ground with sugar (several tablespoons). The mixture is added to the already suitable dough.
- Pour flour into a large, convenient pan, make a well and pour the dough into it. Add butter, melted in a water bath, add salt and carefully add foam from the proteins.
- Mix the dough, place it on the table surface and knead for half an hour. This may require more flour. The result is a smooth dough that does not stick.
- The finished dough should be left again in a warm place for 1.5-2 hours, covered with a towel.
- From the main part you need to form a loaf, leaving the dough for decorations.
- The base is placed on a sheet of parchment lying on a baking sheet and sent to the oven.
- Elements that serve as decoration are completed while the loaf is baking. It is better not to lay them on the product right away, otherwise they will lose their shape. Also, you need to coat the treat with egg white or yolk not at the beginning, but at the end of the baking process.
The loaf should be baked in the oven at a temperature of 200°C on the lower rack. Once the top of the product begins to brown, cover it with foil to prevent it from burning. And continue baking until completely cooked. While the oven is running, do not open the door, otherwise the dough will fall out. After turning off, you need to open the cabinet and let the loaf stand for another 20 minutes. Then transfer to a dish lined with a towel. You can lubricate the treat with sweet water. This will soften him up.