Do-it-yourself goldfish from salt dough. needlework club
A money fish in the house is an amulet that contributes to your well-being, a goldfish, as everyone knows from childhood, fulfills all the wishes of the fish owner. It would be nice to have all these copies that provide a carefree existence. Why not make your own fish from salt dough ?!
Salty dough. Recipe
Even if you have a very strong desire, you cannot do anything if there is no source material. Even fish made from salt dough will remain just a pipe dream if you don’t have this very dough. So, let's start the master class with kneading and studying the exact recipe. Moreover, the whole process will take only 5-10 minutes.
The video shows the simplest, most affordable and reliable recipe for salt dough, from which you can then make original crafts with your own hands. As you watch, you will see that the kneading master class jumps to the newspaper for a few seconds. The dough is kneaded on a newspaper bed. It's better not to do this. Printing ink is toxic.
Some experts replace the starch that is part of the salt dough with the usual wallpaper paste. This can be done if you know for sure that your craft will not be eaten by anyone close to you.
That is why we recommend using only food coloring to color the dough with your own hands in various colors. They must be added to the water before kneading the salt dough. With such an edible plastic material, your baby can create masterpieces without the risk of poisoning.
Such DIY handmade material can be stored for a month. During this period, it will not lose its plastic properties if you put it in a plastic bag and place it in the refrigerator. Yes, and the dough is easier to work with if it has just been taken out of the refrigerator.
money fish
We have prepared the material from which the money fish will be molded.

In addition to it, we need:
- cardboard;
- foil;
- rolling pin;
- Scotch;
- stacks;
- caps from ballpoint pens;
- coins;
- tassel;
- water;
- dyes;
- braid.
Master class on sculpting fish


gold fish
A craft that you can do with your own hands by watching a master class on a video cannot be eaten, even if you are very hungry. Aniline and other chemical dyes are used for its coloring.
Salt dough goldfish looks great not only as a decorative panel on the wall. It is also an original pendant on the chest, a strong amulet and almost food.
Sun and moon
Based on the work of the artist Dan Morris in the primitive style, crafts from salt dough moon fish and sun fish are interesting. They are painted with acrylic dyes using brushes of different thicknesses. The plot can be anything.

Drying
It is not necessary to place crafts in the oven. You can leave them to dry at room temperature for a few weeks. Deadlines may be slightly longer or shorter. It depends on the humidity of the environment.
If you are in a hurry, leave the salt dough fish for 2-5 hours, and then put it in the oven:
- to the very top and lowest temperature for an hour;
- in the middle of the oven for half an hour at medium temperature;
- move it down an hour and turn on the maximum temperature.
Being a sculptor is fun! Creating even a small sculpture is uplifting. And the most interesting thing is that you do not need to be a professional and buy clay, you can become an original artist. Salt dough products have long been included in the list of the most interesting handicrafts. Some masters reach such heights in their products that it is difficult to distinguish them from clay ones. The secret lies not only in experienced hands, but also in the dough recipe. A fish made from pre-prepared salt dough can become both an independent product and the result of spending time together with a child.
We sculpt a bright and original fish from salt dough with our own hands
This article will show a detailed master class for those who are interested in this technique.
Now in stores there is a huge selection of material and kits for modeling. The basis for modeling can be divided into three categories:
- Natural clay.
- Synthetic mass for modeling.
- Salty dough.
The test is more convenient to do with young children. It is no longer scary that he will swallow some kind of chemistry, and the quality is very suitable for tiny hands.
What does it take to make a good recipe? How to make sure that the finished product does not crack? And what other secrets do skilled craftsmen keep?
Recipe:
Anyone can make their own salt dough with ingredients they have at home. For a classic recipe you will need:
- Salt is small.
- Wheat flour.
Already these three ingredients are enough for simple fun with children. Salt and flour are taken in a one-to-one ratio, 300 g of salt and 300 g of flour, 200 ml of water, a faceted glass is an excellent container for measuring the required volume if there is no measuring utensils. In the absence of fine salt, coarse salt can be ground in a coffee grinder. The smaller the grains, the more elastic the dough and the less likely it is to crack. It is better to cool the water by placing it in the freezer for a short while. From this amount, a fairly large lump of dough is obtained. For convenience, you can reduce the number of ingredients in equal proportions.
Salt must be dissolved in water. Next, add flour, but not all at once. It is better to add flour and add water gradually, as needed. But for a good hostess, this is an easy task. Intensive kneading improves the quality for modeling. The dough should immediately be removed in a plastic bag to prevent the formation of a dry crust. She is unsuitable for modeling.
For products of finer work, you need to change the composition of the dough. Adding 1 tablespoon of starch will add elasticity to the dough. PVA glue will give strength if you need to keep the product as long as possible. For fun, it's worth trying both recipes to feel the difference, which immediately catches your eye.

To get started, you need to search the Internet for your favorite photo. It will become a sketch of your product. A novice master can redraw the shape of a fish directly from the computer screen, so as not to waste time on careful, accurate redrawing. The drawing is a template for further details. Now "break" the pattern into patterns. Separately, you need to cut the following parts:
- General body shape.
Everything is clear here, the image circled in pencil is the main template.
- texture
The presence of an interesting pattern on the scales can be shown in several ways. In this case, the author applies and slightly presses a textured woven napkin. Scales can be cut in the form of parts separately and applied to the base. Holes of different sizes look good, arranged in a chaotic or harmonious order. In general, it is the small details of the decor that distinguish interesting works from the general mass. Add coins, beautiful beads or beads and your fish will become magical.
- Volumetric details
Fins, and a tail, and any volumetric decor can be attributed to this category. In overseas fish, these are the most colorful parts of the body. Therefore, it is worth showing all their uniqueness on a dough product. Do not skimp on fantasy, it will tell you what and how to decorate. In this case, the author decided to use the decoration with flowers. In the same way, you can process the eyes, if, as planned, they are not cut out.

The dough rolls out neatly. Care must be taken to ensure that there is a uniform thickness, otherwise this may lead to problems when gluing or drying. The parts are superimposed on each other, lubricating the gluing joints with a brush. After that, it is placed on a flat surface and sent to dry. If patience allows, you can also dry it outdoors. The dough is perfectly self-hardening. If you need to speed up the process, you can send the workpiece to the oven, heated to seventy degrees. If you used plastic decor, then it is better to leave the workpiece to dry on its own.

The fish is dry and needs to be very carefully processed with fine-grained sandpaper and walked with a dry brush to remove all the dust that has formed. It remains only to paint the product. Any paint can be used. But acrylics are the best for this job. They dry quickly. They are not washed off with water after drying, i.e. it will be easy to wipe the dust off the product with a slightly damp cloth. Non-toxic and durable in use. This means that a wonderful fish made from salty dough, convenient for modeling, will delight the eye of its creator for a long time.
Video on the topic of the article
A video master class on sculpting fish from salt dough can be viewed below:
A money fish in the house is an amulet that contributes to your well-being, a goldfish, as everyone knows from childhood, fulfills all the wishes of the fish owner. It would be nice to have all these copies that provide a carefree existence. Why not make your own fish from salt dough ?!
Even if you have a very strong desire, you cannot do anything if there is no source material. Even fish made from salt dough will remain just a pipe dream if you don’t have this very dough. So, let's start the master class with kneading and studying the exact recipe. Moreover, the whole process will take only 5-10 minutes.
The video shows the simplest, most affordable and reliable recipe for salt dough, from which you can then make original crafts with your own hands. As you watch, you will see that the kneading master class jumps to the newspaper for a few seconds. The dough is kneaded on a newspaper bed. It's better not to do this. Printing ink is toxic.
Some experts replace the starch that is part of the salt dough with the usual wallpaper paste. This can be done if you know for sure that your craft will not be eaten by anyone close to you.
That is why we recommend using only food coloring to color the dough with your own hands in various colors. They must be added to the water before kneading the salt dough. With such an edible plastic material, your baby can create masterpieces without the risk of poisoning.
Such DIY handmade material can be stored for a month. During this period, it will not lose its plastic properties if you put it in a plastic bag and place it in the refrigerator. Yes, and the dough is easier to work with if it has just been taken out of the refrigerator.
We have prepared the material from which the money fish will be molded.

In addition to it, we need:
- cardboard;
- foil;
- rolling pin;
- Scotch;
- stacks;
- caps from ballpoint pens;
- coins;
- tassel;
- water;
- dyes;
- braid.
Master class on sculpting fish
- Prepare and lay out on the table tools and fixtures. The best surface to work with is foil. Dough doesn't stick to it. For the best effect, you can sprinkle the surface with a thin layer of flour. Wrap it around a cardboard rectangle and secure from the wrong side with strips of tape.

- Prepare everything you need to make a master class. Cut out stencils of fish from thick paper.

- Roll out a piece of salt dough on foil into a layer at least 0.5 cm thick.

- Put a fish stencil on it and cut out the desired shape with a stack.

- Now let your imagination run free and start decorating the fish. Several methods are used. With a stack, draw stripes on the gills, fins and tail, use a cap from a ballpoint pen to draw a pattern on the sides of the fish. Make a few balls, flatten them a little into thick cakes and glue them to the fish with water. Put a coin in the center and push it in. Glue on the lip strips and eyeballs.

- Dry the craft in any way convenient for you.

- Dilute the dark dye in a thick concentration and paint over all the recesses of the puff pastry with it. Let dry.

- Cover the top with the main background. To apply paint, use a regular foam sponge. You can cover the craft with varnish.
- Finish the master class by assembling the parts. Hang two small fish, made according to the same pattern from the same salt dough, from a large fish using a braid.

gold fish
A craft that you can do with your own hands by watching a master class on a video cannot be eaten, even if you are very hungry. Aniline and other chemical dyes are used for its coloring.
Salt dough goldfish looks great not only as a decorative panel on the wall. It is also an original pendant on the chest, a strong amulet and almost food.
Sun and moon
Based on the work of the artist Dan Morris in the primitive style, crafts from salt dough moon fish and sun fish are interesting. They are painted with acrylic dyes using brushes of different thicknesses. The plot can be anything.
Recently, different types of needlework have become very popular. Embroidery, origami, beading, decoupage, patchwork, felting... For every taste and color.
Today we will get acquainted with the technique of "Salt Dough". A craftswoman from Omsk, Olga Vladimirovna Kuchkovskaya, will help us with this. There are a lot of different funny fish in her collection..
To prepare salt dough, we need:
1 cup flour (any kind)
0.5 cup fine salt
1 tablespoon vegetable oil
0.5 cups of water.
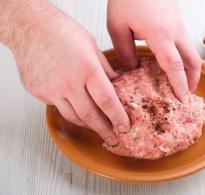
First, pour salt into the water, stir, add vegetable oil and gradually add flour. The dough turns out like dumplings. Once it stops sticking to your hands, it's ready.
Roll out the dough immediately on a baking sheet, sprinkling it with flour.


On the rolled out dough we impose a drawing of a fish and cut it out with a sharp knife along the contour.
We make eyes, lips, fins and glue it to the fish with a brush and water.
In order to create patterns, decorations, relief on the test, you can use anything, any means at hand. For example, using an ordinary shoehorn we make scales, we make various holes with a straw for a cocktail, and holes for a ribbon with a cap from a felt-tip pen.
Cut with a sharp knife in the right places (tail, fins).


You can dry products from salt dough both naturally, in the fresh air, and in the oven. The first option takes a very long time. In our case, the fish was baked in an electric oven at a temperature of 70 degrees. Drying time is individual, depending on the thickness of the product.
We process the finished fish with sandpaper, remove all notches, bumps, roughness. Our beauty is ready for painting.


Acrylic paints are best used for coating. Olga Vladimirovna likes to use metallic and mother-of-pearl acrylic paints, so her fish shimmer beautifully.
After the paint has dried, we cover the product with acrylic varnish and fasten the ribbon. The fish is ready.


Salt dough modeling is a very exciting process, interesting multi-colored crafts can decorate your home, a great gift for friends.
So create and enjoy the process, and if you involve small children in this, it will be doubly pleasant.
We thank Olga Vladimirovna for such an interesting detailed master class.
Do you have interesting ideas? We will be glad if you share them with our readers.
The master class was held by: Elena Sementsova.
I present to your attention a craft made from salt dough. This is a wonderful souvenir that will give your home a piece of the warmth invested in work, or will be a wonderful gift.
After all, the best gift, as you know, is made ... Yes, yes, it was by them - by skillful hands. And if it is also a money talisman, the hero of the occasion is guaranteed to be pleased. The craft is not difficult to make. If desired, the finished result can be obtained in less than a day.
So, we need: flour, fine salt, vegetable oil, water, a rolling pin, a knife, tools for applying a pattern (a cap from a felt-tip pen, a knitting needle), coins, dark (in our case, brown) and golden gouache,
dish sponge.
Salt dough preparation.
Everything is extremely simple here. The main thing is that the salt is fine and the water is cold. Mix a glass of salt and a glass of flour, plus vegetable oil (1 tablespoon). It's about water. Add it in small portions, mixing thoroughly. The most time-consuming in the preparation of salt dough is to thoroughly mix and knead it. The homogeneity and elasticity of the material for modeling depends on this thoroughness.
Now we mercilessly freeze the resulting mass in the refrigerator for a couple of hours. As a "container" for storing salt dough, a plastic bag is ideal. When sculpting, the required amount of material must be taken out of storage. A lump of dough left in the air will be covered with an unaesthetic crust.
Making fish from salt dough.
With a rolling pin, roll out a lump of dough of the required size. Work better on a surface covered with foil. Think of the size of the fish yourself, but the recommended thickness is 5 mm. Now you need to use a knife to cut out the shape of the body of our flounder. Doing this is easier than it looks. It is worth noting that the type of fish and its outlines depend only on your imagination.
Use your creativity and different tools to make different prints on the flounder. I will only note that the stripes on the tail and fins are better obtained by pressing on the dough with a knitting needle. Thin rolled strips of dough are suitable for shaping the mouth. The decoration will be small balls pressed in the center with a toothpick or with the same knitting needle. Coins are attached as follows. We roll a ball of dough, steal it to the right place of the marine life and press it with money.
Let's not forget the eyes. You can also make small baby fish, which are then attached to the “mother” with a rope. Consult with fantasy - it will tell you interesting ideas for small figures. 
Important! Make holes for fastening elements.
Drying of the finished product.
The resulting workpiece must be dried. You can do it in a slow natural way - in the air. The fish will reach the condition for several days. If it burns, use the faster option - the oven. 
The temperature in the oven should be minimal, the door open. It will take five hours for the fish to dry out, and at the same time to brown.
Coloring fish made from salt dough.
All recesses must be painted over with a dark color. Black or dark brown gouache is ideal. 
When this layer of paint dries, we cover our salt dough fish with golden or silver gouache. An interesting effect will be obtained if you use a dish sponge for this, dipping it into the paint and soaking the surface of our future souvenir. Select the eyes and let the surface dry. If desired, you can cover the work with varnish. 
It remains only to attach the details to the main work, threading a thin rope into the prepared holes. Everything, we admire the result.