8 from salt dough. New works using the material "Salty Dough", on the theme "March 8
Salt dough dolls are an original handmade gift for mom, sister, beloved and friends!
It seems to me that every woman at heart is a little girl who loves to play with dolls.
Only someone forgot about it, someone forbids himself to think about it (because she is an adult), and someone still collects dolls and dolls or makes them with their own hands.
Therefore, if you want to give your mother, sister, wife, beloved or girlfriend an original gift for March 8, you can bake and decorate (or dress in beautiful dresses) all sorts of different dolls.
The gift will be unexpected and pleasant, because you will make it with your own hands and put your warmth and love into it.
Who can make salt dough dolls
I think that even a child can prepare such a simple and original surprise for March 8. Well, up to 10-12 years old, probably, this should be done with adults, because you have to use the oven.
And yet - not only a girl or a woman, but also a boy or a man can mold and decorate dolls from salt dough. Do you know how to sculpt with plasticine? It's not more difficult here.
What else can you make dolls from
Using the same technology and patterns, you can bake gingerbread dolls and decorate with either or marzipan.
Examples of how to make figures from gingerbread dough, a dough recipe, and painting finished gingerbread cookies can be found in the recipes:
(painted).
Salt dough doll making technology
What you need for crafts from salt dough
for 7-8 dolls (2 trays)
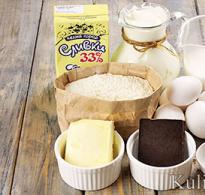
- Flour - 2 cups;
- Salt (finely ground) - 1 cup;
- Water - a little less than a glass (add 3/4 cup and top up as needed). It took me almost 1 glass;
That is, the proportions for salt dough: 2:1 (flour:salt), you can take 1:1, you can put even less salt. Greek housewives take 2 tablespoons of salt for 1 glass of flour. But I haven't tried that yet.
For the convenience of working with salt dough
Preferred but not required
- Baking paper (parchment) - 2 sheets (one sheet per baking sheet);
- Plasticine stacks (clean, washed) are such plastic sticks. You can take a simple knife;
- Rolling pin or clean glass bottle (roll out the dough);
For doll dresses and face painting
- Multi-colored napkins (preferably multi-layered, they do not move apart, stronger) or pieces of thin fabric (chintz, for example). You can make dresses from pieces of felt, colored paper, lace and everything that comes to hand;
- PVA glue;
- Felt pens are thin (you can take thin markers for writing on CDs, glass or other smooth surfaces);
- Gouache or acrylic paint.
At the same time, if you completely paint the doll, then enough paint (gouache + PVA glue or acrylic paints). The rest of the materials are needed only if you make clothes for the doll using appliqué technology.
How to make a salt dough doll
Prepare salt dough
Mix flour and salt. Then add more half a glass of water and knead the dough.
Gradually add water to the dough until the dough stops crumbling - it becomes smooth and pliable. It should be convenient to sculpt from it, you yourself will feel when it becomes suitable for sculpting.

At first, the dough is crumbly and breaks into crumbs. As water is added, it becomes like plasticine or hard clay.
Make figures from salt dough
- Break off a piece of dough and roll it out with a rolling pin. The thickness of the dough can be from 0.8 cm to 1 cm. I didn’t sprinkle anything on the table and rolling pin, this dough does not stick to the board.
- Cut out doll figures from dough with a stack or knife. Iron the contours of the doll (outer lines) with your finger to remove all irregularities.

The process of cutting figures from dough
I made ladies in dresses, peasant women in sundresses and headscarves, and nesting dolls. And from the remnants of the dough I made a rose with leaves. The fewer small parts, the less likely that something will fall off or break.
Therefore, the neck of the doll should not be long and thin (like the waist or long arms extending from the body of the toy), it is better to attach hair and strengthen the neck with it. Otherwise, the doll will come out without a head (it will fall off while you work with the figure)).
The ideal figure of a woman is a doll, in this sense, it is a nesting doll. There are few details, the lines are smooth, rounded.

Doll in a sundress and a scarf (peasant woman)

Doll in a dress

Matryoshka blank

Dough lady doll

Doll in a dress

Doll in a skirt with an apron and a vest
- Transfer the figures to a baking sheet lined with baking paper. I hooked the pupae with a plastic plate (separated them from the table) and, supporting them with my hand, transferred them to a baking sheet. You can use a cake spatula or a simple thin wooden spatula..

Dolls lie on baking paper, which is convenient. They do not stick to the pan and do not burn.

Second baking sheet with dolls and a rose
Bake dolls from salt dough
- Bake dolls in the oven at a temperature of 160-170 degrees C until the dough dries. Readiness can be determined by touch - touch the dough with your finger. Just be careful, it can get hot. I had the 1st baking sheet in the oven for 20 minutes, the second - longer.
Decorate dolls (dress up and draw a face)
How to make clothes for a doll from napkins or pieces of fabric
- The petticoat will add pomp to the doll's main skirt or dress. If you are making a petticoat, glue it first. And then glue the top. I glued only the edges of the parts with glue so that the skirts would not stick to the toy, but would be fluffy.

I made this lace skirt from pastry paper.

The clothes of this doll are made of napkins, there is a sequin on the belt, and the bracelet, beads, face and hair are drawn with a felt-tip pen (regular, but thin)
- The joints (joints) of different napkins (at the waist, for example) can be closed with a strip of napkin or colored paper (there will be a belt).
- It is convenient to draw various small details (eyes, lips, jewelry) with a thin felt-tip pen. You can also use sequins, rain (for the Christmas tree), beads, glass beads, beautiful buttons, coins and any interesting little thing that comes to hand. They are easily glued with PVA glue.
- A scarf for a flat doll is made like this: you need a rectangle with an oval neckline (for the face) and slits (so that the scarf does not cover the entire chest, but you can not do it, it doesn’t matter). Then the extra edges are wrapped behind the back of the pupa and glued there.

Bare-haired doll and blank for a scarf

Now you need to tuck the ends and glue them (fix) at the back

Salt dough toy doll
Making clothes from napkins is the easiest and fastest way. This method is especially good if the doll came out uneven. But you can also draw clothes on the doll.
How to paint a doll with paints
If you have acrylic paint, just paint whatever you want. If gouache - so that the toy does not get dirty later - you need to mix gouache and PVA glue (proportion 1: 1).
Very small and thin details can also be drawn with a felt-tip pen.
I painted matryoshka.

Matryoshka is the simplest doll, it is convenient to cut it out of dough.
I will make the rest of the dolls later. Or I will give the blanks to the girls I know so that they play with the dolls.
From the leftover dough, I made a rose with leaves - it's very simple. Even a preschooler can.
How to make a doll neat
When you have glued all the clothes to the doll, you can cut out the silhouette of this doll from plain paper and glue the doll on the back side with this piece of paper. So you hide all the tails.
How to make a dough rose
Roll out the dough (thinly). Cut out circles with a small glass. Lay out these circles so that the edge of one is on the other. (the strip will turn out). More details (how to do it) can be found in the story about how there is even a video.

So you can make roses from dough, mastic, vegetables or fruits. Mugs or flowers are laid out in one line, layering. You need 5-7 circles. And then they roll it into a tube.
And then twist everything into a roll. This will make a rose. Petals can be slightly bent. And cut out the leaves from the rest of the dough with a knife.
In this article, you will learn how to make your own salt dough and how to dry it. Many photos and step-by-step instructions will help you make a dough craft for any holiday.
For modeling with young children, it is better to use salt dough or Play Doh plasticine.
How to make dough for crafts: recipe
You can make your own dough with just a few simple ingredients: flour, fine salt, citric acid, vegetable oil and water.
Mix first 1 cup of flour with 0.5 cups of salt and 2 teaspoons of citric acid. Pour into a saucepan, add 1 tablespoon of oil to the dry mixture. Place over medium heat, gradually add water and stir. Water should go no more than 0.5 cups. When the mass lags behind the walls of the pan and becomes one lump, remove the pan from the heat. Take out the mass, put it on a board sprinkled with flour, and, like a regular dough, knead with your hands.
If you want to make colored dough for modeling, you first need to dilute dry food coloring in water. You can also add a little gouache to the finished dough and knead it well so that the color becomes uniform.
How to prepare salt dough for modeling?
Prepare salt dough. Color it in different colors, depending on what you want to mold. The dough can be made uncolored, divided into balls and a little gouache of the desired color can be added to each and kneaded. It is better to make a dough of regular colors, and then mix them to achieve the desired.
Keep the dough in a bag, or wrap it in cling film, you can put it in a closed container so that it does not dry out. If it still dries out, add a little water, and if it is too wet, add a little flour.


- Make the dough thinner and just spread it on the base of the craft, so you can make butter on a slice of bread, or make chocolate icing for a cake from brown dough.
- Try on food you've made with toy plates that you'll play with later to match.
- To stick pieces of salt dough together, use a wet brush. Spread the junction with a brush, and stick the parts to each other
- When sculpting food for dolls, it is very important to make the dough the same color as the original as possible, for example, carrots should be orange, not yellow or red.
- So that the colors do not fade, open the craft with varnish. For classes with children, you need to use special harmless varnishes, they do not have an unpleasant odor, because they are made on a water basis


Drying figures from salt dough for modeling
There are two ways to dry salt dough crafts.
- Air dry crafts. It is best if you put them on a smooth surface and leave for a few days. When the craft is dry, turn it over or lay it on its side so that it dries on all sides.
- Baking in the oven. Preheat the oven well, put baking paper on a baking sheet, lay out the crafts on top, put in the oven and turn off the heat. The oven must be closed and not opened until completely dry. You can also bake crafts at a temperature of 100 ° C, but in this case, you need to watch them so that they do not burn.
These two methods can be combined, for example, dry for an hour in the oven, then leave in the air, after a while still in the oven, and so on until it dries.
Of course, if there are other decorations (beads, beads) in the craft, you need to dry it in the first way.
New Year's crafts from salt dough
The child will really like to decorate the house before the New Year and do crafts with their own hands together with their parents.
Christmas tree toys made of dough

 Salt dough can make great Christmas decorations, and even toddlers can handle making them.
- Prepare dough for modeling in different colors or uncolored
- Roll out a cake from it and squeeze out a figure, you can use cookie cutters
- Make a hole with a cocktail tube so that you can hang the figurine on the Christmas tree
- Decorate the toy as you and your child want: stick colorful balls on the Christmas tree, make a garland for it, let it rain, add white snow to the toy
- Uncolored dough can be dried first, and then painted with paints or markers
- Dry the dough or bake in the oven
- Pass the ribbon through the hole and hang the toy on the Christmas tree
You can make a lot of holes in the figures.


Or stick beads, beads and other beautiful pebbles into the dough, but in this case, these toys cannot be baked in the oven.


You can decorate toys with ribbons or decorative strings.

After the dough dries, apply PVA glue to it and sprinkle the figures with sparkles.

Color the uncolored dried dough with a permanent marker.


Cut out a mitten-shaped figurine, make it a beautiful colored ribbon from colored dough and decorate it with a homemade button. This figurine can be baked in the oven.

Print the baby's palm and draw Santa Claus in it - it will not only be a wonderful toy for the New Year tree, but will also remain in memory.

You can also make just such a toy-Santa Claus. To give him a beard, use a garlic press. 

Make these brown dough gingerbread toys.


We sculpt a New Year's candle from dough
To mold a New Year's candle, you will need dough for modeling in different colors, a cardboard cylinder, for example, from a roll of paper napkins and red and yellow napkins.
- Let the child roll up colorful sausages.
- Wrap them around our cardboard base


- Decorate it with colorful balloons
- You can simply stick around the cardboard cylinder with one color and then decorate it

- Make a fire out of napkins and fix it at the top of our candle


Christmas tree made of dough
- First make a blank for the Christmas tree, for this you will need a cardboard box of juice or milk. First cut off its top, cut along the side folds, open. From the rectangles you need to cut off the excess so that you get isosceles triangles. See how to do it in the diagram below.

- Glue the cardboard base for your Christmas tree


- Now let the child decorate it: let it stick around it with green dough - you will get a Christmas tree. It remains only to add balls, a garland, a star to it, and do not forget about the gifts under the Christmas tree


Can you make a tree like this?


Easter crafts from salt dough
For Easter, you can make the following crafts from salt dough:
- Decorated eggs from pastry


- Bunny figurines cut out of salt dough.
- Decorated easter egg


- Egg stand


Easter eggs from dough
Even a toddler can handle this task.
- Take the dough, mold it into an egg-shaped figure.
- Decorate it however you and your child like.


You can use mixed dough of different colors for the base, you can make the base from unpainted and then paint with paints or markers. Open the eggs with glue and sprinkle with cosmetic sparkles. Glue multi-colored balls, for this, moisten the junction with a wet brush. Press beads, pasta, cereals, and other decorations into the eggs. Make prints with different objects.
In general, fantasize!


Dough egg holder
To do this, you will need a cardboard cylinder, dough and paints.
Cover the cut circle of cardboard with unpainted dough, blind its tail, head and other parts, as shown in the diagrams below.


Do not forget to close the stand on all sides with dough.

Decorate the craft as fantasy tells, you can use gouache or watercolors.


Open with a water-based varnish to make the colors brighter and keep the craft longer.


Crafts from the test for February 14 for Valentine's Day
What does everyone associate with this wonderful holiday? Of course the heart! Let's make a festive heart with a child and give it to parents.
Salt dough heart


Here, as everywhere, we first make the base, in our case, the heart, and decorate it!

You can decorate with roses, it will be very beautiful. How to sculpt roses, see step-by-step instructions with a photo below.


You can make such a keychain with paws.


These cute couples are made very quickly and simply.


You can make many of these heart figures, make holes in them and make a garland out of them, which will decorate the wall in the house.

Dough photo frame
Make an empty heart, decorate it and use it as a frame for a family photo, fasten it with colored cardboard on the back.


salt dough decoration
Here is such a fish in love that will definitely suit mother's outfit on this holiday.

Crafts from the test for March 8
On March 8, you can make such flower keychains for mothers, grandmothers, aunts and sisters. They can be made with younger children. You can use multi-colored dough or unpainted, and then decorate it with paints.


You can make such a flower candlestick as a gift.

Make such interesting medals with your children, and most importantly, everyone is different. Let the child give them himself.

Blind figures in the shape of a figure eight and decorate with flowers, stones, beads, in general, what is enough imagination.

Make a pendant with your child, for example, in the shape of a heart and decorate it: make flowers, leaves, decorate with paints, sign a congratulation.


Salt dough roses
- We take the dough for modeling, you need colors
- We sculpt a cone


- We roll the ball, flatten it gently into a round cake
- Glue the ball to the cone


- We make the second ball and glue it on the other side - we have a bud
- We make a few more balls and also sculpt petals from them. We chain them around


- We bend the upper edges of the petals back a little, and press the sides to the center


- We make a few side by side, depending on how lush you want to get a flower
The rose is ready!
 If necessary, make leaves from green dough, push the veins with a toothpick. Make legs out of sausages. Connect all the details in one flower.
Crafts from the dough by February 23


Here's a medal you'll love.


Airplane - salt dough craft
A wonderful gift for dad or grandfather would be a salt dough airplane.
- Roll up the base for the figure - this will be the body
- Bend one side of it a little - this will be the tail. Attach the remaining parts to it

- Roll up the wheels for it and the fender liner

- Walk with a wet brush and attach the parts to the body


- Blind and attach wings in the form of triangles on toothpicks


- Make a propeller and use a toothpick to also attach to the body


- Let the figurine dry for a few days.


- Paint an airplane with gouache

Crafts from dough for Maslenitsa
Maslenitsa is an ancient holiday with many symbols and traditions. Crafts for this holiday are very diverse, you have plenty to choose from.
For the smallest, you can offer to make the sun, which symbolizes the onset of spring.

 Here is such a sun for older children.
 Invite your child to make their own salt dough pancakes.

 Keychain pancakes

Salt dough panels and pictures
With older children, you can make a picture from salt dough.
For example, it could be a fruit basket. Follow the step by step photo instructions below.
- Roll out the uncolored dough to a thickness of about 0.5 cm.
- Prepare a basket template and, attaching to the dough, cut out a basket from it
- Squeeze out the dough with a garlic press, twist it into flagella, stick it, moistening the junction before that, on the handle of your future basket. You can add flagella to the rim


- Using a stack or a knife, push through the lines imitating basket weaving

- Squeeze out a few leaves from the rolled dough with a mold or cut out a few leaves according to the template. Sell them veins
- Stick the leaves on the basket


- Now prepare fruits: apples, plums, grapes, etc. Roll them into balls of different sizes and give them the desired shape. For apples, in the place where the dried inflorescence should have been, stick a clove seasoning, the apples will look like real ones
- Connect everything in one picture

- Leave your craft to dry for a few days, preferably naturally.
- Decorate as you wish
Here is a simpler picture you can make with smaller children.
- Draw a background for it
- Draw the outlines of the character figures
- Ask the child to stick the dough without going beyond the contour.
- Leave the painting to dry
- When it has dried, invite the child to decorate the characters with paints.
- Draw small details
- Open the picture with varnish, put it in a frame and you can hang it on the wall


Step-by-step dough crafts
Below are a few step-by-step instructions with photos for modeling salt dough with children.
Salt dough beads
- We take colored dough, it can be the same color, it can be different
- We roll balls out of it, preferably evenly and of the same size. Can be sized in descending order
- We pierce the balls carefully in the center with a toothpick
- Let them air dry for a few days. Flip them over from time to time.
- When the balls are dry, carefully remove the toothpicks
- The resulting beads are strung on a cord or ribbon.
- You can paint the beads with paints or markers

Salt dough horseshoe
- Roll out the dough into a cake, 1 cm thick
- Attach a horseshoe template and cut out a figure with a knife
- Blind the leaves, cut off the excess, push the veins on them
- Blind the berries and flower, use a toothpick to make holes in the berries and stripes on the flower
- Lubricate the horseshoe with water and stick all the details
- Use a toothpick to make holes around the perimeter of the horseshoe. Make two holes through the top to hang the figurine on a string.
- Leave the horseshoe to dry completely or bake in the oven
- The dough can initially be taken in a certain color for each detail, or you can decorate it with paints at the end


test star
- Roll out the dough into a layer about 1cm thick.
- Cut out an asterisk or other figure with a cookie cutter
- Lubricate the corners gently with a wet finger so that they are smooth
- We decorate the figurine: we make her eyes, mouth, nose, pierce holes with a toothpick, add decorations
- Bake in the oven or air dry
- We open with varnish


Dough caterpillar
- We roll sausage from green dough
- Cut it into equal circles, roll them into balls
- We stick the balls together, do not forget to moisten the junction.
- Making a caterpillar face
- We pierce the figurine with a toothpick or a pin in the place where we will attach it to the ring
- We dry our craft


salt dough apple
- Roll out a ball of dough in the form of half an apple. To make the cut even, press it against some even surface.
- Adding a Flat White Center
- We roll seeds for an apple and a tail from brown dough. We make leaves from green
- We collect the figurine and dry


Salt Dough Crafts - Hedgehog
- Form the body and head of a hedgehog from uncolored dough.


- Make him a nose and eyes, you can use black dough or peppercorns


- Cut the dough with nail scissors, making needles, slightly lift them up. Cut the second row in a checkerboard pattern, and so on until the end


- Leave the hedgehog to dry. When it is completely hardened, you can decorate it with paints and sprinkle it with varnish.


Salt Dough Crafts - Animals
From salt dough with children, you can sculpt many animals. Below are some step-by-step instructions with photos.
Dough sheep
- Roll 4 balls - these will be the legs of the lamb. Place them in a square, pressing them tightly against each other (see photo)
- Roll up a piece of foil and place it inside the pastry. Roll a ball out of it - this will be the body of a lamb
- Add a sheep's head, blind balls-eyes, horns and ears from sausages
- To imitate wool, make a lot of small balls and wrap them around the back of the figure, pressing them down a little
- Dry your craft and decorate with paints and/or markers


Salt Dough Owl
- Roll out the dough into a round cake
- Use a cap from a felt-tip pen to push through the waves, imitating plumage
- Wrap the sides inward - these will be the wings
- Wrap the upper part towards the center too, stretching it out a little on the sides - this will be the head and ears
- Stamp the eyes with the cap and add the beak with a toothpick
- Dry and paint


Dough elephant
- Roll up the ball, pull it out a little - this will be the body of the elephant
- Make 4 thick sausages - these will be the legs
- Blind a trunk from another one
- Make a ponytail from a thin sausage
- Roll out two cakes, put plates of smaller diameter and pink color on them - you will get ears
- Collect everything in one figure and don't forget about the eyes
- Dry the elephant and open with varnish


Dough crafts - cat
- Cut out the cat template from cardboard


- Roll out the dough with a layer of 0.5 cm
- Attach the template and cut out the cat from the dough


- Let the dough dry
- Use sandpaper to sand around the perimeter of the figurine.


Paint the cat with a pencil and then with paints, let dry

Frame the panel


Sculpt fish from salt dough
- Roll out the dough to a thickness of 0.5 to 1 cm
- Cut out the fish according to the pattern.
- Decorate it: make voluminous eyes, fins and tail, imitate scales with felt-tip pen caps or other improvised means
Let the mushroom dry and decorate it

Dough Crafts - Fruits and Vegetables
Many different vegetables and fruits can be molded from salt dough, with which you can then play and feed the dolls.
Remember that the colors of food for dolls should be matched as closely as possible to the original ones.


Following step-by-step instructions and photos, you can make interesting figures from salt dough, which you can then give to friends and family for different holidays. We hope you found a lot of interesting works and useful information in this article. Have fun and beautiful crafts!
VIDEO: Craft from salt dough "Owl"
Municipal budgetary institution of additional education
"Center for Extracurricular Activities"
METHODOLOGICAL DEVELOPMENT
classes with students of the creative association "Testoplasty"
for the holiday
8th Martha "Gift for Mom"
Developed by:
additional education teacher
Kondakova L.P.
g. o. Arzamas, Nizhny Novgorod region
The visual activity of people is very multifaceted. Children get acquainted with its various aspects throughout their lives - at home, in preschool institutions, at school, in the system of additional education.
One of the types of visual activity that is accessible and interesting to children is modeling from salt dough. Art modeling allows you to solve a wide range of educational, educational, developmental tasks. In the process of this activity, children master the techniques and techniques of working with plastic material, get acquainted with the basics of modeling, master knowledge of a visual and artistic nature, have the opportunity to show their abilities, express their vision of the world around them in the process of creative activity.
At the same time, it is known that modeling classes are able to develop a cognitive outlook, develop visual-figurative thinking, educate the motive of work (the need for work, the desire to benefit people, the desire to master a profession and achieve high results in work). Modeling allows the child to hone high artistic skills, independently innovate in the art of modeling, and develop the revealed talent. Working with salt dough allows each child to develop self-confidence.
At the same time, salt dough is a wonderful material for modeling. It is plastic, delicate, soft. Unlike ordinary plasticine, the dough does not get your hands dirty. With proper kneading, salt dough does not crumble, does not crack, and remains for quite a long time.
Handmade souvenirs from it are in great demand. This is a wonderful gift for any celebration and holiday.
Many teachers have the problem of choosing the technique and material for making a gift item, and often they stop at making a postcard.
In this methodological development, I propose to study the technique of making a photo frame from salt dough by March 8.
Lesson topic: Craft manufacturing technology for the holiday 8th Martha "Gift for Mom"
Target : make a gift - a photo frame from salt dough.
Tasks:
continue to learn how to sculpt flowers from salt dough using various techniques: rolling the dough between the palms, pinching off small parts, connecting small parts using water, reinforcing knowledge about the structure of flowers;
develop communicative, creative abilities of students;
to cultivate industriousness and perseverance, a gentle and grateful attitude towards mothers, to promote the development of aesthetic taste, the formation of a perception of beauty.
Equipment: computer presentation "Photo Frames"
Handout: white and pink salt dough, brushes, water jars, modeling boards, stacks, frame template.
Expected Result: making a frame for a photo that can be used as a gift or an interior item.
Lesson progress:
I stage. Organizational and preparatory.
conversation, game, demonstration .
Hello guys! Before I announce the topic of our lesson, please tell me what season is it now? What month? What holiday do we celebrate in March?
Whom do we congratulate on this holiday?
Each of us has our own mother, mother. When you were just born and didn’t know how to speak yet, your mother understood you without words, guessed what you wanted, where it hurts. You can't confuse your mother's voice with any other voice. He is so familiar, so familiar. Mom is a giver of warmth, love and beauty. We congratulate not only mothers, but also grandmothers, sisters, and girls and all, all women. It's International Women's Day.
I'll tell you a little about it now.
Historical reference.
More than a hundred years ago, women began to fight together for their rights, because until then, for the same work as men, they received lower wages, did not have the right to vote in elections and the right to receive professional education. Housekeeping was considered the only activity decent for a woman.
With demands to equalize the rights of men and women, on March 8, 1857, a performance by workers of clothing and shoe factories was organized in America.
And in 1910, the International Women's Conference met in Copenhagen. One of them, Clara Zetkin, proposed to celebrate International Women's Day. This holiday was to annually remind the whole world that in all areas of life a woman should have equal rights with men.
More than a hundred years have passed since then. During this time, a modest housewife has turned into a business woman, politician, scientist. But she still remained the mistress and keeper of the hearth.
On March 8, of course, we congratulate women on their professional achievements. But much more willingly - with the fact that they cook deliciously, create comfort in the house, warm everyone with their cares and love. After all, the most important thing in the life of every person is his family, which gives him support for life, and the main person in the family is, of course, his mother.
Many proverbs and sayings were invented by Russian people about mothers:
Maternal prayer will reach from the bottom of the sea.
The bird rejoices in spring, and the baby of the mother.
There is no friend like a mother.
When the sun is warm, when the mother is good.
Maternal anger is like spring snow: and a lot of it will fall, but it will soon melt.
A loving mother is the soul of the family and the decoration of life.
And today we will make gifts for our beloved mothers. And what THIS gifts will be, you can find out by guessing the riddle and answering a few questions:
This eye is a special eye
He quickly looks at us
And will be born
The most accurate portrait of you. (Camera.)
- That's right, it's a camera. Why do we need a camera? With it, we can take pictures. Why do we need photos? Photos can be placed in an album, as well as in a frame. Look how many different frames. Pay attention to how different and beautiful they are. There are photo frames with floral ornaments, with animals, berries and fruits. They look great in photos.
The framed photo can be put on a shelf or hung on the wall. The photo looks great in a photo frame. You can choose a photo frame according to the plot of the photo.)
I I stage. Basic.
Used methods and techniques: conversation, independent work .
It is the manufacture of the frame that we will now deal with. But before proceeding to the practical part of our lesson, I will introduce you to the rules for T/B:
1. Carefully use special tools and improvised devices when working;
2. In no case do not take salty dough in your mouth;
3.Do not lick your fingers;
4. Not rub your eyes with dirty hands;
5. After work, be sure to wash your hands with soap and clean up the workplace.
Well, now we will warm up a bit and start sculpting.
Flowers grow in the meadow
Unprecedented beauty.
(Sipping - arms to the sides.)
The wind blows sometimes
Only it's not a problem .
(Children wave their hands, imitating the wind.)
Flowers reach for the sun.
Stretch with them too.
(Sipping - hands up.)
flowers leaning,
The petals drop.
( slopes)
And then they get up again
And they still bloom.
Gymnastics for fingers
Here are my helpers, turn them as you wish:
We rotate the hands.
And like this, and like this, they will not be offended in any way.
We rub with our hands.
One two three four five. (Clap)
They don't fit again. (shake brushes)
They knocked. (Tapping fingertips on the desk)
They turned it over. (Circular rotations with a brush)
And they wanted to work. (Rubbing hands)
We tried, we drew
Our fingers are tired. (Squeeze-unclench hands)
And now we'll rest... (shake brushes)
Let's start drawing again. (Rubbing hands)
The fish splashed happily
In clean fresh water (Freely wave hands)
They will shrink, they will unclench, (Squeeze and unclench fists)
They will bury themselves in the sand. (Rotational movements with brushes)
Practical part.
We take white dough as the basis for the frame. Knead the dough with the back of your hand (in no case with your fingers) to the desired thickness. Too thick base is not necessary.
Then we start making a rose, with which we will decorate our frame. In order to make a rose, we pinch off 9 pieces of pink dough, the size of a cherry, then roll balls from these pieces.
The next step is to flatten the balls with your thumb. These will be the petals for the rose.
After you have made the petals, we begin to make a flower, for this we turn the first petal into a roll, and then glue all the other petals in a spiral one by one, not forgetting to use water. Petals should be on the same level.
This is how you end up with a rose.
We glue it with water in the upper right corner of the frame. Then, in order to complete the decoration of the frame, we make small balls, the size of a cherry seed. I needed 17 of them.
We glue these balls on the frame with water in random order. I decided to do it this way, and you can use your own version of the decoration. After the balls are glued, we apply a pattern to them with a brush.
Our frame is ready. It remains, when it dries, glue cardboard on the back and insert a photo.
I II stage. Reflective.
An exhibition of works is held, the teacher conducts a reflection.
Sample questions:
Did you enjoy today's lesson?
What caused you trouble?
What mood did you work with?
IV stage. Final.
Everything in the forest makes noise, sings -
Mother's Day is coming!
We all need to talk about:
What will we give mothers?
Monkey dads will say:
We will buy bananas for moms!
To cook all year round
We have a banana compote.
Hamster dads will say:
We will buy hooks for moms!
To day-to-day to night
We knitted sweaters!
They will say, daddy bears will say:
We will buy-buy mothers covers!
We will buy jars, roots -
Let moms cook jam!
Well, a bunny on the edge
Rushing into the distance, spreading his ears,
Hey, wait! Where are you?
I'm in a hurry to buy flowers!
After all, why donate hooks?
Oh, you bears, hamsters!
For moms to rest
So that they flutter like little birds,
Let's love moms!
Let's give them flowers!
So stop thinking too much!
All follow me on the road!
For a gift - the most hour!
They are waiting for us with mom's flowers.
And where to get flowers - we will find!
We will go to mothers with them,
Mom's Day is a big day...
We love mom with all our hearts!
The experience of this lesson shows that children of primary school age make gift photo frames for their beloved mothers with great enthusiasm and diligence. In the process of decorating them, the guys show their creative imagination, inventing various decorative elements that they want to decorate THEIR frame with.
Also, in the course of the lesson, students at an accessible level receive information about the history of the holiday on March 8.
This methodological development can be used by teachers of additional education, as well as elementary school teachers in technology lessons.
Literature:
Kiskalt I., Salt dough fascinating modeling, M. Profizdat, 2002
Rubtsova E. Sculpt from salt dough. Decorations. Souvenirs. Crafts. - Vladis, 2009
Sineglazova M. O., Amazing salty dough, M. SME Publishing House, 2005
Skrebtsova T. Danilchenko L. Mini-paintings, panels, photo frames from salt dough, 2008
Khananova I. Salty dough, M. 2007
The long-awaited spring is here! And as we know, International Women's Day is celebrated in the spring - March 8th. And of course, we immediately think about what to give our mothers and grandmothers. Of course, there is nothing better than a handmade gift. We offer you a composition from salt dough "Volumetric card for March 8" (see photo. 1).
So, let's begin. To design a postcard, you can use decor items purchased at a needlework store, or get by with improvised materials.
1. Thick cardboard (the size depends on the number of parts).
2. Salty dough (see preparation here).
3. A glass of water.
4. Brushes (for painting and gluing parts)
5. Toothbrush, ruler (for the "splashing" effect).
6. Watercolor and acrylic paints.
7. Lacquer (you can use furniture).
We take the finished salt dough, and pinch off the middle piece. It will be an eight. Next, divide it into 2 parts and roll them out. It turned out two "sausages". For gluing to cardboard, we moisten one side of the “sausage” with a brush and attach it to cardboard.
Salt dough flowers, rosette (photo. 2), daffodil and tulip (see how to make a rosette, only here it will be larger in size).

Photo. 2 Salt dough flowers. Salt dough rose.
For a salt dough daffodil (photo. 3), you need to make the middle of the flower. It's a small flattened ball. Petals are also small flattened balls, only elongated. We glue them from below our middle.

Photo. 3 Salt dough flowers. Salt dough narcissus.
For a salt dough tulip (photo. 4), you also need a middle and the same elongated leaves. These leaves are glued with water in a circle.

Photo. 4 Salt dough flowers. Salt dough tulip.
And so, it remains to make a sprig of mimosa from salt dough and decorate our picture with various curls. Let's make a "sausage" and attach it to the lower right corner. This is a branch. Next, we make "balls". To do this, pinch off a middle piece from the dough. From this piece we pinch off a little more, and make small circles. We fasten them to the water to a branch (photo 5).

Photo. 5 Salt dough mimosa.
Then, we lubricate all objects with water so that there are no cracks, and set to dry for about 4-6 days.
The podlka had dried up by March 8. It remains to make a background and paint the work. We will make the background with the help of “splattering”.
To do this, take an old toothbrush and a ruler. We will help the brush in water, but not much, otherwise there will be huge traces of paint. We take a brush and apply any color you like on the brush.
Paints need watercolor. Now, let's take a ruler. We set the brush slightly at an angle. And with a ruler, moving towards ourselves, we draw along the brush (see photo 6).
First you can try on some piece of paper. In this postcard, 4 colors were used when spraying: yellow, ocher, green and cherry.


Phot. 6 Performing the "sprinkling" technique.
When the paint dries, you can cover everything with gloss varnish.
Hello everyone, hello!! Today, on the agenda of all the expected topic - crafts for International Women's Day. After all, immediately after February 23, we begin to prepare for March 8. Therefore, dear educators, teachers, parents and children, rather start viewing this post, choose a gift and start tinkering !!
Let me remind you that there is already a selection for making spring postcards for March 8, so if you missed it, look. Well, in this article we will analyze the most popular DIY crafts and it will not only be flowers !!
We will start with the newest ideas for making congratulations. Indeed, on this wonderful spring day, we so want to please our mothers, grandmothers, sisters, girlfriends, teachers. Therefore, for you, a small photo selection of the most interesting for the current year !!
How do you like these green horseshoes for good luck, decorated with flowers made of ribbons and beads?! Isn't it very beautiful!!

Or such voluminous beaded flowers?? But here you will need special skills in beading.

But gentle figure eights made of felt are also very handy.

Look at what a delicate basket of flowers made of satin fabric, it looks very festive!!

Volumetric paper figure eights are always in place, especially if you know how to work with such subtle patterns.

Well, this beauty is made using the quilling technique, it looks amazing!!

An amazing firebird that brings happiness to the house!!

Or a simple chamomile in a pot. Such a present is easy to perform and very harmonious in appearance.

And what lovely lilies of the valley from buttons, I think with such a gift you will definitely surprise others.

I also really liked the idea with the pincushion, and we get not only the pincushion, but also a jar for storing various little things. Look how easy it is to make!!

Of course, the female sex is very fond of sweets and flowers. I decided to combine these preferences and make such a nice present.
- Basket of flowers
We will need: a box of sweets (preferably with sweets), colored paper, cardboard, colored table napkins, scissors, glue stick.
Manufacturing process:
1. Use a whole rectangular candy box as a background.
2. Take two sheets of colored paper in different shades of brown, cut them into strips 1 cm wide.
3. Now weave the stripes of different shades perpendicular to each other (Fig. 2).

4. Cut out an oval 13 cm long and 10 cm wide from cardboard of any color.
5. Glue this oval to the woven rug from the wrong side (Fig. 3).

7. If you have tips protruding from the canvas, then fill them in and glue them to the oval from the wrong side. You should get our basket.
8. Stick it on the candy box.
9. Now take 6 napkins of different colors and, when folded, cut out circles with a diameter of 4-5 cm from them. Glue these circles, make a circular cut.
10. And cut out circles with a diameter of 1-1.5 cm from yellow paper and also make circular cuts. These centers need to be glued to the center of the flowers.
11. According to the stencil given below, cut out 9-10 leaves and stick them on the basket (Fig. 5).

12. Glue the flowers between the leaves and your congratulations are ready !!

How do you like this idea?! In my opinion, it’s very excellent and original, as they did it with their own hands, they also treated me with sweets.
Crafts from paper and cardboard from the first to the senior group of kindergarten
I can not leave aside creativity for our children. As always, paper and cardboard are popular materials, as well as various additions. In general, I will not languish for a long time, now you will see everything with your own eyes !!
Excellent butterflies-flowers made of folded paper like a fan, the background can be painted with watercolors.

But the original bouquets, make the base of a tube of green cardboard and glue the cut out buds and leaves on it.

Or such cute hearts. For pots, you can use jars of sour cream.

And here is an interesting clearing of ordinary tubes for juice and colored paper.

And these eights are made from a toilet sleeve, they cut it off, glued a cardboard bottom, and decorated it. By the way, if you do not connect the circles, you will get caskets.

Crafts from paper plates, looks very impressive.

Well, how about without voluminous postcards, I think you have already learned how to make them !!

These beautiful paper flowers can be framed and you get a picture.

Again cute, amazingly beautiful pots!!

Or you can make postcards from colorful napkins.

And do not forget about origami, in the picture there is a scheme for folding daffodils.

And if you want something special, then I suggest doing just such a paper cake.

We will need: colored xerox paper, colored paper napkins, beads for decoration, stapler, glue.
Manufacturing process:
1. Make cakes out of paper by folding them with an accordion, then folding them in half and gluing them together. For one cake you will need 6 sheets.

2. Make three cakes in total.

3. Make flowers out of napkins.

4. Large peony.

5. And small roses.

6. Connect everything together by decorating with beads.

Here is such an inedible beauty!
We create souvenirs with our own hands from corrugated paper
Also, do not forget to make crafts from corrugations, from it all actual bouquets are obtained as living, real ones !!
I don’t give a detailed step-by-step description, if interested, go to the article, there you will find master classes in bouquet and flower products. And now a small selection and video plot.


And as promised, a short video on how to make a bouquet of roses with your own hands from corrugations.
The most beautiful crafts for March 8 from felt
Well, those who love to sew and are familiar with such an amazing material as felt know that there are a huge number of different souvenirs for the spring holiday. Look at what I liked, maybe you can sew something from the proposed options.
- colorful flowers

- cute little birds

- Keychains in the form of hearts

- Cheerful bouquet

- Red eight

- adorable ladybugs

- Flowers photo frame

And you can also sew such potholders:

Or make a needle bed in the form of this insect))
We will need: red and black felt, threads, cotton wool or synthetic winterizer for filler, threads, needles.
Manufacturing process:
1. Cut out the template and transfer it to the fabric. Make blanks from felt.

2. Sew all the details, leaving a small opening.

3. Fill the cow with filler and sew the rest.

4. Your needle bar is ready.

And here is the template for making it:

Master class on making a gift for mom from salt dough
Do you remember, I once told you about making and that a large number of souvenirs can be made from it, including those for March 8?! So, if you missed this article, then be sure to go, look, maybe choose interesting ideas for congratulations.
Well, now I suggest you make such cute presents for our mom and remind you of the salt dough production technology. 😉
- "Gift for Happiness"
We will need: flour - 2 tbsp, salt - 1 tbsp, water - 1/2 tbsp, gouache, colorless varnish, ribbons, templates.
Manufacturing process:
- Make the salt dough recipe above.
- Roll out a layer from the mass and cut out a heart and a horseshoe according to the template.
- Decorate souvenirs according to your imagination.
- Next, let the crafts dry. Ideally, leave them for 5 days.
- Then paint with gouache, let dry again.
- Cover with a colorless varnish, insert a ribbon.

Let's see what else can be molded from this excellent material for creativity.
Multi-colored figure eights, decorated with flowers and sparkles, can be glued to a magnet and make a great gift.

You can make a bouquet of any flowers, it is also always relevant.

Heart with an inscription, decorated with buds of your favorite flowers.

Simple photo frame. Such work is also possible for small children.

Spring suns, very funny and warm!!

Real picture!!

And here is an awesome candlestick, it looks insanely beautiful!!

Or maybe you like lovely cats or a bunny?!


Or these angel girls?!

And how do you like such a dog with a chic bouquet ?!

In general, everything here depends on your imagination, and everything else will work out !!
Video story on how to make roses from cotton pads
And whatever you say, flowers remain the main gift on International Women's Day, and most often they give roses and tulips.
It turns out that beautiful bouquets can be made not only from paper, but also from cotton pads. And this is done very very simply, I think you will see this when you view the following plot:
Well, how impressed? And now we will see what types of flowers can still be made from this improvised material.


I would never have thought that such masterpieces can be made from ordinary cotton pads !!
Children's DIY crafts from beads
You know, I also remembered how, as a child, I wove various baubles, bracelets, chains and pendants. And I thought that unusual and festive souvenirs can be made from beads.
I studied the Internet and it turned out that the most popular in beadwork on March 8 are flowers, who would doubt it !! We've selected the cutest designs for you.
You can weave such a bouquet of mimosa from a thin wire.

Such a figure of eight of ribbons, decorated with blooming flowers.

This is the original decoration.

Or a cute heart-shaped topiary.

A simple postcard: we spread the drawing with glue and lay out the beads.

You can also weave such a basket, it turns out a real gift.

Floral applique.

How do you like these cute decorations?! Wonderful for spring!!

Bouquet of unopened tulips!!

Here is such a charming selection of crafts from beads !! Beauty in one word!!
Interesting thread congratulation ideas
While doing this article, I came across very magical and soft-looking works made from threads. Mostly take fluffy threads for knitting. The manufacturing technology is simple, it is either an application, or joining in a bundle and cutting the desired shape.
Here's a look at how you can make such a yellow dandelion step by step.

On the basis of guns, you can also make a branch of mimosa.

Or an applique: draw a plot on the basis, and winding the threads, glue along the contour.


And if you know how to knit or crochet, then make such a lovely box and decorate with beads.

DIY craft templates for March 8
According to the tradition that I have developed when preparing similar articles, in the end I offer different options for stencils and templates. So hold on, circle and create!!
- paper flower

- Wreath with butterflies

- Birdies. Can be made as an appliqué or sewn from felt

- flower vase

- Postcard in the form of an apron

- Flower card-mug

Well, that's all my dear friends and lovers of creative work. I hope you liked the ideas of crafts dedicated to the holiday of March 8. Write your reviews, I will be glad !! And see you!!