How to make lollipops in the microwave. How to cook lollipops in the microwave (15 minutes)
I continue the topic of “forgotten” recipes. I’m sure many will remember with pleasure the home-made “petushki” lollipops. I did them very often as a teenager. Luckily, I still have that same mold. True, it took a lot of effort to wash it and bring it into good shape. And she made the lollipops themselves almost with her eyes closed. The child was delighted!
Lollipops "Petushki"
Total cooking time: 15 minutes
Servings: 6 pieces
Ingredients:
- - granulated sugar (0.5 cups);
- - water (2-3 tablespoons);
- - citric acid (on the tip of a knife, optional);
- - vegetable oil for greasing the mold;
- - chopsticks (I had skewers for kebabs).
This quantity of products is designed for one approach, taking into account the existing form for lollipops like mine. On average, you need 4 times less water than sugar. You don’t have to add acid, but it adds a slightly noticeable sourness.
So, pour granulated sugar with water. Add citric acid.

Place on low heat and cook, stirring, until a caramel color is obtained.

Lightly grease the mold with vegetable oil and pour the syrup into it. After a couple of seconds, insert the sticks into the future lollipops and leave to cool, which will take about half an hour.

Open the mold and take out the “cockerels”.

As you can see, making lollipops at home is not difficult. And if you don’t have a mold, it doesn’t matter, you can make lollipops on a plate - just pour the syrup onto a plate greased with vegetable oil, and then use a knife (after cooling) to chop it into pieces.
By the way, slightly overcooked homemade lollipops are great for getting rid of a cough.

For all important questions please contact
Microwave ovens can do more than just reheat or defrost your food; they can create dishes that will please even the most sophisticated gourmet. And these dishes can be made from everyday ingredients. All you need is a little knowledge and experience in cooking, to which you need to add a little creativity, and you can make liquid chocolate, bake a pie, fry it in your microwave oven.
But today we’re going to talk about how to make caramel from sugar. Caramelizing sugar in a frying pan, on a burner or in the oven is inconvenient, since the sugar may crystallize again due to excessive stirring or even burn. By using a microwave, you will not be afraid of the above problems. You will also save time - the golden caramel will be ready in a few minutes.
How to make caramel in the microwave
Place 1 cup granulated sugar in a glass bowl twice the size of the cup. Add ¼ cup of water, stir. Place the bowl in the microwave at maximum power. The process of turning the sugar into caramel can take anywhere from 50 seconds to 3 minutes, depending on how dark you want your caramel - the longer the heating continues, the darker it will be.
Check every 20-30 seconds. A hot bowl will cause the sugar to cook even after you take it out, so it's best to remove it when it's a little lighter than your desired color.
After the caramel reaches the desired color, pour it into another container, thus stopping the heating process.
Adviсe:
- you can cook without adding water. However, water slows down the process, which is useful when using a microwave. Water also prevents the sugar from burning. So, if you are doing this for the first time, it is better to add a little water to the granulated sugar;
- and, of course, I remind you that glassware is most desirable.
Have you ever eaten salted caramel? Very interesting taste sensations, I tell you. Try it, especially since it’s easy to do.
You will need the following ingredients:
- 1 tbsp. tablespoon coarse sea salt (approximately)
- 100 g unsalted butter,
- ½ cup granulated sugar,
- ½ cup brown sugar
- ½ cup light corn syrup or invert syrup, which you can make yourself,
- ½ cup condensed milk.
Delicious creamy caramels will be ready in just 6 minutes!
Mix ingredients in a microwave-safe bowl.
Heat on high for 6 minutes, stirring every 2 minutes, until all ingredients are thoroughly combined and sugar has completely melted. If the mixture still looks grainy, continue heating it, stirring occasionally, until all lumps are gone and the mixture is creamy.
Stir the mixture and pour into a 30 cm diameter bowl, previously greased with oil. Let the mixture cool for 15 minutes.
Sprinkle with sea salt and place the bowl in the refrigerator for an hour.
Cut the cooled mixture into pieces, wrap in wax paper, place in an airtight container and store in the refrigerator for up to 3 weeks.

It's time to enjoy some salted caramels!
Ingredients:
- granulated sugar – 80 grams;
- liquid – 20 ml.
- total cooking time: 3 minutes;
- total amount of caramel: 9 pieces.
How to make homemade candy in the microwave:
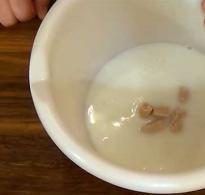
1. Why did I indicate “liquid” instead of the name of a specific ingredient? Add what you want to the caramel: it can be compote (without berries, of course), lemon or other juice and just plain water. I used water for experimental purposes. So, mix both ingredients.

2. Now we move this mass into a deep glass. You can use a bowl, but the syrup will bubble and rise to the top. Do we need it? Hardly. So, we place the glass in the microwave oven (the power of my microwave is 700). We don't use any modes. Imagine heating up food and simply set the time. For now for 1 minute.

3. A minute has passed, place the mass and set another 1 minute and 20 seconds. At this stage, the syrup will be transparent and can now be poured into molds, but then we will not get caramel, but... Let's wait a couple more seconds?! At about the 3rd minute, the mass will begin to take on a yellowish-brown tint. And it is at the 3rd minute that the mass will have a consistency that will harden completely and irrevocably.

4. Of course, when preparing caramel in 2 minutes and 20 seconds, you can also tint it with dyes (the dye is used in the first step), but if you leave the mass for all 3 minutes, there will be no point in coloring it.
5. Pour the prepared hot caramel mixture into greased molds and let it harden.

Homemade lollipops in the microwave are ready! Bon appetit!!!
Best regards, Yulia.
Step 1: melt the chocolate in the microwave.
Break or cut the milk chocolate into very small pieces, literally into crumbs. Add butter to it, also cut into small pieces.
Place everything in the microwave on high power 600 W on 1.5 minutes. Everything should melt thoroughly.
After you remove the chocolate from the microwave, mix it well with a whisk.
Step 2: heat the cream.

Heavy cream also needs to be heated in the microwave at a power of 600 W for 30 seconds.
Step 3: mix everything together.

Pour the cream into the melted chocolate and butter and mix everything very thoroughly to form a homogeneous thick mass. It will look delicious as is. You'll definitely want to try it.
Step 4: prepare the candies.

Using a spoon, carefully pour the thick chocolate mixture into the molds, avoiding the formation of air bubbles.

Place the candy preparations in the refrigerator for at least 3 hours. You can also put it in the freezer if you want to get the results faster, but I don’t know how well that will work.
Remove the finished candies from the molds, sprinkle with cocoa powder and serve.
Step 5: Serve the candies.

You should serve sweets, of course, for dessert with tea, coffee, or whatever you usually prefer. You can present these sweets to your friends by wrapping each one beautifully. And if you are going to store them, then hide the sweets in a sealed container and put them in the refrigerator so that they do not melt. Also, do not carry them with you for a long time and do not leave them on the table in the heat.
Bon appetit!
You can make these sweets with nuts, raisins and other dried fruits, or you can put half or a whole strawberry in each mold, and then pour chocolate over the berries.
Choose good chocolate, one that will definitely melt.
Dark chocolate will also work, just add a little sugar to it or omit it if you prefer bitterness.