How to make bread sticks recipe. Bread sticks: cooking secrets
Crunchy bread sticks can become your favorite snack. They are easy to prepare and every time you can add variety to the recipe and get new tastes. You can add cheese to the dough, sprinkle with sesame seeds, herbs de Provence, chili, rosemary, oregano, paprika, cumin, whatever. You can combine these supplements to your taste and get something unique every time. In addition to additives, you can also play with the shapes: try baking thin, thick or twisted and choose which ones you like best.
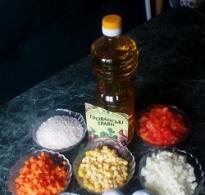
Step 1. Prepare all the ingredients
7 gr. salt dissolve in 280 ml. warm water. Take warm water, but not hot, the temperature should be around 32-36 degrees.
Weigh 500 gr. flour in a large bowl (I used a mixer bowl) and mix with 1.5 tsp instant yeast. Mix the contents well.

Old, stale flour - it is advisable to sift.
If you use dry yeast, increase their amount to 4.5 teaspoons, live, in turn, you need to take about 35 grams. Do not forget that both of them require preliminary dissolution in water. How to do it - read on the package.
Step 2. Knead the dough
Add water to flour, pour 2 tbsp. tablespoons of olive oil.

Stir the resulting mixture and knead the dough.

I used a planetary mixer for this. If you don’t have an assistant, put the dough on a surface dusted with flour and knead with your hands for about 15 minutes until it becomes elastic and pleasant to the touch.
After that, transfer the dough to a large bowl, tighten with cling film and leave in a warm place to ferment for an hour and a half until the volume doubles. Do not forget that the container in which the dough will “grow” must be taken with a margin so that nothing runs away.

An important point that applies to any bread dough, as well as pizza dough: do not try to make the dough less sticky by adding flour. Flour can be added 2-3 pinches maximum, and then more in order to sprinkle the work surface. If you overdo it - the dough will become too dense, airiness will be lost. To achieve the desired consistency, you need only kneading.
As a warm place, you can use the oven on the “light bulb” mode or after turning on the heat in it for a couple of minutes.
Step 3. Shape the sticks, leave to proof
This is what the dough should look like after fermentation:

If during this time your dough has risen badly (but has risen at least a little) - do not be discouraged. Try to wait some more time. If there is no result, look for the problem in the ingredients, room temperature and yeast introduction technology.
You can make grissini any shape you like. The easiest option is to roll out the dough into a layer a little less than 1 cm thick.

Using a pizza cutter (or a regular one), cut the layer into strips 0.5-2 cm wide, depending on how you want to see the finished sticks: thin, medium or thick. Roll the strips, in turn, on the work surface with your hands to give the blanks a cylindrical shape and then move them to a baking sheet for proofing.

Also, when cutting a sheet of dough, you can make strips about 2 cm wide, and then twist them with a screw.


Length - vary to your liking. If the resulting workpiece seems long, cut it with a knife. You can also change the thickness: you see that it turns out too thick - stretch the product in length.
After the stick is formed, transfer it to the baking sheet on which you plan to bake, do the same with the rest of the blanks.
Leave for 30 minutes, covered with cling film or a kitchen towel.
It is advisable to cover the baking sheet with baking paper. Also, do not put dough pieces close to each other - in the process of proofing and baking, it will increase in volume.
If you want to add spices, herbs and other aromatic additives to the dough, it is better to do this at the stage of rolling out the dough: first roll out the layer 1.5 times thicker than you plan to get in the end and season it to taste, then roll it out to the desired thickness, and give the desired shape. Additives will be imprinted into the dough and flavor it perfectly.

Another option is to flavor the olive oil and apply it to the pieces before baking. To do this, pour about 80 ml. oil in a deep plate, add spices to taste and let it brew for a while. The longer it brews, the more flavors and aromas the oil absorbs.

Step 5. Preheat the oven to 200 degrees, bake for 15-20 minutes
Remove the cling film (or whatever you covered there) from the baking sheet and send it to the oven preheated to 200 degrees.
Bake the grissini for 15-20 minutes, depending on the size and desired degree of goldenness. If you made very thin sticks, 10-12 may be enough, so do not miss the moment of readiness. It is very easy to understand that the sticks are ready - their crust will acquire a beautiful golden-bread color.

After you take the baking sheet out of the oven, do not rush to immediately tear off the sticks. Let them lie down for 5 minutes, so it will be easier for them to leave.
Here's what I ended up with:


And here is a twisted-buttered variation:

Use ready-made grissini with tea, beer, instead of bread ... In general, as you wish.
Unscrupulously tanned restaurateurs force staff to display Grissini ritorti (grissini bread sticks) without fail. With multiple goals. Firstly, crispy bread sticks exude an incredible aroma, and secondly, this is a good manners rule. And, of course, there is an acute feeling of hunger. Everybody! It is done.
To bake this creation of Italian bakers, you need yeast dough. And three hours at least. I don’t have so much time, so Pudov confectionery flour, self-rising, will help. The only negative in this case is the flour is sweetish. But this can be easily corrected with salt and seasonings. Moreover, sticks should be salty and spicy. Still need a good olive oil.
In order to knead the dough, you need to combine flour, one egg, spices, salt, half a glass of water and almost all olive oil (4 tablespoons, and leave the 5th spoon for kneading dough and for hands).

Then add all the seeds. Quite a bit of.

We knead our bun. It will look like a very old kolobok, but this has its own charm. Now you can add the last spoonful of oil.

You can just knead with a spatula.

Here is such an old man turns out.

The dough should not float, if necessary - add flour and knead again. In a bag and for half an hour in the refrigerator of our pensioner Kolobok.

We prepare a baking sheet and a place where we will roll out the dough into a layer.

Real grissini sticks are very long and not thick. I will "twist" the width of my pan. We take out the dough, roll it into a layer.

Cut into long strips.

Then we fold each strip in half and begin to wrap the grissini in the following way: half up and half down. That is, we do not weave the pigtail with our hands, but twist it right on the table and stretch the workpiece.

We lay out our blanks on a baking sheet.

Before loading into the oven, lightly brush with olive oil and garnish with your choice of sesame seeds and paprika. For contrast and flavor.

Bake Grissini ritori breadsticks in a preheated oven (200 degrees) for 15-20 minutes. Depending on what degree of ruddy suits you.

It is almost impossible to spoil, grissini will simply become drier. We take it out, let it cool slightly and begin to try.

And just like that, and with sauce, and with vegetables. It is delicious in every way: with milk, and with beer, and with kvass, and with light wine. And on a picnic, in nature, but with sausages or kebab - just magic! Enjoy your meal!


- In restaurants and pizzerias, breadsticks are served as an aperitif. They can be combined with prosciutto, sauces, and other products. The result is a snack. Unleavened grissini are also served with cinnamon, ice cream, turning into a dessert as well. In Italy, sticks are also sold on the streets as a snack.
- It is not necessary to use sesame seeds. You can cook grissini with cumin, pepper or without spices at all. It all depends on your taste. You can also place seeds or aromatic herbs inside the dough. And if you want to make sweet grissini, knead the dough with sugar and without salt, you can add vanillin or cinnamon, poppy seeds. With such sticks they eat ice cream, using them instead of spoons. To prepare a beer snack, sprinkle the sticks with coarse salt instead of sesame seeds.
- Another option for making sweet grissini is icing. Such breadsticks are very fond of the people of Thailand, who prefer them even to their traditional sweets.
- You can form blanks not only as indicated in this recipe. Roll out a sheet of dough 4 mm thick. Cut it into strips 1 cm wide and twist flagella from these strips.
- Before shaping the sticks, check the dimensions of your baking sheet so that the grissini are not too large later.
- Knead the dough for at least 10 minutes. Then the finished products will turn out to be light, even “airy”, with a pleasant crispy crust.
- A small digression into history. Grissini appeared in 1679, when the baker Antonio Brunero, at the direction of the doctor Teobaldo Pecchio, came up with pastries for King Victor Amadeus II. The monarch, due to poor health, could not digest bread crumb, and sticks proved to be the solution to the problem. The king liked them so much that he crunched them even in the theater during the performance. And Napoleon Bonaparte even organized a regular transport connection between Paris and Turin to always get fresh grissini.
- These breadsticks will be a real discovery for vegetarians who love delicious pastries, but cannot afford products with eggs, milk and butter.
- Breadsticks can be stored in a paper bag at room temperature for 2-3 days. You can also freeze them, but then the breadsticks will no longer be so crispy and tasty. It is best to cook them in such a way that they can be eaten in a few days.
Recipe preparation steps with photo
To make grissini breadsticks, you will need wheat flour, yeast, sugar, salt, water, and sesame seeds.

Crumble the yeast, add sugar to them. Pour in 100 ml of water heated to about 40 degrees. It should not be hot, but only warm. Otherwise, the yeast will not ferment. Mix everything and leave for 10 minutes in a warm place.

Pour half the flour, salt.

Mix everything and start kneading the dough. Sprinkle flour in batches. Perhaps it will need a little less or more than the planned amount. It is important not to add too much flour at once, otherwise the dough will turn out to be too dense and tasteless. We don't need that.

Knead a soft, elastic dough. As soon as it stops sticking to your hands - that's it, do not add more flour.

Shape the dough into a ball, cover with a towel or cling film and leave for 40 minutes in a warm place. During this time, the dough will increase in volume by 2-3 times.

Punch down the dough to make it firm and soft again. It will be a little sticky at first, but that's okay. Shape the dough into a sausage about 5 cm wide. Then cut across into slices about 1.5-2 cm wide.

From the resulting blanks with your hands, roll out the "laces" of the dough. Blanks for grissini should be thin, no more than 1 cm in diameter. Even better - about the thickness of a pencil. If the sticks turn out to be not quite even, it's okay - this is quite acceptable.

Now you need to roast the sesame seeds. Pour it into a preheated dry (it should be absolutely clean) frying pan and fry at medium heat, stirring constantly. Be sure to stir the sesame seeds, otherwise they will burn. The seeds will be white at first and then gradually darken. When the sesame seeds turn golden brown and give off a characteristic smell, pour them onto a plate.
Grissini are bread sticks that can be called a complete replacement for the usual bread. The recipe for this flour product was found in the 14th century. The inventor of these delicious bread shelves was an Italian doctor who was developing a diet for his patient with digestive problems. Today, there are many tips to get delicious crispy breadsticks that will become a worthy dish on any table. For their preparation, you can use various flours and filling options.
Recipes for grissini sticks with photos
To prepare classic grissini, you need yeast dough. Every hostess who has cooked this at least once has her own secrets that allow you to get fragrant and crispy sticks. A variety of additives and toppings make the taste of grissini especially spicy and delicate. Gourmets and simply lovers of bread products will not remain indifferent to this beautiful and simple dish.
Grissini with cheese and sesame
Grissini with parmesan cheese and sesame seeds will be a great addition to the main course, and can also serve as a light snack. To prepare these sesame bread sticks, you need to take the following ingredients:

Flour - 2 cups;
Dry yeast - 0.5 tbsp. spoons;
Chicken egg - 1 pc;
Water - 100 ml;
Parmesan cheese - 0.2 kg;
Sesame - 10 gr.;
Salt - a few pinches;
Vegetable oil - 1 tbsp. the spoon.
Cooking algorithm:
- The flour should be sifted into a bowl. After that, salt and an egg are added to it;
- Dry yeast must be diluted in warm water;
- We introduce diluted yeast into flour with an egg;
- . The dough should be quite tight. After all the ingredients are thoroughly mixed, you need to slightly moisten a clean kitchen towel and cover the bowl with the dough with it for 40 minutes. This time will be required for the dough to come up;
- After forty minutes, take the dough out onto a hard surface. It can be a board or a table. First, the surface must be sprinkled with flour. Now the dough is kneaded with hands until it stops sticking to the hands;
- A coarse grater is used to grate the cheese. After preparation, this ingredient interferes with the dough. As a rule, for an even distribution of cheese, it is required to knead the dough for two minutes. After that, the dough should be left for another 20 minutes in a bowl;
- The dough rolls into a thick sausage and is divided into small pieces;
- Each piece rolls out. You should get a long thin sausage (length 25 cm);
- Future grissini are wetted with water and sprinkled with sesame;
- The oven must be heated to 200 degrees. The baking sheet is lubricated with oil. Future breadsticks are placed on it.
Cooking time - 25 minutes. After that, grissini can be served at the table.
With parma ham
Parma ham is characterized by a unique spicy taste. This appetizer is very popular among Italians. In our country, they increasingly began to prepare it for various celebrations and receptions. This dish will be a worthy addition to any table. To prepare it, you need yeast dough and Parma ham.

Ingredients:
Flour - 0.35 kg;
Water - 1 glass;
Dry yeast - 10 gr;
Salt - 10 gr;
Olive oil - 50 ml;
Sugar - 1 tbsp. l.;
Parma ham - 02 kg
- Yeast is stirred in warm water. After that, sugar, salt and olive oil are added to them;
- Slowly and carefully add flour. Next, a soft dough is kneaded;
- The resulting dough should be covered with a soft towel and put in a warm place for half an hour. After that, the dough is laid out on a hard surface and kneaded. Before rolling it out, you need to wait another 40 minutes;
- The dough is rolled out to a layer of two centimeters and cut into small strips. Next, each strip is rolled into a thin strip;
- The resulting sausages are sent to an oven preheated to 220 degrees and baked until golden brown;
- Each cooled stick is wrapped in a slice of Parma ham.
Video recipe for bread sticks made from rye flour without yeast
This video will show you one of the grissini options. This recipe will appeal to those who love dishes based on rye flour. The recipe in the video does not require yeast to make bread sticks. Within three minutes, you'll learn what it takes to make rye sticks, how to knead the dough properly, and how to achieve the classic grissini shape.
For dough
- 110 g wheat bread flour
- 90 g water
- 0.1 g (grain) pressed yeast
For the test
- 1 kg wheat bread flour
- 480 g water
- 200 g sourdough
- 22 g salt
- 20 pressed yeast
- 100 g olive oil
- 100 g butter at room temperature
- coarse salt or sesame seeds for sprinkling
STEP-BY-STEP COOKING RECIPE
Measure the ingredients for the dough. Knead . To do this, dissolve 0.1 g (literally crumbs) of yeast in water, add flour and mix with a wooden spoon until the flour is moistened. Clean the sides of the bowl, cover the bowl with clingfilm or a lid, and leave the dough to ferment for 12-14 hours at room temperature (about 25°C).
Measure the ingredients for the dough. Mix yeast in water. Combine the flour and water in the mixer bowl, attach the hook attachment and knead on low speed. Add biga and salt, knead at low speed for 5 minutes. Increase the mixer speed to medium and knead for about 5 more minutes, until the dough is smooth. While continuing to mix on low speed, gradually add the olive oil and butter.
Grease a large bowl or container with oil. Transfer the dough into it, cover with a film or a lid and leave to ferment for 1 hour. Punch down the dough using the stretch and fold method. Return the dough to the bowl, close and refrigerate for 1 to 8 hours.
Line baking sheets with baking paper. Dust your work surface with flour. About an hour before the expected start of baking, turn on the oven to warm up, setting the temperature to 190 C.
Remove the dough from the refrigerator, separate about a third, return the rest to the cold. Roll out the dough into a rectangle about 6 mm thick. Drizzle with water to help the topping stick, and sprinkle with salt or sesame seeds (optional). Using a pizza cutter or large knife, cut the dough into strips 12 mm wide. Spread on baking sheets, cover with foil and leave to proof for 30 minutes.
Remove the cling film and place the trays in the oven. Bake for 15-18 minutes, depending on the thickness of the sticks. The finished grissini will be golden brown and crispy. While the first batch of dough is baking, roll out and cut the next one. Cool the baked grissini on a wire rack.