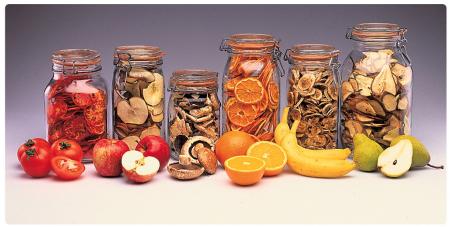
Dried apples in the microwave. How to dry apples for the winter at home in the oven and microwave
In the winter months, when the body is so lacking in vitamins, dried fruits come to the rescue. If you figure out how to dry apples in the oven or microwave, you can prepare a healthy product in any volume in a short time and with minimal hassle. True, it is necessary not only to master the technique of processing fruits, but also to know how to choose fruits and prepare them. According to experienced housewives, the use of a microwave oven, gas or electric oven allows you to achieve a texture that is not as “rubber” as that of ingredients dried in fresh air.
Before drying apples in a microwave or oven, it is necessary to select suitable fruits and carry out their initial processing. The chances of getting the desired results will increase if you consider the following rules:
- We give preference to sour or sweet and sour apples of winter varieties, without a tart aftertaste. The flesh should be light yellow or white, firm, without watery patches. Sweet apples after drying at home become almost tasteless.
- At the very beginning of work from fruits, you need to select the most beautiful ones, without damage and signs of spoilage. We wash them under running water, clean from the core and peel. Summer varieties are best left with the skin on.
- We spread the blanks for several minutes in water with the addition of a few drops of vinegar or a pinch of citric acid. This will protect the flesh from browning and staining.
- If there are any questions about the quality of the fruit, then the slices can be additionally blanched for 5-7 minutes. But it is worth considering that this technique reduces the benefit of the product.
Cut the prepared fruits into slices, 5 to 7 mm thick. Depending on what principle of drying apples at home will be applied, additional manipulations may be necessary.

How to dry apples in a gas oven?
To learn how to properly dry apples in a gas oven, the first time you have to work hard, but then the manipulation will seem easy and fast. The process itself consists of several stages:
- Choosing the optimal mode. We warm up the chamber to 50-55ºС. If you keep the blanks at a higher temperature from the very beginning, they will quickly become covered with a crust that will not allow moisture to evaporate. Pieces of fruit will not dry out, but simply baked.
Tip: When using a gas oven to dry fruit, the air in the kitchen becomes very heavy, which is not only unpleasant, but also somewhat dangerous to health. You can reduce potential risks by regularly ventilating the room. Even the strongest hood will not cope with such smog.

- Choice of approach. At home, apples can be dried on a baking sheet or wire rack. In the first case, we line the surface of the fixture with parchment paper and lay out the cut in one layer. In the second - just put the pieces on the grill. This option allows you to dry the workpieces more evenly and spend less time on it.
- Exposure time. The duration of the manipulation is from 3 to 8 hours. Such a difference may be due to the size of the pieces, the type of product, the quality of the oven, the type of drying (on a wire rack or a baking sheet) of fruit. In any case, 1.5-2 hours after the start of processing, the products should be turned over.
At the initial stage of processing, the oven door should be kept ajar, then the moisture will evaporate more actively. After the first mixing of the components, the door can be closed and the temperature raised to 70°C. As soon as the blanks can be dried to half of their original volume, the temperature is again lowered to the starting one.
Features of using an electric oven
The indisputable advantage of drying fruits in such an oven is the fact that the air in the kitchen does not become heavier from such manipulation, it is easier to regulate and control the temperature level. And useful components with this approach are destroyed much more slowly. True, in order to achieve optimal results at home, you must adhere to the following rules:
- Processing begins with a temperature in the region of 60ºС, this figure can be increased as the product dries. Permissible maximum - 80ºС. After reaching this temperature level, open the oven door slightly so that the moisture begins to come out more actively.
- The cut is laid out on parchment paper, laid out on a wire rack. Once every 1-2 hours, the slices are turned over. In this case, it is better not to use a baking sheet, the products will bake unevenly and may burn.
- Drying time for fruit is 5-8 hours. The denser and more acidic the product, the longer it dries. An hour before turning off the temperature in the oven should be reduced to the original, this will reduce the risk of burning the elements.
For more uniform drying of the components, the drying modes in the electric oven should be alternated from low to medium and vice versa. If you do not want such difficulties, you can use the convection function and simply leave the grate at the middle level.
How to dry apples in the microwave?
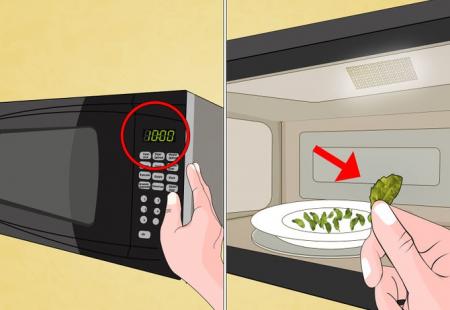
If you want to get the result as quickly as possible, you need to learn how to dry apples in the microwave. Manipulation is very simple, you just need to practice a few times and everything will start to turn out quickly and tasty. Spread the sliced apples in a single layer on a suitable plate. We set the microwave mode to 200 watts. We set the timer for 3 minutes, but for a better study of the products, it is recommended to check them every 30 seconds. If necessary, we run the device several more times until an optimal result is obtained. Fruits are considered ready when their flesh becomes soft, stops sticking to hands, changes color to cream.

In the microwave, apples can be cooked not only in the traditional dried form. This type of processing allows you to get delicious apple chips. We spread the sliced, soaked and dried fruit slices on a special overlapping grill and cook on the “Grill” mode for a quarter of an hour. In the middle of cooking, the components can be turned over so that they are evenly baked. The finished product is flavored with lemon juice and sprinkled with cinnamon.
After drying the products at home is over, you need to make sure that the products are ready. To do this, we take one slice in our hands and try to bend it. If it does not break, and the hands remain clean, the product is ready. Fragile slices that break into pieces indicate that they are overdried. This does not mean that they need to be thrown away, they may well be suitable for making compotes.
In the summer, fruits, berries and greens are cheaper, many have their own dachas and gardens, so the hostesses strive in various ways to preserve the harvest for the winter. There are several ways, but it is most convenient to dry the blanks using a microwave oven.
This process is simple and not too time consuming. Suitable for different berries: raspberries, strawberries, blueberries, black and red currants, bird cherry and mountain ash. Initially, they need to be washed very well, dried from excess water, and only after that you can proceed to the main drying. To do this, you need to evenly place them on a microwave dish and turn it on at 200 watts.
Drying will take only a few minutes, after which you need to check if they are dry. If not, then the berries can be turned over and put in the microwave for a few more minutes.

You can also dry fruits, any that you have. Before drying, they must be processed. To do this, thoroughly wash, dry and remove, if necessary, the core. Then cut into slices or cubes and proceed to drying in the microwave. The power is set to the same - 200 watts. The drying period depends on the size of the cut fruit.
Three minutes is usually sufficient, but you can extend the time if necessary. Using a microwave oven, many hostesses dry greens, which, with this type of heat treatment, fully retains its beneficial properties. It can be dried both with branches and finely chopped.
Before drying, the greens must be washed and slightly dried. Only then can it be placed in the microwave. For finely chopped greens, a microwave power of 180 W and two to three minutes is enough. But for drying greens with twigs, it is better to add power by another 20 W, and increase the amount of time to three to four minutes.

You can dry berries, herbs and fruits with a microwave oven at any time of the year. This is very convenient, since it is very difficult to dry blanks for the winter without it. You can also dry the blanks for the winter using a conventional oven, which is similar in drying technology to using a microwave oven.
When choosing a microwave oven for preparing preparations for the winter period, you can be sure that all the necessary vitamins and nutrients are stored in them, which are simply indispensable during beriberi.
A thrifty housewife already in the summer is thinking about what she will feed her family in winter, when the prices for fruits, vegetables and greens “bite”. During the harvest, intensive work is carried out - everyone cooks compotes, juices, jams, canned food, but the easiest and cheapest option for preservation is drying.
The main advantage of such storage of products is the safety of all nutrients and vitamins, flavonoids, microelements. Fiber (pectins) improves digestion, microelements improve health, stimulate brain activity.
It is also important for the hostess that dried products take up little space. We will learn more about how to properly dry apples in the microwave for the winter, as well as prepare mushrooms and herbs, medicinal and aromatic herbs.
How to dry apples in the microwave at home
Rules for preparing apples:
- for harvesting dried apples, it is advisable to take winter sour varieties. If you still dry the summer harvest, then it is better with the skin, but the quality of the blanks will be lower;
- it is necessary to select the fruits intact and without worminess;
- wash and dry apples thoroughly;
- cut the apples into small slices up to 5 mm, remove the core (you can not remove it for compote);
- it is recommended to soak the slices in salted water (20 grams of salt per liter of water) for 3-4 minutes. It will brighten dried apples, protect against insects and increase shelf life.
Important. Apples from your garden are best dried with a peel, there are many useful substances. And if the fruits were purchased in a store, then it is better to do without the peel.

Consider a step-by-step process - how to dry apples in the microwave for the winter:
- put apple slices on a dish covered with cotton cloth, not a thick layer;
- put in the microwave, dry at a power of 200 watts for 1 minute. The duration of drying depends on the size and juiciness of the pieces;
- remove the plate, turn the slices over on the other side and dry again at the same power for 1-2 minutes;
- every half a minute check the condition of the apples, if after turning off they are damp, turn on again for 20 - 30 seconds;
- in ready-made slices, the skin will fade, and the flesh will not stick to the hands. The slices will become creamy and soft to the touch;
- remove the blanks from the oven and additionally dry them in the open air, spreading a cloth towel on the table and laying the slices in one layer.
It is better to store any dried fruits in a glass container or in a durable fabric bag in a cool, dry place.

Dry herbs and herbs
A microwave oven can quite cope with the preparation of dried herbs, fragrant herbs, which give a special aroma and taste to dishes. And if the greens are grown in their own garden, then it will be the cheapest and most environmentally friendly products. Usually dill, parsley, basil, mint, celery, lemon balm and other plants are dried.
Important. To preserve the natural aroma and taste, drying herbs and herbs should be carried out as quickly as possible.
Step-by-step instructions for drying dill in the microwave:
- rinse twigs without stems, put in a colander;
- finely chop, put on a paper or cotton towel in a thin layer;
- cover with the same towel on top so that the greens do not burn;
- put a plate of greens in the microwave, put pressure on top with a load, for example, put a glass of water;
- dry for 3 minutes at a power of about 800 watts;
- periodically (every 30 seconds) check the degree of readiness, you can extend the process by 10 - 20 seconds if the greens are damp.
Store herbs in a dark cool room, in sealed bags, shelf life is one year.

Important. Well-dried leaves turn pale, become dry and brittle.
Drying mushrooms in the microwave
Dry mushrooms are a good help for the hostess in winter, you can diversify the menu and save money. Is it possible to dry mushrooms in the microwave, and what types, do they contain a lot of moisture, can the microwave oven handle it? We will tell you how to effectively prepare dried mushrooms.
It is advisable to dry the tubular and marsupial species of mushrooms (porcini, boletus, boletus, morels, truffles), and from lamellar mushrooms and champignons are not bitter and dry well.
Process preparation:
- mushrooms must be selected dense, whole, without rot;
- They do not need to be washed, they absorb a lot of moisture and do not dry out for a long time. Thoroughly clean the mushrooms with a brush, wipe with a damp cloth;
- in noble mushrooms, hats are cut into slices, legs in 2 cm circles, in chanterelles, honey mushrooms, only hats are oiled, cut into 1 cm plates;
- it is advisable to dry (dry) the mushrooms before the main drying in the microwave, this can be done in any room or in the sun. If they are not dried, they can release juice in the oven.

How to dry mushrooms in the microwave:
- put the chopped mushrooms on a wire rack, dish, tray, spreading a cloth napkin or towel;
- place in the microwave for 15 minutes at a minimum mode of 100 - 180 watts. The duration of processing may vary, it all depends on the thickness and moisture content of the slices;
- remove the dish, drain the accumulated liquid, ventilate the oven for 5-10 minutes from moisture;
- do a second drying, then a second airing, and so on several times;
- after drying, spread the mushrooms on a table in the open air and hold for half an hour.
Important. Mushrooms should be checked after each cycle. If they quickly break down and crumble, then they are overdried. Properly dried mushrooms should be flexible, not immediately break.
Mushrooms should be stored in glass containers or in strong moisture-proof bags in a dry, well-ventilated area. The best but expensive option is a vacuum container.
Drying berries
You can also dry berries in the microwave, as they are much healthier than in the form of jam. It is better to dry large berries - strawberries, grapes, cherries. For fragrant tea and compote, currants, raspberries (slightly unripe) are dried, you can also prepare mountain ash, blueberries, chokeberry. All useful substances are preserved in dried berries, and chokeberry (aka chokeberry) becomes less tart. The berries are selected whole, dense, the collection is made in warm sunny weather.

Berries are dried almost the same as greens:
- laid out on a tray or dish covered with a paper towel in small portions;
- from above with the same towel close;
- the power is set to 200 W, the drying time is 3 to 5 minutes, since there is more moisture in the berries;
- it is necessary to dry in several stages, constantly checking the degree of readiness (every half a minute).
There are many options for using dry blanks, but first they need to be washed with running water, and then soaked for several hours in cool water. Cooking will become easier, and the taste and aroma will be brighter.
Can you dry apples in the microwave? Scientists have proven that dried apples help the body fight against various diseases. They strengthen blood vessels, regulate cholesterol levels, and are an excellent tool for the prevention of osteoporosis.
In addition, dried fruits contain cellulose, which improves digestion and stabilizes the intestines.
To obtain supply of these useful elements, apples can be dried in the microwave. You can dry fruits in this household appliance, but it is important to do it correctly so as not to overdry the apples.
Basic Rules
How to dry apples in the microwave correctly? For cooking apples, it is better to use winter varieties- sour-sweet or sour. These varieties include:
- Anise;
- Antonovka;
- Aport;
- Titovka;
- Slav;
- Borovik.
Used to prepare dried fruits and summer varieties or carrion. But the final product will be of poor quality. Summer varieties are dried with skins.
For this you will need:
- Fresh apples in any quantity.
- Fabric bag.
- Large glass bowl.
- Cutting board.
- Cotton fabric.
 Before drying apples in the microwave, you need to process, not all at once, but in portions. If all the apples are processed at once, they will oxidize and darken.
Wash and dry apples. Excess moisture will increase the drying process.
Remove core. This is done using a special tool. It looks like a tube with sharp edges.
The core can also be removed with a knife, cutting the apples into quarters. But if , then the core can be left.
Recommendation. If you have to dry apples from your garden, then you don’t need to peel the skin, because there contains many useful trace elements. Apples bought in the supermarket must be peeled.
Cut apples after processing with a knife or household slicer. The thickness of the pieces should not exceed 5 mm. Lay on a cotton cloth, put on a plate and send to the oven.
Prepared pieces of apples for 4 minutes can be soak in saline. It is a natural clarifier that will allow apples to become lighter after drying. The solution will also protect dried fruits from insects and increase their shelf life. To prepare the solution, 100 g of salt is taken in a bucket of water.
Before cooking, apples can soak in sulfuric acid within 3 minutes. This solution will repel pests and keep the color of the apples. The solution is prepared from 1 liter of water and 1 g of acid.
Step-by-step instruction
How to dry apples in the microwave for the winter:

Apples of early and medium varieties prepare faster than winter. The readiness of winter apples is determined by a darker color.
Recipes
How to dry apples in the microwave? In the microwave, you can also cook a wonderful dish of dried apples - apple chips. To do this, you need apples and spices such as lemon juice, sugar and cinnamon:
- Wash the apples, remove the core and cut them thin slices.
- Rinse the apple slices cold water so they don't stick to the plate. Leave the slices on a towel or wire rack to drain the water.
- Turn the oven on grill mode.
- Arrange apples on a rack.
- flavor lemon juice or cinnamon.
Drying apples, so you need 15 minutes. Ready slices should darken and become crispy. Drying time can be added if necessary. An even shade can be achieved by turning the slices over.
If the oven does not have a “grill” mode, then the slices just need to be laid out on a plate so that they do not touch each other. The microwave must be turned on at full power and wait until the fruit darkens and becomes crispy.
In apple chips prepared in this way, preserves the taste of apples.
They can be added to porridge, sprinkled with powdered sugar or sprinkled with honey to make them even tastier.
From dried apples, as well as fresh ones, you can make stuffing for pies and charlotte.
Only for this you need dried fruits soak in boiling water and then run them through a meat grinder.
In the finished mass you need to add sugar and cinnamon. Charlotte filling is ready.
Storage
dried apples not worth it place immediately in a container for storage. They must be scattered on the table, after spreading cotton fabric.
Apples are needed periodically mix and shake. So dried fruits will reach full condition.
It is necessary in cloth bags in a cool place, in baskets or special boxes. Sometimes you need a container shake so that the apple slices do not cake.
Summary
Different varieties of apples contain different amounts of juice, so each variety dries for a different time. If you put a lot of pieces on a plate at once, the drying time may be longer. Due to microwave energy in apples, it is possible to save maximum vitamins and minerals.
In addition, microwave drying is time saving as the whole process only takes a few minutes. And the apples at the same time are elastic and light.
Fall is the perfect time to start preparing for the winter. One way to store apples is to dry apples in the microwave. It allows not only to preserve the taste of fruits, but also the vitamins and microelements contained in them, which decrease when apples are preserved in jam or compote. And for storing such a blank, much less space is needed than, for example, for fruits frozen in the freezer. In addition, dried fruits strengthen the body's defense mechanisms, stimulate brain activity, thus they are very useful for schoolchildren and students, and they will not interfere with office workers either.
How to dry apples in the microwave?
Before you dry apples in the microwave, you need to know how to prepare them. To begin with, you should carefully sort out the fruits. Wormy and damaged apples are not suitable for drying in the microwave, as they will rot during further storage.
Then the apples should be washed well and cut into pieces. There are two options for cutting: you can remove the core from the fruit and cut into circles 1.5 - 2 cm thick or cut each apple into 8 slices - as you like. Sliced pieces of apples should be placed for 5 minutes in salted water. This way you will avoid oxidation, the apples will retain their color. Prepare salt water at the rate of 20 grams of salt per 1 liter of water.
We lay out the prepared pieces of apples on a plate in one layer and send them to the microwave oven for 2 minutes at a power of 200-300 watts. Then you should get a plate and check the readiness of the apples. They probably aren't ready yet. Therefore, set the timer for 30 seconds and send the apples to the microwave again.  Drying apples in the microwave happens abruptly: the fruit has just been raw and has already burned. The end result should be dried fruit - elastic to the touch, similar in appearance to apple chips, which will take about 3 minutes to cook. Empirically, you can deduce the exact time of how to dry apples in the microwave without overheating, and put each new portion in the microwave immediately setting the timer for the right time. Cooking time depends on the size of the apples, juiciness and the amount that can fit on a plate.