Dessert with custard and sauce. Dessert recipes with custard
Pour salted flour into a blender bowl, add butter, beat into buttery crumbs, pour in cold water, beat until a fairly thick dough is obtained.
Form a ball, wrap it in film, place it in a deep bowl, and put it in the refrigerator for half an hour. If you don’t have time to cook further, you can leave it there for a couple of days, then before cooking, let it sit in the room for a third of an hour and let it thaw.
Cut a disk of baking paper the size of the saucepan with a hole in the center. Boil water and sugar in this saucepan over high heat, reduce heat to medium, add the zest of one orange and peeled pears.
Cut the vanilla pod, add the vanilla seeds to the pears along with the pod, cover the top with a cut out circle to immerse the pears in the syrup as much as possible. Adjust the heat so that the boil is only slightly noticeable, boil the pears for 15 minutes until softened, let cool without removing from the syrup.
Roll out the dough into a circle according to the size of the mold, place it in the mold, trim off the excess, cover with paper, cover with peas or beans so that the bottom does not rise during baking, bake for a third of an hour.
Pour out the weighting agent, let the dessert base with pear filling and custard cool, and reduce the oven temperature to 175 degrees.
Cut the pears into 4 parts and place on the base.
Beat half a glass of sugar with the egg into a thick foam, gradually add flour, pour in cream, add salt and vanilla extract or brandy, beat again until a homogeneous mass is obtained, pour in the pears.
Bake in a preheated oven for 10 minutes, sprinkle with lightly fried almond petals mixed with a tablespoon of sugar. Continue baking for another third of an hour until the cream darkens slightly, let cool, cut into pieces.
Good afternoon Today I, together with iCook TM cookware, have prepared for you a wonderful, tasty, delicate and uncomplicated dessert.
“Playing” with berries and fruits, you can each time place a new emphasis on one simple base. Let's get started:
for 3-4 servings:
custard
2 eggs
2 tbsp flour/cornstarch
4 tbsp sugar
250 ml milk
1 tsp vanilla extract
70 g butter
caramel sauce
glass of sugar
glass of cream
2 peaches
3-4 apricots
1/2 cup blueberries
1/2 cup strawberries
1/2 cup cherries
Savoiardi cookies
iCook TM saucepan.
First, prepare the cream: mix eggs with flour, vanilla and sugar in a saucepan. Pour in the milk and stir well with a whisk. Place over medium heat and cook, stirring constantly, until thickened. Add butter to cream.
Remove from heat and pour into a bowl, cover with film so that a crust does not form on the cream.


Prepare the caramel by melting the sugar in a saucepan over medium heat until golden brown.


Pour in the cream, removing the saucepan from the heat, and stir until the vigorous boiling stops. Return to the heat and cook until the caramel has dissolved in the cream.
Pour the sauce into a glass.

Cut the fruits, berries, if necessary, too.

Pour warm custard into bowls and distribute fruits and berries on top.
Drizzle the dessert with caramel sauce and serve it with savoiardi cookies!
Bon appetit!!!

So, using iCook TM cookware, we prepared a wonderful, beautiful and tasty dessert in half an hour! No difficulties - the main thing is self-confidence and love for cooking!
Thanks to Optitemp technology, namely uniform and rapid heating of the pan, we easily cooked custard in the iCook TM saucepan. At the same time, the cream did not burn and no lumps formed. The cream turned out to be the perfect consistency!
We were also able to prepare caramel without any “adventures”, and you probably know that everything is not always simple).
High-quality materials, average temperature conditions and patented technologies provide excellent results and give us confidence that our culinary experiments will be successful!
I wish you a good mood and remind you that you can get acquainted with a wide range of stylish and multifunctional iCook TM cookware on the official website -
For garnish:
3 pears (smooth, not crushed)
500 ml water
250 g granulated sugar
Chocolate sauce:
100 g pear syrup
220 g dark chocolate
30 g unsalted butter
Preparation:
Shortbread dough:
1. Sift the flour into a bowl. Add sugar to flour.
2. Chop the butter into small pieces with a knife or grate it on a coarse grater. Add to the flour with sugar and mix. The mixture should look like crumbs.
3. Make a well in the center of the mixture and add the yolks, then the vanilla essence. Knead the dough.
4. Wrap the dough in cling film and refrigerate for 30 minutes. Then take it out, roll it out, cut out circles of the required diameter and line 12 small molds with them.
5. Prick the dough with a fork and put it back in the refrigerator for 30 minutes.
6. Preheat the oven to 180C.
7. Line the pans with foil or parchment paper and fill the pans to the brim with ceramic beans or dried beans/peas. This is a very important point, since the weight during baking does not allow the dough to deform.
8. Bake in the oven for 15 minutes, then remove the weight and continue baking without it for another 10 minutes. Let the dough cool slightly, then remove from the tins, place on a baking sheet and fill to the brim with custard.
Bake again in an oven preheated to 180C for 20 minutes. The cream should turn golden.
Garnish:
Pour water into a saucepan, add granulated sugar and put the syrup on the fire. Bring to a boil, leave the syrup to simmer over medium heat for another 10 minutes.
Prepare the pears: carefully peel them, do not remove the stem.
Place prepared fruits in syrup. The syrup should completely cover the fruit. Cover and cook over medium heat for about 25 minutes to 30 minutes (depending on whether you use hard or soft pears).
Turn occasionally to cook evenly. Remove fruit from syrup.
Let cool.
Carefully cut the pears with the stem into 2 parts. Make a fan out of the pear - carefully cut into thin strips, not reaching the base with the stalk.
Chocolate sauce:
Break the chocolate into pieces and pour in some of the sugar syrup in which the pears were cooked. Stir until the chocolate is completely melted. Add butter while stirring.
Serve hot or cold.
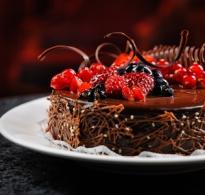
Assembly:
Place 1 quiche and pear on a plate, spread into a fan shape. Drizzle chocolate sauce over pear.
The dessert can be served either warm or cold.
Bon appetit!
27.01.2015
Custard - dessert, filling and decoration
Custard is not only an independent dessert, but also an impregnation for various cakes, a delicious filling for confectionery products (cakes, eclairs, profiteroles, waffle rolls and cones, “Nuts” cookies, etc.). Ideal for the famous Napoleon cake.
There is an opinion among people who do not understand the intricacies of cooking that custard comes in only one type and is not divided in any way. But, as it turns out, there are a great many variations in the preparation of this dessert, familiar from childhood.
Firstly, custard dessert can have different tastes, although it is prepared exactly the same. It depends on the juice filling: whichever you prefer for making dessert, that’s what the taste will be.
Secondly, the cream varies in consistency and composition. Naturally, the creamy mass will also have a different taste and, in some cases, color. If we talk about the different composition, the first thing that comes to mind is custard made with egg whites, which even tastes significantly different from the meringue preparation. Still, heat treatment does its job and greatly changes the taste.
The taste of custard comes from childhood. Remember how you liked to lick the “roses” from a beautiful birthday cake. In Soviet times, there was no abundance of food dyes, and cakes were prepared using natural ingredients. That is why the colors on many cakes were not pleasing with their variety, but were reduced to yellow, pink, white and pale green. Nowadays, when our chemical industry is ready to invent any dye with the most incredible color, housewives began to prepare custard on their own at home and use natural food dyes.
Classic custard contains no dyes.
But at the same time, it is ideal for decorating cakes, because... holds the shape of flowers, leaves and borders well. The main ingredients that go into the classic custard miracle of cooking: milk, eggs, flour, sugar.
Of course, each new recipe may differ from the previous one, therefore, by slightly changing the recipe by at least one ingredient, you will get a completely different taste and consistency of the cream. So all experiments with custard should be done not immediately before the holiday, but ahead of time, in order to figure out whether you like the taste and appearance of the cake impregnation.
Decorations in the form of graceful flowers, leaves, or ornate lines for the sides of the cake hold up well and do not deteriorate during the day at room temperature.
Most wedding cakes are decorated with protein custard.
This decoration applies only to classic wedding cakes. Modern “naked” cakes are almost never decorated with cream. Unlike buttercream, a bouquet of custard roses will not flow at standard room temperature. Custard creams tolerate coloring well with food dyes, so you can use them to create any paintings and cake decorations.
Almost all recipes for one or another custard (except protein) include wheat flour. With its help, the mass turns out thick and holds its shape well.
Custard for sponge cake.
If you remember the classic sponge cake recipe, there are no flavoring additives, and the composition comes down to flour, sugar and eggs. Therefore, any sponge cake prepared according to a standard recipe can only be saturated with the taste of the cream with which the cakes are coated. Depending on what taste you want to give to the biscuit, this additive should be added to the creamy mass. To make chocolate custard, replace one tablespoon of flour with a tablespoon of cocoa powder. But you can also use standard flour and melt half a bar of dark chocolate. For a white sponge cake without additives, a chocolate custard recipe works well.
Custard is a classic of the genre! It seems that everything is simple, but at the same time, not everyone succeeds. Like any recipe, making a good custard has its own characteristics.
● The best utensil for making custard is a stainless steel pan with a double bottom, as it heats and distributes heat more evenly.
● It is advisable to cook the custard in a water bath. This method is guaranteed to protect the dessert from curling and ensure uniform heating.
● When cooking, the cream must be stirred constantly. Do not use a metal spoon or whisk for stirring. It is best to use a wooden or silicone spatula for this. And the stirring itself must be done in the form of an infinity sign (a kind of figure eight). In this case, the mass will not burn, will mix evenly and become a homogeneous consistency.
● To whip egg whites faster, add citric acid. Add a little salt to the yolks.
● There is a risk that egg whites may curl and form lumps during the heating process. To prevent this from happening, use only egg yolks. This will make the cream richer and only taste better.
● If the cream is not thick enough for the filling, add a little softened butter. To prepare a thick, long-lasting cream, do not use a large amount of liquid.
● Instead of a stabilizer for cream, you can use starch in a ratio of 8 g of starch per 200 ml of cream.
● To quickly and efficiently squeeze juice from citrus fruits, place them in hot water for 3-4 minutes.
● The readiness of the cream can be determined using a regular spoon. If you dip it into the cream and take it out, a light mass that evenly envelops the spoon will mean that the cream is completely ready.
● You can check the readiness of the custard dessert using a knife. If you stick it into the middle of the dessert and it comes out clean, then the dish is ready.
● If the cream is not used immediately after preparation, then the mass should be allowed to cool to room temperature, stirring frequently (so that a thick film does not form during storage), then sprinkle sugar on top and put in the refrigerator. You can also place oiled paper on the surface of the cream.
● Vanillin, if you like it, is best added to the cooled custard. In a hot mass, it not only quickly reveals the aroma, but also quickly disappears.
● If you trace the moment of overheating a little and see that the cream is ready to curdle, you need to quickly remove the pan from the heat and lower it into cold water with ice.
● It is better to cool the finished custard to a temperature of 10°C. In order for the mass to cool faster than at normal room temperature, place the pan in cold water, and then after a while place it in the refrigerator.
● To give the custard a more airy and delicate texture, you can pass it through a fine sieve.
● To diversify the classic taste of custard, you can add any ingredients to it. If you want to add berries or large pieces of fruit, this should be done at the very last moment of cooking. Products that need to be boiled to release their flavor (dried apricots, prunes, lemon zest, chocolate, nuts) should be placed in warm milk at the beginning of cooking.
● To calculate the weight of a particular product, the Comparative Table of Weights and Measures will help you.
Every family has its own favorite type of custard, which is the hallmark of any homemade dessert. Don't be afraid to experiment, because creating new, delicious varieties of custard is always fun!
Let cooking become your favorite pastime and a wonderful hobby!

Recipe 1. Custard according to GOST
Custard prepared according to Gosstandart is gelatinous, homogeneous, and pale yellow in color. Due to the fact that it does not hold its shape well, it is used, as a rule, only for lubricating (impregnating) cakes and as a filling for confectionery products. The shelf life of such custard is no more than 6 hours from the moment of preparation, so it is recommended to use it immediately for its intended purpose.
Ingredients:
✵ whole milk - 372 g (1.5 cups);
✵ butter - 13 g (1 heaped teaspoon);
✵ chicken eggs - 75 g (2 pcs.);
✵ wheat flour (highest grade) - 45 g (1.5 tablespoons);
✵ granulated sugar ‒ 193 g (1 cup);
✵ vanilla powder - 0.2 g.
Preparation
1.
Heat the flour well in the oven at 110°C for 40-50 minutes until a pleasant smell of roasted nuts appears, then let it cool.
2.
Lightly beat the eggs with a fork until smooth, combine with flour and mix thoroughly until lumps disappear. 
3.
Pour sugar into the milk, stirring, bring to a boil and immediately pour into the whipped egg-flour mixture in a thin stream. 
4.
In a separate larger diameter pan, boil water and in this water bath, boil the mixture at a temperature of 100°C for about 10 minutes. During this time, the cream should thicken as a result of gelatinization of the flour.
6.
Remove from heat and start beating again, adding butter and vanilla powder. 
7.
Then the custard needs to be cooled quickly.
The yield of the finished product is 0.5 kg, just enough for one small cake.
Cook with pleasure!

Recipe 2. Custard with liqueur
Perhaps everyone has ever encountered this situation: you cook according to a recipe, do everything correctly, but the result, to put it mildly, is not very good. Some begin to blame their “crooked” hands, others - the authors of the recipe, and for others, after such a failure, the desire to bake something may disappear for a long time. In fact, very often it’s not a matter of hands or even a recipe, but rather the peculiarities of the cooking technique. That's why we're sharing one of the basics with you so that your pastry experiments will always be on top.
Ingredients:
✵ milk - 500 ml;
✵ egg yolks - 4 pcs. (90 g);
✵ liqueur ‒ 5-10 ml;
✵ corn starch - 45 g;
✵ granulated sugar ‒ 200 g;
✵ vanillin - on the tip of a knife (or 1 teaspoon of vanilla sugar).
Preparation
1.
Pour half the sugar into the egg yolks and immediately mix thoroughly with a whisk to prevent lumps from forming, which will later spoil the smooth structure of the cream.
2.
Then add starch to the yolk mixture and stir thoroughly again with a whisk.
3.
Pour the milk into a ladle, add vanillin and the other half of the sugar, bring to a boil and remove from heat.
4.
Add some of the milk to the yolk mixture, stirring quickly with a whisk, then pour it all back into the ladle with the remaining milk.
5.
Now comes the most crucial moment. Cook the custard using a whisk. Return the mixture to medium heat, stirring very vigorously so that no lumps form. At first the mixture will be liquid, but as soon as it begins to thicken, immediately remove the ladle from the heat, continuing to stir very vigorously until thickened. If you leave the ladle on the stove, lumps may form because... the starch will set too quickly. Once you have a smooth, even texture, return the ladle to medium heat. Stirring constantly, bring to a boil and cook for about 1 minute to get rid of the starchy taste. All this time, work very actively with the whisk, not just stirring, but stirring intensively, without stopping.
6.
The finished cream must be cooled immediately by transferring it to a flat bowl and covering the surface of the cream with cling film to prevent a crust from forming, and then put it in the refrigerator. 
7.
After the cream has cooled completely, transfer it to a bowl for further work. It will have a slightly rubbery texture that will need to be smoothed out with a whisk.
8.
At this stage, you can add any liqueur to your taste and stir the cream with a whisk until it becomes a smooth, shiny mass, but do not stir it for too long, because. starch-based creams do not restore their structure. As soon as the cream becomes smooth and homogeneous, immediately stop kneading.
9.
The finished cream does not spread, holds its shape so much that it can be used for shaped design using a pastry bag (syringe).
It is recommended to store the custard in the refrigerator for no more than one and a half days.
Cook with pleasure!

Recipe 3. Butter custard
The proposed recipe is very successful and probably the simplest. Thanks to the addition of butter, the cream turns out more fluffy, holds its shape better and is suitable for curly decoration.
Ingredients:
✵ milk (or cream) - 150 g;
✵ butter - 150 g;
✵ egg yolk - 1 pc.;
✵ flour (or starch) - 2 tbsp. spoons;
✵ granulated sugar ‒ 150 g;
✵ vanillin - to taste.
Preparation
1.
Mix egg yolk with sugar and milk. Add flour (starch) and vanillin.
2.
Boil the resulting mixture over low heat, stirring continuously, to the desired state: to obtain a fairly thick milk sauce.
3.
Remove from heat and cool. 
4.
Beat the butter until white and fluffy. Continuing to beat, gradually add the egg-milk sauce. Oil and sauce should be at the same temperature. If the butter separates a little, continue beating until smooth and shiny. 
The result should be a thick, stable cream, suitable for filling and shaped decoration. This cream can be filled
A light summer dessert made from custard with gelatin.
A simple jelly recipe with calorie calculations.
A dish for those who benefit from gelatin.
Delicious sweet for hot weather.
Custard for a classic Napoleon is a delicious thing. It perfectly copes with the role of a summer dessert - boil a thicker cream, cool, pour into cups, add fresh berries, fruits, chocolate or jam with a bright taste - a wonderful delicacy.
If you complicate the task a little - add gelatin, you can get the consistency of a soufflé or jelly. A little butter will add tenderness, the jelly will not be rubbery. For a consistency closer to a soufflé, a moderate amount of gelatin is required, then the dessert will take longer to harden in the refrigerator, but the result is worth it.
Custard with sour cream is perfect for soufflé or jelly. It very rarely burns and cooks faster than milk, so any beginner in the kitchen can do it.
Custard with vanilla sugar from non-acidic sour cream tastes just like ice cream, like milk cream.
The recipe is incredibly simple, but requires checking for sweetness and possibly adjusting the sugar to suit your taste. Please note that adding gelatin diluted with water will slightly reduce the sweetness of the cream.
Gelatin custard can be poured into different shaped molds, large and small. This dessert looks original and attractive.
You can decorate a cake or dessert in bowls with small roses, hearts, and flowers from silicone molds. This is a good substitute for buttercream roses, which require more time and skill.
Our dessert can be complemented with bright berries or fruits, jam or jam. It will be delicious and beautiful.
For topping, you can crush walnuts on a board with a rolling pin and mix with ground chocolate.
The recipe does not require pharmaceutical precision; a little more or less water, sour cream, sugar, and butter is acceptable.
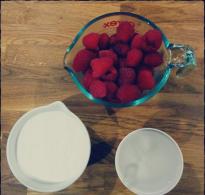
Ingredients:
- Sour cream 20% –100 g
- Eggs – 1 pc.
- Starch – 1.5 tablespoons – 15 g
- Vanilla sugar – 1 teaspoon
- Sugar – 100 g
- Butter – 25 g
- Gelatin – 12-15 g
- Water in cream – 150 ml
- Water for swelling gelatin – 100 ml
Preparation:
It is better to cook custard in a thick-walled container or in a water bath to avoid burning. Although sour cream is unlikely to burn in a small portion of 1-2 eggs, it thickens too quickly. In any case, this cream has never burned for me.
You can see the recipe for making sour cream custard with photographs.
1. Mix sour cream with starch so that there are no lumps. Gradually add the egg, sugar and vanilla sugar, and water while stirring.
2. Place the dishes over low heat and bring to a thick consistency while stirring. When the first bubbles appear, remove from heat. Add butter, stir. Cool until warm.
3. Pour gelatin into a cup, add 100 ml of cold water, leave for 10-15 minutes. The gelatin will swell. While stirring, heat the mixture in a water bath until the gelatin crystals are completely dissolved, but do not bring to a boil. The solution will have the consistency of liquid syrup.


4. Pour gelatin into warm cream. Mix. Pour into molds, cups or salad bowls. You can add berries or pieces of fruit. Cool to room temperature, cover with film, and place in the refrigerator. Depending on the size of the dish and the temperature in the refrigerator, the jelly will be ready in 1-2 hours.


This is what frozen jelly looks like in bowls.

When using shaped molds, the jelly mass must be fluid so that voids do not form, which will be noticeable when we turn the mold over. If the jelly mixture has cooled down, become too thick and does not flow, it must be heated in a water bath.
If the jelly is not intended to be turned, the temperature of the jelly mass is not particularly important.
5. Remove the jelly from the molds. There are several methods for this.

The jelly molds should be kept in a bowl of hot water for a very short time or slightly heated with a hairdryer.
You can turn the mold over onto your palm and place it under hot tap water and after 10 seconds try to lift the mold. If it hasn't come off yet, hold it on a little longer. There is no need to be afraid that the jelly will fall apart in your hand, it is quite strong.
In my opinion, the most convenient method for silicone molds is keeping them in the freezer. Keep the jelly in the refrigerator for about an hour, then place it in the freezer. Check after 15-30 minutes - pull back the wall of the silicone mold. If the jelly is still stuck to the mold, hold it a little longer.
It's okay if the jelly freezes completely, it can be quickly defrosted at room temperature.
Jelly in metal molds is also convenient to take out after storing in the freezer.
6. The finished dish can be served with berries, chocolate, nuts, or simply topped with jam.


Jelly in cream bowls can be smeared with jam and sprinkled with chocolate chips or decorated with small jelly figures.


Calculation of calorie content of a dish
Calorie content of 100 grams of jelly: 960: 560 × 100 = 171 kcal
© Taisiya Fevronina, 2018