Legendary perfection: Homemade Oreo cookies. How to make your own Oreo cookies How to make Oreo cookies at home
Oreo cookies are a product with a memorable advertisement: “twist, dip, lick...” Very popular lately! If your child is begging for Oreos like my daughter, congratulations. Have you already seen the expiration date on the packaging? Do you know what a year is for a confectionery that contains milk? That’s what I mean: during production, a significant amount of preservatives and additives, including harmless ones, were used! So I would look for a homemade Oreo cookie recipe.
So here it is. The recipe is clear, easy to prepare, all ingredients are available. An interesting way to form cookies: there is no need to roll out the dough and cut out circles from it. Everything is done much faster and easier. And more interesting. Be sure to try making this super chocolatey, melt-in-your-mouth crumbly treat.
Ingredients
Dough:
- cocoa powder 4 tbsp. l.
- wheat flour 4 tbsp. l.
- baking powder 0.5 tsp.
- butter 150 g
- powdered sugar 2 tbsp. l.
Cream:
- butter 50 g
- powdered sugar 2 tbsp. l.
- cream 33% 100 ml
How to make Oreo cookies
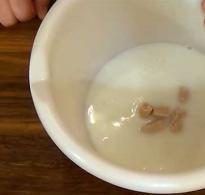
 I am preparing everything necessary. The butter will need to be softened, so I take it out of the refrigerator in advance.
 Place soft butter and powdered sugar into the bowl of a food processor.
 Beat until a fluffy light mass is obtained. Add cocoa powder, baking powder and flour.
 Process until a soft, buttery chocolate dough forms. It should crumble a little, but still come together well into a lump. I put it on cling film.
 I compact and form a long sausage with a diameter of 4-5 centimeters. Be sure to pay a lot of attention to this process; there should be no air voids left inside. I place the workpiece on a flat surface and put it in the refrigerator for 1 hour.
 I free the chocolate sausage from the cling film and cut it into circles 3-4 millimeters thick.
 I transfer them to a baking tray lined with baking paper. The cookies increase in volume just a little, so you can lay them out quite tightly.
 Place in a preheated oven and bake at 180 degrees for 8 minutes. I take it out and leave it to cool right on the baking sheet. Do not touch under any circumstances until cool, as the cookies are very fragile.
 For the cream layer, use a mixer to mix soft butter with powdered sugar. Separately, whip the cream. I combine both mixtures, carefully mixing with a spoon.
 In the resulting cream, small lumps are allowed to appear, which are formed from contact of the oil mixture at room temperature with cold cream.
 I put a little cream on one cookie using a pastry syringe or a spoon. I cover with the second cookie.
 Before serving, the Oreo should rest in the refrigerator for at least 2-3 hours.


Note:
- It is better not to replace powdered sugar with sugar,
- Cocoa powder should be of the highest quality.
“Twist it. Lick it. Dip it." These actions are almost Oreo's philosophy. More than 35 billion cookies are sold annually in almost 100 countries. And it appeared on the Russian market two years ago. Local Oreo is produced at the Mondelēz International factory in the Vladimir region. The Village visited Sobinka to see how it is made.
Photos
Ivan Anisimov

Biscuit factory
Oreo has been produced at the Sobinka factory since August 2015: the company says that the product is still considered new for both the consumer and the manufacturer. This is in contrast to the US, where the cookies have been produced since 1912 and come in about 40 flavors, including blueberry, pumpkin and green tea. How the cookie got its name is not known exactly. Possibly from the French "or" - "golden" (previously the cookies were sold in gold packaging) or from the Greek "oreo" - "hill" (perhaps they were previously baked in the form of a hill). Another version is a strange play on words: two O's are taken from the word "chocolate", and between them the "re" is from the word "cream".
Not only Oreos are made in Sobinka: Yubileinoye and Belvita cookies, Tuc crackers and Barney Bear biscuits are produced on six production lines. The factory looks like a large rectangle: however, due to the abundance of equipment, you have to move around here quite carefully - people are walking along one aisle, electronic forklifts are driving nearby, and somewhere above all this - at the level of the second floor - thousands of chocolate medals are floating on a conveyor belt. It all starts with a raw material warehouse, then comes the actual production zones - dough, baking and packaging, then the finished product zone.
Sergei Sidorov, head of production section No. 2, calls himself a chocolate maker. He has been working for the company for 13 years and completed his internship at Mondelēz, where they made chocolate, not cookies. “By and large, there is no difference in the technological processes, but I received all the hardening there,” he says. Sidorov has worked at the Sobinka factory since 2010, but still does not recognize himself as a biscuit maker.
Factory Mondelez International
Location: Sobinka city, Vladimir region
Employees: 449 people
Square: 15 hectares
Power: up to 90 thousand tons per year


Dough like black soil
Most of the raw materials entering the warehouse are brought from Russia. Flavorings may be imported. All ingredients are validated and pre-tested. Oreo contains flour, sugar, butter, vegetable fat, cocoa, water, starch, syrup, baking powder, emulsifiers and flavorings.
After all the components have been delivered and unloaded, and the samples have been tested in the laboratory, the bulk raw materials - flour, sugar, butter, glaze - enter special silo containers. Other components - cocoa, soda, baking powder - are stored in bags and barrels.
Production starts after workers receive the plan: the warehouse issues packaging and raw materials, and employees in the formulation area begin preparing batches. Some of the raw material comes into a large mixer from the silos, the other part is weighed and added to the mixer by hand. The raw materials spend 15–20 minutes in the mixer: the components should be mixed and the mass should become homogeneous. For different products, the factory produces three types of dough: sugar, biscuit and layered. Sugar dough for Oreo cookies is considered simple and does not require additional control other than measuring the temperature. Sergei Sidorov says that preparing dough at a factory is no different from making it at home, except in scale. The output is loose lumps, which, outside of the production environment and sweet smells, are more like black soil.


Conveyor intersections
Next, the dough is unloaded onto the conveyor. The automatic strip is not parallel to the floor and carries the lumps somewhere near the ceiling. The technologist says that here there is a short resting of the dough before the molding section. The dough is checked by metal detectors - the ingress of foreign objects must be completely excluded.
Molding gives the cookie its recognizable appearance. The dough passes through two rollers under strong pressure: as a result, the relief halves of the future cookies emerge onto the receiving surface. Visual control workers monitor the appearance of the product, and the quality department monitors the quality of the drawing. If necessary, the molds are changed on the conveyor - cocoa in the dough is considered abrasive, so they are erased from time to time.
The whole process is automatic: the conveyor is like a fast river with symmetrical islands of cookies. Each conveyor belt has its own characteristics: for example, what the cookies receive after molding is woven, gray in color and has a certain moisture content - the cookies should not stick to it.
After the woven fabric, the biscuits are transferred to the feeding fabric into the oven. This is followed by baking, which lasts about five minutes at a temperature of 200 degrees. The oven has six zones, but only four are used to produce Oreos. “Each zone is responsible for something: one is for moisture, another is for shape, the third is for stabilization. Each zone has its own microclimate,” explains Sergei. The oven operator controls the quality of baking: weighs and measures the diameter of the sponge cake with a caliper, checks the texture and determines the moisture level.
After the oven, the cookies continue their journey through the factory - the halves end up on a natural cooling conveyor, which meanders and forms entire intersections. After it, the product is ready to receive the filling.
The filling is made separately in an area of the factory called the kitchen. Its components are the same as in cookies: sugar, fat, vanillin. There is no cocoa in the vanilla filling, but in the chocolate filling, which just recently appeared in Russia, cocoa and chocolate flavoring are added. The operator prepares the batch and unloads it into the mixer, and the pump pumps the finished filling - liquid dense cream - through pipes to the sticker conveyor.


Three reels and two halves
Here the cookies diverge into two streams. Operators carefully ensure that no gaps form in the slender rows of chocolate, otherwise this will lead to defects and stop the entire process. Breaking the ranks cannot be allowed. The halves from one stream fall onto the drum with the pattern down, the filling is squeezed out onto them, the halves from the other stream fall into the drum with the pattern up - this is how you get a chocolate sandwich. Three reels seem to work at the speed of light, but Sergei notes that in reality the productivity is not that great. “The line on which Yubileiny is produced is called the Monster Line and is five times more productive,” he adds.
In the grip of drums and other serious obstacles, the cookies, of course, break. All cookies with defects in appearance are sent for recycling. This product is added to the new test in a minimum percentage.
After the two halves have found each other, the almost finished Oreos go back onto the conveyor - here the filling cools and its crystallization ends. Before entering the refrigerator area, there is one more visual control. Every day, thousands of cookies float before the eyes of employees.
Oreo has five packaging machines. The machines operate themselves, but they are fed manually. Only girls work here as operators. According to Sergei, men cannot cope with such work: the cookies are very fragile, you need to carefully take them from the line and transfer them to the cassette of the machine. “It looks easy, and the girls can also tell a joke. But try to take 10 cookies so that not a single one falls out,” says Sidorov. Only experienced workers are allowed here, and newcomers learn on slow-moving machines.


Lick and Dunk
Oreo has three packaging formats: 38, 95 and 228 grams. The packages are formed into pallets, which are sent to the warehouse. At the factory they say they work almost from scratch: “We don’t have large stocks. The finished product also does not sit in storage and is sent to the distributor within a few hours.” Oreo from the Vladimir region is sold only on the Russian market.
The Russian consumer is very similar to the European consumer, the factory notes. Now the brand's main task is to teach customers how to eat Oreos the way they eat them in the US: by licking and dipping. “The method of consumption is very important; it is with milk that the cookies reveal their taste,” says Olga Golubtsova, communications manager at Mon’delis Rus. “This ritual dates back to the 1920s, and the whole world eats Oreos this way.” In Vladimir, from where “Lastochka” departs for Moscow, Oreo can be seen on any counter - from the large “Perekrestok” to “Products on Devicheskaya”. Perhaps someday Russians will learn to eat it correctly.
The best Cookie recipes with step-by-step instructions with photos
20-30
1 hour
480 kcal
5/5 (2)
Surely everyone remembers the taste of store-bought Oreo cookies - this delicious delicacy with a snow-white filling that simply melts in your mouth. What could be tastier with morning coffee? My mother recently bought a good cookbook, which contained a lot of useful tips for baking this delicacy at home. Of course, I decided to make cookies according to the book recipe and was right - my sweet tooth was absolutely delighted with the resulting treat.
I invite you to jointly enjoy the process of making delicious and aromatic cookies with a unique delicate cream, which makes the product even more appetizing and delicate.
Kitchenware
- Sieve for sifting flour.
- Mixer for high-quality whipping of products.
- Some deep containers for convenient preparation of dough and cream.
- Cling film And piping bag.
- rolling pin for rolling out dough.
- Round small shapes to form cookies with a diameter of about 4 cm.
- Baking paper for baking products.
- Thin spatula for placing cookies on a baking sheet.
- Flat dish for serving baked goods on the table.
We will need
| To prepare the dough | |
| wheat flour | 300 g |
| butter | 180 g |
| cocoa powder | 50-60 g |
| powdered sugar | 200 g |
| vanilla extract | 5-7 ml |
| chicken egg | 1 piece |
| baking powder | 8-11 g |
| salt | 5 g |
| black food coloring | 5 ml |
| To prepare the filling | |
| butter | 60 g |
| powdered sugar | 340 g |
| vanilla extract | 5 ml |
| milk | 60-70 ml |
| Additional Ingredients | |
| wheat flour | 50-100 g |
How to choose the right ingredients
- To make cookies, it is better to use premium wheat flour. Other varieties may negatively affect the softness of the product and its taste.
- I do not recommend using margarine or various substitutes such as butter spread instead of butter. In order for the baked goods to be fragrant and airy, choose butter with a fat content of 72% and be sure to check that it does not contain any additives - real butter is made only from cow's milk cream.
Step by step instructions
Preparing the dough

Preparing the cream

Baking cookies

Final stage

Oreo cookie recipe video
For those who like to perceive information visually, I have put together a video with detailed step-by-step instructions for kneading dough and baking homemade Oreo cookies. After watching this video, you can make sure that there is nothing complicated in preparing this delicious product. By itself, the pastry turns out very crispy, and the cream makes it even softer and more delicate in taste. I am sure that your whole family will like the result. Enjoy watching!
- To make cookie dough or cream, you can replace the vanilla extract with two packets of vanilla sugar.
- If you don't have powdered sugar on hand, grind regular granulated sugar in a coffee grinder.
- The cookies can also be made without adding black food coloring because the product is already a very rich brown color.
- If during the process of kneading the cookie dough you notice that it is too liquid and does not hold its shape, sprinkle it with a small amount of flour - the consistency of the mass should be crumbly, brittle, but not falling apart.
- Instead of a pastry bag, you can use a regular plastic bag with a corner cut off.
- Special cookie cutters can be replaced with a 50 ml glass.
I guess that's all. I hope that I managed to intrigue you and you will definitely decide to make homemade Oreo cookies. The taste is practically no different from a store-bought product, however, our version does not contain any fillers or substitutes - the cookies are prepared exclusively from natural ingredients.
If you have any additional questions about preparing it, be sure to ask them in the comments, and I will immediately give a comprehensive answer and help you avoid mistakes. I would also really like to know what cookies are your family’s favorite? What ingredients do you use to prepare it? Write about it, I will definitely try your options and share my opinion about them! I wish you bon appetit and enthusiastic reactions to your culinary masterpieces!
Oreo is a famous brand that makes cookies. It consists of two round chocolate discs with a cream filling between them. The cookies were first produced in 1912 and have been the best-selling baked product ever since. The filling in cookies can be of different tastes. The most popular: strawberry milkshake, blueberry ice cream, mint, green tea, etc.
Today for dessert we suggest making you delicious chocolate Oreo cookies at home with a creamy layer. If you follow our step-by-step recipe exactly, you will get tender and crispy pastries that are perfect for your morning cup of coffee.
TIME: 60 min.
Easy
Servings: 6
Ingredients
- flour – 250 g;
- butter – 200 g (110 g will go into the dough, 90 g into the cream);
- powdered sugar - 230 g (110 g will go into the dough, 120 g into the cream);
- large egg - 1 pc.;
- cocoa (powder without filler) – 2 tbsp;
- baking powder – 1/2 tsp.

Preparation
For our recipe, we took the butter out of the refrigerator in advance. It should be quite soft by the time it is cooked. We preferred cocoa in powder form without fillers.
Place soft butter (110 g) in a large bowl and add powdered sugar (110 g). At medium speed of the mixer, beat these two ingredients into a homogeneous mass. 
Beat in a large egg and continue beating everything together. 
Sift the flour into a separate bowl, add baking powder and cocoa. Mix everything with a pastry spatula. 
Add the butter-egg mixture to the flour mixture. Let's mix. Let's form the chocolate dough for our cookies. 
Let's roll it into a ball. Before cooling on the refrigerator shelf, wrap it in food grade polyethylene. Let's send it out to cool down. 
After twenty minutes, place the dough on the work surface of the kitchen table, freeing it from the film. Using a rolling pin, carefully roll it into a layer, the approximate thickness of which should not be more than three millimeters. Using a pastry ring (we have a diameter of 7 cm) we squeeze out identical blank mugs.

Place them on parchment paper lined with a baking sheet. Place in a preheated oven. We will bake Oreo cookies for 10-15 minutes at 180 C.

Place the finished chocolate cookies on a wooden surface. Let's wait until it cools down completely.

Prepare the cream from the remaining butter (90 g) and powdered sugar (120 g). Beat these two ingredients with a mixer. We should get a homogeneous butter cream. Using a pastry syringe, place one layer of it on the cooled chocolate cookie circle and cover with a second one. For flavor, you can add vanillin, lemon or orange zest to the cream. If you don't have a syringe, you can take a regular bag, put the cream in it and cut off the tip.

Chocolate Oreo cookies can be served with
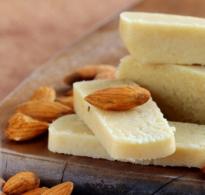
Chocolate Oreo cookies with a creamy layer can be made at home. This dessert is prepared quickly and easily, from available ingredients that allow you to make the taste as close as possible to the original. Homemade Oreo cookies are light and crispy with a melt-in-your-mouth filling.
Ingredients for Homemade Oreos
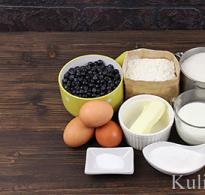
Oreo cookies are made from the freshest, highest quality ingredients. The prepared components are grouped according to their intended purpose: products for preparing chocolate dough are placed in one group, and products for making a delicate creamy layer in the other.
High-quality natural products will provide a taste close to the original
To prepare chocolate dough you will need:
- 125 g flour;
- 125 g butter;
- 100 g powdered sugar;
- 40 g cocoa powder;
- 0.5 tsp baking powder for dough;
- 0.5 tsp vanillin;
- 0.5 tsp salt.
 It is advisable not to add other components to the cream so as not to distort the taste.
 For the cream layer you need to prepare:
- 125 g powdered sugar;
- 75 g butter;
- 0.5 tsp vanillin.
For both the dough and the cream layer, soft butter at room temperature is used. The dough made from such butter will be crispy, and the cream will be tender and homogeneous.
Powdered sugar can be purchased at the store or prepared at home. In the latter case, the sugar is thoroughly ground in a coffee grinder. Use finely dispersed salt, without lumps or large crystals. This salt should easily pass through the sieve.
 Homemade cookie dough will be softer than the original
 Kitchen utensils for making cookies
To create a chocolate-cream Oreo, you will need the following kitchen utensils:
- plastic, ceramic or glass cups;
- measuring cup;
- sieve;
- plastic bag;
- pastry bag;
- mixer or blender;
- tablespoon;
- teaspoon;
- parchment paper;
- baking tray
A mixer or blender can be replaced with a regular hand whisk.
You can make a pastry bag yourself from a thick plastic bag. Cream is loaded into the corner of the bag, the free edge is twisted into a tight spiral, and the sharp corner filled with cream is cut with scissors to form a small round hole.
 The beauty of homemade cookies is that you can make them in any quantity, and you can enjoy your favorite taste without being limited by standard packaging
 Step by step recipe
At the first stage, prepare the chocolate dough. To do this, sift flour, cocoa, salt and baking powder into a separate cup and mix well.
 Sifting will make the dough more airy.
 Place soft butter, heated to room temperature, in another cup. Add powdered sugar and vanillin to the butter and beat it all with a mixer or blender for 2-3 minutes.
If you use a hand whisk, it will take a little longer to whisk the ingredients. The work is finished when the mass becomes fluffy and homogeneous.
 If small lumps of oil remain in the mixture, do not worry - they will disappear during the process.
 A sifted mixture of flour, cocoa, baking powder and salt is introduced into a cup with butter and powdered sugar in several stages.
 Add the mixture gradually so that the mixture is even.
 First mix the dough with a spoon, then quickly knead it with your hands. The dough is thick, dense and resembles the texture of wet sand. It doesn't stick to your hands or work surface, so it's easy to work with.
 The dough should be like plasticine so that you can easily pinch off a piece from the total mass and then return it back
 Roll the finished dough into a thick sausage and wrap it in cling film. The sausage should have a uniform thickness, without thinning or bending. Only from a perfectly smooth sausage will it be possible to cut out halves of the dessert that are equal in size.
There is another way to make identical cookie dough. You need to roll out the dough into an even layer, and then cut out identical circles with a glass or glass.
 The “sausage” is placed in the refrigerator so that it hardens its shape and the cookie halves are identical.
 The edges of the film are tightly twisted and, by lightly tapping the narrow edges of the sausage on a flat surface, the dough is shaped into a cylinder. Place the sausage in the refrigerator for at least 30 minutes to harden.
 Small unevenness is not a problem - some cookies can be put a little less cream so that there is no excess
 At the next stage, begin preparing the creamy filling. Beat the soft butter with a mixer for about a minute, add vanillin and powdered sugar and continue beating the cream until ready.
 Do not overdo it with vanilla, otherwise it will overwhelm the creamy taste.
 The cream is ready when it becomes fluffy and snow-white, and the powdered sugar has completely dissolved. The cup of cream is placed in the refrigerator for a while.
 It is better to beat the cream with a mixer or blender - it is very difficult to achieve such homogeneity with a whisk
 The chilled dough is taken out of the refrigerator and the plastic is unwrapped.
 The dough should easily come away from the cling film
 Using a thin sharp knife, the workpiece is cut into cubes 1 cm thick. At the same time, they try to maintain the even round shape of the future cookies.
 There should be an even number of dough circles.
 Turn on the oven. While it heats up to the desired temperature, cover a baking sheet with parchment paper and place the cookie dough on it.
 If you cut circles from a layer of dough, they will be thinner, but the taste will not be as pronounced
 If you don't have parchment paper, you can lightly dust the baking sheet with flour. The dough will not stick to such a sheet and can be easily removed after baking.
 There should not be too much flour so that it does not distort the taste.
 Cookies are baked in an oven preheated to 170 degrees Celsius for 10 minutes.
 Do not put the preparations in a cold oven - they may not be baked or, conversely, burn, as the cooking time will change
 During baking, the workpiece may become covered with small cracks. This is normal, the cream will hide all defects if placed on the inside.
 To prevent the cookies from cracking, you can try piercing each piece with a toothpick in several places before baking.
 The finished cookies are left on the baking sheet and allowed to cool. When it has cooled, prepare a pastry bag and fill it with cooled cream.
 If you don’t have a bag, you can use a pastry syringe with any attachment
 To make the bag of cream elastic, you need to tightly twist the free edge. As you twist, the cream will move towards the free corner and be squeezed out.
 There should be no voids in the bag without cream
 The cream is squeezed onto the cookies in a spiral, moving from the center of the workpiece. The edges of the cookies are left free of filling.
 Do not skimp on the cream, especially if the dough turns out “thick”
 You can simplify the procedure as much as possible and spread the cream on the cookies using a regular knife. But in this case, the creamy mass may not be distributed evenly enough between the cookie slices.
 If you use a knife, apply the cream carefully without pressing on the dough so that it does not crumble
 The spread pieces are covered with the other halves on top. Do the same with all other cookies.
 If you want the inner surface to be smoother and the cream to be distributed evenly, cut the “thick” cookie dough in half lengthwise
 The finished dessert is placed in a plastic container and placed in the refrigerator for 1–2 hours to allow the cream to harden.
Serving options
It is customary to serve chilled milk with Oreos. The cookies are bitten down with milk, or the dessert is dipped into a glass, allowing the liquid to lightly soak and soften the chocolate cakes.
 The milk will also taste better because it will take on the chocolate flavor from the cookies.
 A great addition to Oreo would be strong, aromatic tea. The cookies are placed on the edge of the tea pair or served on a separate dish.
 It is better to drink tea without sugar - this way the taste of the cookies will be fully revealed
  For a beautiful presentation, you can simply choose a plate that matches the color
You can give a loved one a pleasant surprise - homemade Oreo cookies, packaged in a beautiful tin box. The cookies are placed in dense rows, sealed with a lid and tied with a satin ribbon.
 Cookies intended for a gift should not lie for a long time after baking - they will quickly lose their taste
 Cookies will look no less appetizing in a cardboard or wooden box of a suitable size. The inside of the box is lined with parchment, and then the Oreos are laid out in tight rows. The box is covered with bright packaging paper, and a label with a dedicatory inscription is glued on top.
 Eco-friendly packaging is in fashion, so a box covered with craft paper will look stylish
 Dark brown cookies look great against the background of openwork snow-white napkins. They can be used to line the bottom of the cup in which the dessert is served. It is better if the napkin is plastic, since chocolate-butter cookies can leave unsightly greasy marks on white fabric.
 Guests will be happy with this serving option - the cookies will look appetizing
 Instead of a cup, you can use a convenient and roomy tray that can accommodate several glasses of drinks and several servings of cookies. Stamped cookies look like store-bought ones
Some foodies like to build little towers out of homemade Oreos. They save space on the table, look neat and aesthetically pleasing.
 Confectionery string will not spoil the taste of cookies
 Oreo cookies can be easily made at home. A household recipe is as simplified as possible compared to a factory recipe, both in terms of ingredients and in terms of cooking technology. Even novice housewives can use this recipe. The finished dessert pleases with its appetizing appearance and pleasant chocolate-creamy taste.