How to make paper cupcakes step by step. Paper cupcake pans
A skilled cook can prepare a cupcake from the list of products given in the recipe. And children can make such a craft, for example, from paper. This tutorial shows you how to make an origami cupcake in a few simple steps. Then such a product can be used during play, fed to dolls by cutting into portions with scissors, or decorated with a postcard or other applique. In any case, origami is an amazing form of creativity that requires accuracy and accurate reproduction of instructions in order to obtain a positive result.
The cupcake will be made of paper, you can use any color at your discretion, but it is desirable that the sheet is white on the back side. Then we will get a plausible copy of the dessert with cream. Now let's look at how to model doll food out of paper.
What to prepare for the origami cupcake:
1 sheet of colored paper, the reverse side of which is white;
Scissors;
Glue (optional);
Anything to decorate a craft (in this case, cream corrugated paper was used).
Origami cupcake step by step
1. Like most origami models, this figure is made on the basis of a square. Naturally, you can take any size, but not too small so that the paper is easy to work with. Cut out a square and bend it diagonally so that the white part remains inside.
2. Place the resulting triangle at a right angle upward. Fold the right corner of the top layer towards you, showing the white side. Fold the corner down and iron the fold. Make sure that after bending the tip touches approximately the middle of the triangle’s height.
3. Return the previously lowered corner up, but do not combine it with the original position, but make a fold at the bottom.
4. Lower the corner down again, again forming a fold at the fold. And so on, return the corner up and down until you get a kind of accordion; a two-color snake will be visible in the center of the triangle. It is at this moment that you can use glue, especially if your paper is thick and sticks out after folding.
5. Carry out a similar procedure with the second layer of the original triangle. Bring the corner down approximately in the center of the white tab, then bring it back, leaving a crease.
6. Bend the upper tip towards you and lower it down, showing the colored side. Glue can also help here.
7. Turn the sides of the triangle back. Do it symmetrically. The result should be a trapezoid.
8. The cupcake is almost ready, but I want to decorate my craft further. Use corrugated paper for this. Cut out several petals, glue them into a flower and attach them to the central part.
The origami cupcake is ready. This is a simple assembly diagram that will be fun for kids.
Cupcakes in paper tins are a simple pastry for tea. Recipes for cupcakes in tins, unlike cupcakes, can be either dessert (muffins with blueberries, banana, cocoa) or not sweet (English muffins, cheese, corn flour).
Paper molds make the process of preparing muffins much easier: they do not need to be greased with oil, and the finished muffins come out with an even, round shape. If the paper molds are very thin, it is better to place them inside a metal mold for several muffins, and if they are dense enough, then the muffins can be baked separately. Small mini cupcakes in paper tins are baked in molds with a diameter of about 3 cm.
The dough for cupcakes in paper molds is prepared in the standard way, like any other similar dough, the ingredients are mixed in a certain order. Bulk products are mixed separately from liquid ones, and only before baking are both components combined into dough.

After combining the liquid and dry parts, mix the products quickly but carefully so that excess does not form in the dough (the more gluten, the less soft and airy the muffins will be). If there are any lumps left, it’s okay, especially since the dough will have to be stirred additionally after adding fruit, nuts or chocolate before baking the muffins in the molds.
TestoVed advises. This method of preparing muffins or cupcakes in molds requires that the liquid component be added to the dry component, that is, flour and sugar, and in no case vice versa.
Do paper muffin tins need to be greased?
Paper muffin tins are convenient because there is no need to grease the paper with butter or vegetable oil before baking, unlike metal ones or when using silicone ones for the first time.
Whatever recipe you choose, the paper pans release perfectly from the finished cupcakes without pre-greasing. The only thing worth considering is that if the paper in the molds is too thin, it will be more convenient to insert them into metal ones before baking.
Cupcakes in paper molds: recipe with photos step by step
5 minutes to prepare
20 minutes to prepare
295 kcal per 100 g
Recipe with step-by-step photos for cupcakes in paper molds at home, quick and simple.
Ingredients
- wheat flour – 2.5 cups;
- granulated sugar - half a glass;
- baking powder – 1 tsp;
- salt - a quarter tsp;
- milk – 1 glass and a quarter;
- vegetable oil – half a glass;
- large chicken egg – 1 pc.;
- vanilla extract – 1 tsp. (optional);
- additives to taste (chocolate pieces, dried fruits or pieces of fresh fruit, berries) – 1-1.5 cups.
Preparation

- If the paper molds are made of thick paper, it is not necessary to put them in metal ones - you can bake cupcakes just like that.
- The cupcakes can be stored at room temperature in a tightly closed container for up to five days.
Cupcakes in tins - simple recipes
You can add from one to one and a half glasses of various additives to suit every taste to a simple dough for muffins in molds (recipe above). Raisins or chocolate chips are classic toppings for cupcakes and muffins, but any combination of fruits, fresh, dried or frozen, nuts and even cheese will create a completely unique dessert every time.
- . Cut one ripe banana into pieces, chop the walnuts and add to the rest of the ingredients along with 0.5 tsp. ground cinnamon.
- Apples and cheese. Peel and chop one medium apple (you should get about 1 cup apple chunks) and add to the base along with 1/2 cup shredded cheese, such as cheddar.
- Cupcakes for tea or coffee. Add 0.5 tsp to flour and other dry ingredients. cinnamon and a quarter tsp. ground nutmeg. Before baking, cover the muffins in paper cups with a streusel of half a cup of flour, a quarter cup of sugar, 4 tbsp. soft butter at room temperature and sea salt on the tip of a teaspoon.
- . Soak three quarters of a cup of dried cherries in warm water. Drain the water and stir into the base with an equal amount of chocolate pieces.
- Birthday cupcakes. Add 0.5 tsp. almond extract into liquid ingredients. Fold half a cup of colorful sprinkles into the dough.
Passing by fresh baked goods in the supermarket, we cannot miss the shelf with sweet and fragrant cupcakes. You won’t find any kind there: vanilla, chocolate, with berries or raisins. However, preparing such a favorite delicacy at home seems to be not an easy task. But, as they say, “the eyes fear, but the hands do,” and after trying it once, you will probably make cupcakes in paper molds, the recipes for which we will now present, your signature dish.
Paper forms may differ in density, and this characteristic must be treated with particular care. Thick molds are used independently, while thin ones are inserted into more reliable metal or silicone ones. You can also combine thin and dense shapes. Knowing this secret, you will surely prepare perfectly shaped cupcakes.
Simple recipe
The uniqueness of this option is that there is no need for prolonged whipping of butter into butter cream, since this ingredient is simply not in the recipe. Instead, a vegetable one is used, and a mixture of a small amount of ginger and cinnamon adds a spicy flavor. So, take notes, because now we will share the simplest of recipes.
Ingredients:
- Sugar - 1 tablespoon;
- Flour - 1 glass;
- Eggs - 2 pieces;
- Vegetable oil - 4 tablespoons;
- Honey - 2-3 tablespoons;
- Baking powder - 2 teaspoons;
- Cinnamon and ginger - to taste.
Cooking method:
- In a convenient deep container, mix all the dry ingredients: baking powder, flour (pre-sifted) and sugar. If you use spices, then you need to send them there already at this stage.
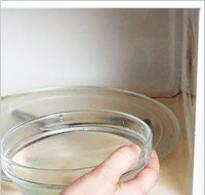
- Beat the eggs separately until thick foam forms. Then add melted honey in a steam bath (or in the microwave) or liquid honey and mix everything thoroughly.
- Now we combine the dry and liquid bases and bring the dough until smooth, and only after that add vegetable oil into it and mix again.
- The oven needs to be preheated to 180 degrees, in the meantime we spread the dough into paper forms. They need to be filled no more than 1/3, since under the influence of high temperatures the dough actively increases in volume. You can make a small surprise by placing fresh or frozen berries or pieces of dried fruit on the bottom of the mold.
- According to the recipe, mini-cupcakes need to be baked at the same 180 degrees for 15 to 20 minutes, it all depends on the features of the oven. Check for doneness using a wooden skewer by inserting it into the middle of the cake. If you take it out completely dry, then the baking is ready.

You can serve with berry or fruit syrup, different types of glaze, or simply sprinkled with powder.
Classic cupcake recipe
A classic of the genre, it is this that is considered the basis for the preparation of all other variations. This recipe for small muffins has been known for centuries. Of course, today's version is significantly different from those that appeared in England many centuries ago, however, the modern interpretation of the recipe has already become a classic.
Components:
- Butter - 200 grams (can be replaced with the same amount of margarine);
- Flour - 1 glass;
- Sugar - 1-1.5 cups;
- Eggs - 4 pieces (if large, then 3 is possible);
- Salt - a pinch;
As a filler you can use raisins or other berries and dried fruits, chocolate chips. Their quantity depends only on your taste preferences.
Let's start cooking:
- After softening the butter, grind it with sugar until smooth and light. Then add eggs there, without stopping beating. This should be done in portions, adding one at a time and mixing.
- Then add the dry ingredients one by one. The flour must first be sifted. You can add any of the fillers you choose to the dough obtained in this way, and then mix it thoroughly. If using raisins, pour boiling water over them first and then sprinkle with a little flour. Such manipulations will help it spread throughout the dough without settling on the bottom.
- The baking temperature should be 180-200 degrees (depending on the oven), and in the meantime we distribute the dough into the molds, which we fill half or 2/3 full.
- They need to bake for about 20 minutes. Readiness can be checked using the method described above.

Curd joy
Everyone’s favorite cottage cheese muffins can be prepared not only in bulk form, but also by dividing them into small portions. It’s even more convenient, because each cupcake can be decorated separately, making the treat even more appetizing.
Components:
- Flour - 200 grams;
- Cottage cheese - 200 grams;
- Eggs - 2-3 pieces;
- Sugar - 150-200 grams;
- Butter - 150 grams;
- Baking powder - 1 teaspoon;
- Any filler - to taste.
The process of their preparation is not particularly complicated:
- Beat eggs with sugar into a homogeneous thick mass.
- Grind the cottage cheese through a sieve. It is advisable to take one that is not very wet and greasy, so the cake will turn out more airy. Then we add it to the egg mixture and mix.
- Melt the butter and add it to the dough base. Mix.
- Mix the sifted flour with baking powder and add to the dough, kneading it thoroughly. Spices and fillers are also added at this stage.
- Now distribute the dough into the molds, leaving 1/3 free. Place them in an oven preheated to 180 degrees for 25-30 minutes.

This delicacy can be served either warm or already cooled with sour cream, fruit sauces or powdered sugar.
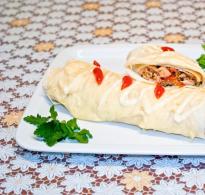
Meat muffins
Agree, this interpretation of them is quite unusual, because we are used to eating them exclusively sweet. Nevertheless, such an unusual dish can completely amaze your household, so it’s definitely worth the risk. For the recipe for muffins with meat, we will need the following ingredients:
- Minced meat - 300 grams;
- Potatoes - 5-6 pieces;
- Onion - 1 piece (large);
- Carrots - 1 piece;
- Grated cheese - 1 cup (grated on a coarse grater);
- Eggs - 2 pieces;
- Sour cream - 1 tablespoon.
Preparation:
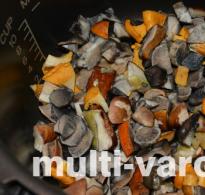
- Let the potatoes boil. At this time, fry the minced meat, grated carrots and chopped onions with a small amount of vegetable oil (preferably olive oil).
- Drain the water from the boiled potatoes and mash. Add minced meat fried with vegetables and ¾ cheese.
- Add separately beaten eggs to our “dough,” leaving about a tablespoon to grease the muffins before putting them in the oven.
- Fill the molds with dough, simultaneously heating the oven to 190 degrees. Before putting them in the oven, brush them with egg mixed with sour cream and sprinkle with the rest of the cheese.
- At this temperature, the cooking time will be approximately 30 minutes. A hint that the cupcakes are ready will be the golden brown crust that forms.

You can serve the finished baked goods with sour cream, mayonnaise, ketchup or other favorite sauce.
It is better to give various gifts, especially small ones, in gift wrapping. After all, giving your loved ones a beautifully designed gift is very pleasant. Today's master class will tell you how to make a gift box in the shape of a coffee cake. This craft can be an excellent packaging for small sweets if it is made a little large. Look, for example, just for such packaging. A DIY paper “Cupcake” box turns out elegant, beautiful, and original. 
To create a box you will need the following materials:
— brown colored paper (single-sided can be used);
- cardboard;
- coffee beans;
— a plastic cup, for example for sour cream;
— kraft paper;
- pencil;
— double-sided tape;
— corrugated paper in white and beige tones;
- scissors;
— yarn or twine;
- hot glue.

The plastic cup will be the frame of our box. Its upper rim must be cut off. During the process, you can adjust the height of the future cupcake. The height of our craft is approximately 6 cm. 
Step 2
From a sheet of cardboard we create sketches of the lid. The diameter of the circle should approximately match the diameter of the cup. To create a more accurate circle, you can trace the outline of the neck of the cut glass with a pencil. We also draw a strip on the cardboard that is 3-4 cm longer than the diameter of the circle. Cut out the details. 
Step 3
We glue the strip to the circle and bend its ends. 
Step 4
Apply thermal glue to the fold of the cardboard strip and attach it to the plastic cup. 
Step 5
When the base is completely ready, we can start decorating the craft. Cut out a strip 6-6.5 cm wide from brown paper. Fold it like an accordion. Then we paste it over the side of the box. 
Step 6
We decorate the bottom of the cupcake-shaped box with a white corrugated stripe. First we create voluminous flounces along its edge, stretching the edges in different directions. 
Step 7
Now we begin to create the top part of the “Cupcake” gift box, which will consist of three tiers. So, we will make the first element from light-colored corrugated paper. 
To do this, cut a strip 3 cm wide, create beautiful curves along the edge and glue it to a cardboard circle. 
We will make the second tier from craft paper. We fold it like an accordion. 
Glue the edges together and glue a small cardboard circle to the center. 
In the same way, we create the third tier from dark brown paper. 
Step 8
We attach a twisted white corrugated ribbon to the brown part. Then we glue all the parts together. 


Step 9
Next, apply hot glue to the inside of the top part and sprinkle some grains inside. 
We also decorate the lower tiers with them. 
Step 10
We supplement the lower part of the craft with a decorative rope or yarn. 
Step 11
Carefully place paper shavings or sisal in the middle. 
Now in such a box you can give even a very fragile gift. 
That's it, the cupcake box is ready! 
You can also do
How to make molds from baking paper for cupcakes, muffins, cupcakes.
A simple method, step-by-step description with photos.
A great activity for children - they will love it.
Paper cupcake liners are a brilliant invention. It's incredibly convenient: 100% non-stick, great time saver, beautiful to serve and easy to eat.
Love at first bake. Try it once and you no longer want to bake without them.
Unfortunately, paper cups are not available for all molds. For non-stick protection, you can use any smaller size. Of course, it’s better when they fit perfectly in shape.
It happens that you don’t have any molds at home, but you want to bake. And also, homemade forms are cheaper. They can be made in advance and then used with pleasure.
Moreover, even defective, torn or slightly dented ones will come in handy someday; they will definitely perform the non-stick task.
The best paper is selected empirically. Thick brown paper makes good, durable molds, but the most beautiful ones are made from thin white paper.
Any one will do for starters.
We will need:

- roll of baking paper (baking parchment, baking paper)
- scissors
- a simple pencil, not a chemical one
- metal, tin cupcake molds at least 2 pieces
- plate with cold water
- clothes pin
- a glass of suitable size to fit the mold on
- salad bowl, bowl, cup of the required size or compass
- ruler
Making cupcake molds
1. Using a ruler, measure the height of the mold wall, it’s 3.5 cm, and the diameter of the bottom, it’s 5.5 cm.
Then the required diameter of the round blank for the mold will be equal to:
3.5 × 2 + 5.5 = 12.5 cm
You can use a compass, but it is more convenient to use a cup, bowl or salad bowl of the right size.
You can make the molds a little higher. To do this, you need to increase the diameter of the workpiece by 1 cm.
This is especially true if the cupcakes are likely to rise too much. This is convenient because you don’t have to wash the molds. They are as closed as possible. In addition, if desired, the finished molds can be trimmed.
In our guide, paper molds are higher than metal ones for clarity of pictures.
2. Unwind the roll a little. We attach a cup. We bend or mark with a pencil the diameter of the workpiece with a margin of about 0.5 cm at the edges.

3. Fold a sheet of paper, run it with your fingernail, and fold it several times. For 10 paper molds, you need to fold the paper 5 times. Using a ruler, tear the stack off the roll. You can use scissors.

4. Fold the stack in half. We outline the cup.

5. To prevent the paper circles from moving apart when cutting out, we connect them with a clothespin.


7. Pour some cold water into a plate.
8. The number of paper molds in one serving depends on the thickness of the paper. Well, no more than five pieces. If you need them to dry faster, it is better to do 2-3 pieces at a time.
You need to quickly dip the paper mugs into the water, shake them off, then stack them on top of each other. If you make 3-5 pieces, you can wet them through one circle, there will be enough moisture.

9. Place a metal mold on the glass.

10. Carefully place a stack of moistened circles onto the mold.

11. Press the mugs into the mold with your hands.

12. Cover with another metal mold.

13. Remove and lightly press the inner mold.

Straighten the protruding frills, then it will be easier to separate the dried molds.
There is paper that almost does not absorb water, it is good because it dries quickly, but the molds made from it with ready-made cupcakes can open up on their own in places and look sloppy. Blanks made from such paper must be clamped tightly between metal forms and kept between the forms longer, overnight, for example.
14. Place in a warm place to dry. Can be placed on a radiator.

Dry molds quickly and conveniently using a large-diameter pan with a flat lid. Instead of a lid, you can cover the pan with a round metal tray. Fill with water, bring to a boil, turn off. Place the molds on the hot lid.
Very quickly it will be visible at the edges that the paper has dried. We take out the top metal mold - the walls of the paper molds are dry, but there are drops at the bottom, then leave to dry for another 5-10 minutes without the top metal mold.
15. Store in a dry place in a closed box or container.

© Taisiya Fevronina, 2018.