Color the eggs with patterned food coloring. Marble eggs with greenery
One of the main symbols of Easter is painted eggs. Traditionally, they are dyed in onion skins, which gives the eggs their symbolic red color. But I really want to decorate not only red, but also multi-colored, unusual, painted Easter eggs.
The easiest way is to use food coloring for eggs. But even here, not knowing the rules and features of coloring, one may encounter a number of difficulties. Therefore, we will figure out how to dye eggs for Easter with dyes. Moreover, we will consider both classical methods and unusual coloring options.
We will not talk about the safety of chemical ready-made dyes in this material. Let's get acquainted only with the pitfalls of this problem.
Recall that additives marked "E", which are part of such dyes, are harmful to health. Therefore, after processing with dyes, eggs often pass from the category of food to the category of souvenirs.
Many, without thinking about whether it is possible to eat food coloring for eggs, eat protein that has been stained with paint. We advise you not to take risks and not give such eggs to children and allergy sufferers.

Many manufacturers add salt or sugar to the composition, which reduces the concentration of harmful chemical additives, but does not make the paint edible.
Often on sets of dyes such as Krashenka, Easter Set, Egg Dye, Decoration, etc. the manufacturer does not indicate the composition at all, but only writes that the dye is food.

But don't let your guard down. Even by the color of the dye, you can find out what dangers lie behind it.
For those who are not familiar with the "chemical kitchen" of dyes, we have prepared a brief transcript.
The most harmless dyes are E 100 and E 140. The first is obtained from curcumin and gives an orange, less often red color to the dye. The second is chlorophyll, which colors eggs green.

E 122 (carmoisine) is used to obtain a red dye. Causes allergic reactions in people who are sensitive to aspirin.
E 124 gives a red color, but is prohibited for use in the food industry.
E 128 is another additive for getting a red tint. Banned by the European Commission due to the presence of aniline.
E 102 or tartrazine is a yellow dye with a tarnished reputation.
E 132 is an additive in the form of synthetic indigo carmine, which is necessary to obtain green, blue and yellow. But the karma of this supplement is complex: it causes suffocation in asthmatics, exacerbations in allergy sufferers with complications like Quincke's edema.
The E 133 or shiny blue FCF is capable of the same feats as its predecessor.
E 142 or a green additive causes allergic rashes on contact - banned in a number of countries.
This frightening list is endless. But this is enough to understand that the label "food" does not make the dye safe.

Organic dyes can be attributed to really safe ones. But it is very expensive and unprofitable for the manufacturer. Therefore, in stores they did not even hear about such dyes.
How to color eggs with food coloring
If the question of whether it is possible to eat dyes for eggs does not bother you to such an extent, we suggest that you still protect your relatives and try to prevent the dye from penetrating through the shell. To do this, you have to follow a few simple rules.

Choose eggs for coloring fresh and with a strong shell.
Take the eggs out of the fridge ahead of time to keep them warm. This will prevent cracking of the shell due to temperature differences.
It is advisable to wash the product with warm water before cooking, if necessary, use a brush and soapy water.
It is better to lower the product for cooking in water at room temperature.

Some housewives add salt to the water when cooking. But this method will not prevent the formation of cracks, but will help the protein to curl up faster and not leak out of the shell in case of splits. Such eggs are further unsuitable for staining.

It is better to cook in a wide saucepan and lay the eggs in one layer.
Avoid high boiling while boiling: eggs will bounce when boiled hard and may hit each other.
There are certain requirements for the dyes themselves for Easter eggs. When choosing a remedy, pay attention to the composition. At a minimum, the packaging should be labeled "food".

Important! Pearlescent dye for eggs is strictly contraindicated for ingestion. It can only be used to decorate souvenir eggs.
The classic way to dye eggs with food coloring
The method of staining will largely depend on the type of dye itself. Most often, powdered dry dyes are used for eggs for Easter. You can find food coloring in tablets.

The principle of staining with such means is identical. But it is better to study the instructions before use, where the recommended proportions are indicated.
The color indicated on the package will be obtained by dyeing white eggs. If the dye is applied to brown shells, the color may differ significantly.
Often brown colored eggs get a sloppy or dirty look.
Keep in mind that the more saturated the staining solution is, the brighter and darker the shell color will turn out.
Dye pre-boiled eggs.
It is advisable to degrease the shell before painting. This can be done with vinegar or alcohol.
If using alcohol, wait 10-15 minutes after treatment for the product to evaporate from the surface. If salt was used during cooking, it must be thoroughly washed off before being treated with an oxidizing agent.

Add a spoonful of vinegar to the finished solution - this technique increases acidity, which improves staining.
We lower the egg into the solution, where it is kept for about 10 minutes.

After that, we take out the dye from the liquid and leave it to dry completely.
It is better to dry the krashenki on a stand for eggs. But even in this case it is difficult to avoid the appearance of stripes.
It is better to make a special stand. To do this, stick pins or needles with caps into the foam rubber washcloth.
On such an impromptu stand, painted eggs dry without streaks or streaks.

After drying, the dyes can be treated with vegetable oil to give them a shine. This can be done with a brush or directly with your hands.
In addition to the classical method, you can use
How to use Liquid Egg Dyes
There are liquid food colors for eggs in packages such as plastic capsules or glass test tubes.

The concentration of the coloring matter in such products is much higher, and the crafts after their application are bright, shiny.
Boiled eggs are also used for processing. We will work directly with our hands. Therefore, we put on gloves on our hands to prevent the absorption of the dye into the skin.
We apply a little dye directly on the egg shell and begin to rub the coloring matter until the entire surface is covered. If necessary, you can add directly during processing.
The process of applying liquid dye to eggs is shown in detail in the video:
For those who still prefer natural materials, we have prepared a selection
Since ancient times, people have exchanged eggs and Easter cakes for the Easter holiday. The tradition has evolved over the years, resulting in many ways to color and decorate paraphernalia. With the words "Christ is risen!" men and women, children and older generations exchange eggs, later looking at intricate patterns. Among other things, coloring eggs is a rather exciting process that can rally households. There are basic methods, we will consider them in more detail.
How to prepare eggs for painting
As mentioned earlier, experienced housewives, through trial and error, identified the main options for coloring eggs for Easter. However, regardless of the method chosen, they must first be prepared.
- Remove the eggs from the refrigerator a few hours before the intended coloring and leave at room temperature. Such a move will help to avoid temperature differences, due to which the shell cracks. An alternative is to pierce the shell with a thin sewing needle, which will prevent the eggs from bursting.
- If food pigments or onion peels are used as the main staining method, it is recommended to pre-wash the shell. To do this, use a kitchen sponge and baking soda. The end result is paint that will lie flat without streaks or spotty inclusions.
- Before starting the procedure, degrease the shell by wiping it with vodka or medical alcohol. If neither is available, treat the surface with soapy water, then rinse thoroughly and dry.
- To give the shell a gloss after painting, wipe the surface of the eggs with vegetable or corn oil. Do not use cotton pads for these purposes, gently soak your fingers in the composition, then spread over the shell.
When you have prepared the "material", start painting. Choose the best option for yourself, and then clearly follow the instructions.
Method number 1. Food colorings
Food coloring is considered to be the most common type of Easter egg coloring. You can purchase ready-made colors or bring your own shades. Pigments can be pearly, glossy or matte, it all depends on the manufacturer.
To properly prepare the composition, take care of such a number of containers in advance that each color has a separate bowl. Dilute the paint with water at room temperature, there should be a lot of liquid so that the eggs completely drown in it.
After diluting the paint, pour in 30 ml. table vinegar solution, then send boiled or raw eggs to the bowl. The exposure time varies, it all depends on how intense the shade you want to get.

Stencil
- Purchase tracing paper - ultra-thin paper - online or at a stationery store. Cut out any image from it in the form of a stencil (the inner part is extracted). Anything is suitable as a drawing: favorite cartoon characters, Easter theme, Jesus Christ, etc.
- A picture for a stencil can be downloaded from the Internet. The final result depends on the quality of the original image and the material itself. When you have made a stencil base, namely printed and cut it out, soak the paper in water at room temperature. The material should become elastic, repeating the shape of the egg.
- Attach the stencil to the shell, smooth out the creases. If your drawing is small, duplicate it in several places. Fix the stencil with gauze or a piece of nylon stockings (tights).
- Dilute food or natural dye, send eggs into it and cook them until cooked. At the end of the procedure, remove the eggs, put them on toothpicks or newspaper, cool to room temperature. As soon as this happens, remove the gauze and stencil, enjoy the result.
Vegetable oil
- A beautiful result is achieved by coloring eggs with the addition of vegetable oil. To perform the procedure correctly, prepare two containers with the same shade. Pour oil into the first, and leave the second unchanged.
- Boil hard-boiled eggs, cool to a temperature of 30 degrees (the coloring composition should have the same indicator). Dip the "material" into a bowl of paint, wait for the required interval (the exact time is indicated in the instructions).
- After that, remove the eggs, leave the paint to dry. When this happens, send the product to the second container with vegetable oil, again wait for the time. Dry the eggs, evaluate the result.
Insulating tape
- Cut the tape lengthwise to make thin strips (you can skip this step if you like). Prepare several containers of diluted paint, preferably blue and yellow.
- Glue the strip in the form of a spiral or any other pattern of your choice. Dip the eggs in a bowl with blue, wait a while, remove and wait for drying. Remove the tape.
- Now glue the next strips, which will slightly cover the previously obtained pattern. Dip the egg in yellow paint, wait an interval, remove and dry.
- You will end up with a yellow egg with blue and green stripes. The option is good in that it allows you to experiment with obtaining new shades by applying one color to another.
Stationery rubber bands
- Purchase rubber bands at the stationery store, which are usually used to tighten banknotes (silicone base). Hard boil eggs, cool, prepare paint of one or more shades.
- Then you can proceed in two ways. The first involves coloring the egg in any color with prominent white lines (gum bands are attached to a previously unpainted egg). The second option is two-phase coloring, as a result of which the lines are obtained in the color in which the egg was originally painted.
- Consider the second option, it is more complex. Dye the egg yellow, dry it. Wrap stationery rubber bands in a chaotic manner crosswise. Dip the "material" into the green paint, wait for the pigment to set. Dry, remove gum. You will see that the egg has turned blue with yellow stripes.
plant leaves
The technique is similar to the stencil technique with only one clarification - plant leaves are used as a pattern, most often parsley and dill act in their role.
- To get an accurate result, tear off a few leaves, attach them to the shell, fix with gauze or a nylon stocking. Dip in the paint, wait a while.
- After the expiration date, remove the eggs, cool and dry them. Unfold the fixing material, remove the leaves, grease the surface with vegetable oil and enjoy the result.
- The same electrical tape, self-adhesive paper or adhesive tape can serve as an alternative to leaves. Cut out the pattern you need from the material, attach it to the defatted shell of a pre-cooked egg. Place the product in the pigment bowl, then remove and dry.
Method number 2. natural dyes

- Onion peel, beets, turmeric, carrots, birch leaves, calendula, orange or lemon, spinach, red cabbage, nettle, coffee can act as natural dyes.
- The main feature of "folk" staining is considered to be that the composition acts slowly. As a rule, it takes about 8-10 hours to get the result.
- To prepare the solution, pour water into a saucepan and add a large amount of the chosen dye. Pour in 35 ml. table vinegar, stir. Bring the solution until the first bubbles appear, then reduce the power and boil for another 15 minutes.
- When the paint is ready, insist it for about half an hour, then send the eggs into the container and simmer them over low heat for 25 minutes. Then turn off the burner, leave the product in the solution overnight.
Turmeric
To give eggs a seductive golden hue, use ground turmeric.
- Boil water in an enamel pan, pour 90 gr. turmeric, bring to a boil. Place raw eggs in a container, boil them until tender, then let them brew for another 8 hours without removing them.
- It is recommended to carry out the procedure with extreme caution, since it is quite difficult to remove turmeric from the surface of furniture and clothes, however, like other natural dyes.
red cabbage
A decoction based on cabbage will give the eggs a rich blue tint.
- Grind a whole head of cabbage into small slices, place in a saucepan and pour boiling water over it. Add 180 ml. table vinegar solution, cover and leave for 10 hours.
- After the expiration date, send the eggs to the container, control the color intensity every 2 hours. Then remove the product and leave it to dry. If desired, paint the surface with gouache or felt-tip pens.
Beet
Beetroot will help color the eggs in a raspberry or pinkish hue, it all depends on the length of time the product is kept in the solution.
- Grate 4 medium-sized beets, then mash the mixture with a potato masher or chop in a blender.
- Pour boiling water over the prepared mixture so that the water covers the beets completely. Pour in 150 ml. vinegar concentration of 9%, wait 6 hours.
- Put boiled eggs in a saucepan, let it brew for 5 hours. After the time has elapsed, remove the product, leave to dry.
onion peel
Onion peel will color the eggs a red-brown hue with a bronze sheen.
- To prepare a coloring solution, you will need to take a husk from 4 kg. Luke. Raw materials must be sent to a large saucepan and pour boiling water.
- Put the container on the stove, bring the mass to a boil and simmer for 1 hour. After that, cover with a lid, leave to infuse for 24 hours.
- After the due date, pass the broth through a colander or cheesecloth, boil the eggs in it for about 10 minutes. Then do not remove the product from the pan, leave the liquid to cool completely.
Regardless of the chosen method of coloring, you can create patterns on Easter eggs using improvised materials.

- Boil round-grain or long-grain rice, soak an egg in water and roll it in rice to stick the grains. Tie with a stocking or gauze, fix on both sides with elastic bands.
- Prepare the coloring pigment, dip the eggs into it and wait the required period of time. For this method, natural dyes are better.
- When the eggs are colored, remove them and leave to dry completely. Remove the cloth, remove the rice, brush the surface of the shell with sunflower oil.
Silk fabric
Eggs can be dyed with fabrics; silk or cotton with existing patterns is ideal for this purpose.
- Moisten the egg in hot water, wrap it with a piece of cloth so that the design fits snugly on the surface of the shell with the front side. Sew the egg with threads around the entire perimeter so that the fabric does not slip.
- Wrap with a piece of nylon, tie on both sides, creating a kind of candy. Pour 100 ml into an enamel saucepan. vinegar (6%), add water, send to the eggs. Boil them for about 15 minutes, then turn off the stove.
- Let the eggs stand in the solution for another quarter of an hour, then place them in a bowl of cold water and leave to cool completely. Carefully remove the retainer and stocking, evaluate the fruits of your labors.
First, prepare the eggs for painting: remove them from the refrigerator, leave them at room temperature, pierce a thin hole in the shell with a sewing needle. Consider coloring with food or natural dyes. Use a stencil, parsley leaves, silk fabric, or scrap materials to create a unique design.
Video: how to paint eggs for Easter (different ways)
Easter has its own customs and traditions, one of which is the painting of eggs. The article will be useful for both adults and children. Easter eggs are a symbol of a great holiday. Mistresses are in awe of painting eggs, and many tend to come up with new patterns.
The tradition of painting eggs for Easter
There are several versions of the origin of this tradition.
Version 1.
When Jesus was resurrected, Mary Magdalene came to the emperor with the news. Since a gift was needed for such a trip, she took a white egg with her. She said to the emperor, "Christ is risen." The emperor did not believe such news and said that it was as implausible as the fact that the egg turned red. And miraculously, the egg immediately turned red.
Version 2.
Hens in Lent lay eggs non-stop. The owners were afraid that they would spoil. Therefore, we decided to dye fresh eggs red.
Version 3.
When Jesus was a baby, painted eggs were a form of entertainment for him.
What eggs to paint for Easter?
At Easter it is customary to paint chicken eggs: no matter the color or size.
IMPORTANT: For even coloring, wash the eggs thoroughly with vinegar and soap. Otherwise, the paint will take unevenly.
What colors are used to paint eggs for Easter?
Previously, eggs were dyed only red.
Now for the Easter holiday you can find a wide variety of options for painting eggs:
- painting in one color: yellow, green, blue, orange. In fact, the color can be whatever is closer to your soul.
- painting in several colors: many patterns, drawings

How to dye eggs red?
Color the eggs traditionally Red color will help:
- Food colorings
- onion peel
- Beet. Boil an egg along with a whole beetroot. Boil until you get the desired color. You can simply grate a boiled egg with beetroot broth or beetroot, grated

How to dye eggs with onion skins?
- Take a pot filled to the top with onion skins
- Fill with water not to the very edge
- Put to boil for 45 minutes. Boiling time depends on the desired paint color
- Let the potion cool down
- Put the eggs in the husk and cook for 10-15 minutes after boiling
- Boil until you see the desired color
IMPORTANT: Eggs must be completely submerged in water. Turn them over for even coloring.

Food coloring for Easter eggs
Eggs can be dyed with natural and non-natural food coloring.
WITH non-natural dyes everything is clear: go to the store, buy the food coloring of the desired color, dilute the dye in water, put the egg in the water with the dye until the desired color is obtained.
IMPORTANT: Staining with these dyes usually produces a more uniform color. But from this there is a feeling of unnaturalness.

WITH natural the dye issue is more complex. Many natural dyes can be used depending on the desired color of the final egg.
Yellow.
Turmeric will help color the egg yellow. Painting technique:
- In 0.5 liters of water, add 2 tbsp. turmeric, 1 tbsp. table vinegar
- Put the eggs in the water
- Cook until ready

Pink color.
The pink color of the eggs will be given by cranberry juice, in which the boiled eggs lie down until the desired color is obtained.

Dark brown color.
Boil eggs in strong black tea.

Blue color.
Blue color will help to get red cabbage:
- Finely chop 2 cabbages
- Pour 0.5 liters of water into a saucepan
- Add 6 tablespoons to the water. table vinegar
- Pour in the cabbage
- Leave overnight to infuse, after mixing
- In the morning, put boiled eggs into the infusion until the desired color is obtained.

Easter egg painting
Egg painting will look equally good on both pre-dyed eggs and natural colored eggs.
Painting with a permanent marker.
An easy way to paint Easter eggs for those who can draw.

Painting with paints.
For painting, you only need paints and brush thin. Paints can be used the most simple acrylic.
IMPORTANT: With this method, you can decorate the egg with your child and make a painting that you like.

Painting with powdered sugar.
- Prepare the powdered sugar
- Add as much water to it as needed until a thick homogeneous mass is obtained.
- Apply the pattern with a confectionery syringe with a sugar mixture
- Let the egg dry
Wax painting.
- For painting with wax, you will need wax pencils or wax paints.
- Choose the tool you will use to paint: knitting needle, needle, awl, copper wire
IMPORTANT: The copper wire will keep the wax hot for a long time, allowing you to draw more lines at a time.
- Heat the wax up to 65 C
- Dip the tool in wax and apply the pattern

If you do not have the makings of an artist or cannot come up with the desired pattern, use stencils.
- Print a stencil
- Pick up paints and apply them with a sponge or brush
- Attach the stencil to the egg
- Blot with a sponge or brush over the stencil
- Remove the stencil and dry the egg

How else can you paint eggs for Easter?
Colored floss threads.
Wrap the egg completely with different colored floss threads and boil the egg hard.

Beautiful napkins.
- Buy beautiful napkins with a pattern suitable for the holiday
- Cut out the elements you want to transfer to the egg
- Prepare gelatin according to package instructions.
- Dissolve the gelatin granules by heating it
- Apply the cut out pattern to the boiled egg
- Brush over the prepared gelatin
- Align the pattern from the center to the edges

Paper.
- From paper, cut out figures, stripes, patterns
- Attach paper of your choice to the egg
- Wrap the egg tightly with nylon or gauze
- Dip in the desired dye. If necessary, cook in dye.
- Waiting for the egg to dry completely
- Removing paper


Silk.
- Cut a piece of silk in your desired color
- Wrap an egg in it
- Wrap over with gauze or nylon and secure
- Pour water into a saucepan and 3 tbsp. vinegar
- Boil wrapped eggs in water with vinegar for 20 minutes after boiling

- Roll wet egg in rice
- Wrap with gauze
- Dip in dye
- After staining, open the gauze and let dry.

marble effect.
First way.
- Choose two dyes that match in color (preferably light and dark)
- Paint an egg in one of them
- Pour the second into a bowl and pour a few tbsp. vegetable oil (depending on the volume of water)
- Mix water with oil
- Dip the egg completely once into the water so that it catches as many fat bubbles on the water as possible.
- Blot with a tissue
- Let dry


Dyeing eggs for Easter is an integral ritual of one of the main Christian holidays, symbolizing the Resurrection of Jesus Christ. This holiday is beautiful and solemn, with well-established centuries-old traditions. In addition to a deep religious meaning, Easter is associated with the purification of the soul and home, with delicious Easter cakes and Easter dishes.
The egg is rightfully considered a symbol of the birth of life, and the Easter painted egg means the resurrection from the dead and eternal life. It turns out that painted eggs were found in Egyptian and Sumerian tombs, which were built as early as the 3rd millennium BC. e. It is even difficult to imagine how many years such a tradition has existed.
Orthodox paint eggs during Holy Week on Maundy Thursday or Red Saturday. In 2019, these are April 26 and 28, respectively. Painted eggs are consecrated in the church at a festive service, and the first meal after Lent begins with eggs.
Do-it-yourself painting eggs for Easter has become not only a family art, but also a kind of competition - whose eggs are the most beautiful. And there are a lot of ways to paint eggs. You can, of course, paint eggs for Easter with paints, but this is still harmful chemistry, and food paints are not always on sale. I offer you natural ways to dye eggs at home.
Coloring eggs with onion skins - the traditional way

This is my favorite and most reliable way to color eggs. With this method, the eggs are always a beautiful color. I start harvesting onion peel a few months before Easter - I collect it in a separate bag. To make the color of the eggs saturated, there should be a lot of onion peel.
Pour the onion peel into a saucepan and cover with cold water. Put on the stove and bring to a boil.
Choose a worse pot, because the husk will paint the sides of the pot so that it will be difficult to clean.
Pour the eggs in a separate bowl with cold water and leave for 10 minutes.
Water with onion peel boils at this time, we reduce the fire so that the eggs do not crack. Add 1 tablespoon of salt to the pan and carefully drop the eggs one at a time. Cook over low heat for 15 minutes.
If you want a more intense color, remove the pan from the heat and leave the eggs in this solution for a while.
After removing from the pan, let the eggs cool slightly and rub them with sunflower oil with a paper towel to shine.
Now the eggs “played” with paint, you can put them in a basket and bring them to the church to consecrate. I try to bless the eggs every Easter, and then treat my family, friends and neighbors.


How to dye eggs in onion skins with a pattern

If in the first recipe it was possible to use any eggs - white or brown, then white eggs are suitable for painting with onion peel with a pattern.
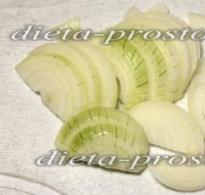
To decorate the eggs, we prepare the leaves of the plants in advance. Before Easter, fresh leaves are not always there, because this holiday can be in March, when nature is still sleeping. Therefore, you can use fresh herbs from the store - parsley, basil, dill, mint or lemon balm.
Birch leaves look beautiful. You can put a few branches in a vase of water in advance, and when the leaves bloom, use a few to decorate Easter eggs.
Lace, woolen threads are also suitable for coloring eggs with a pattern.
Also, you will need to prepare clean old stockings, tights or gauze in advance. You will also need thread.
So let's color the eggs.
Pour onion peel with cold water and bring to a boil.
We wash the eggs, dry them with a paper towel and wipe each egg with a cloth with vinegar.

We put a leaf or other decor on the egg, press it tightly and wrap the egg in a piece of stocking fabric or gauze.
To make the leaf adhere more tightly to the egg, it can be slightly moistened with water.


We tie a nylon or gauze fabric with a thread.
 You can beautifully and originally paint eggs with lace and onion peel. It's simple - cut off the lace of the desired length and wrap the egg around it. We tie the ends with a thread and cut off all the excess.

You can also decorate the egg with woolen threads. Just randomly wrap the egg with string.

So that the eggs do not crack, pour 1 tbsp into the broth. l. salt. Carefully lower the eggs into the broth with onion peel and cook for 10-15 minutes. After that, the eggs are carefully immersed in cold water.

We remove the decor from the cooled eggs and wipe the eggs with vegetable oil.

Marble eggs with greenery
And this is my favorite method. Eggs are unusually beautiful, with marble stains. I will share one secret of this method - the more we chop the onion peel, the more beautiful the drawing will turn out. You can even try to grind the husk in a coffee grinder. I like to grind the husk with scissors.

To make the husks stick well to the eggs, moisten them with water, then roll each egg in the onion skins. In a piece of gauze or stocking, put some more husks, place the egg inside and wrap around. Tie the ends with thread. Put to boil in a saucepan, adding 1 tsp. salt. 5 minutes after boiling, pour in 2 tsp. greens and cook for another 5 minutes. Then pour over the eggs with cold water and remove the gauze, remove the husk. Rub eggs with sunflower oil.

Beautiful marble eggs are ready!
How to dye eggs with onion skins and rice
Another simple and wonderful option for dyeing eggs in natural ways. The rice sticks to the eggs and the result is a pattern in the form of droplets. This method is very simple, try it. In addition to rice, you can also use peas.
Pour grains of rice or peas into a stocking, place an egg there, distribute the grain with your fingers around the entire circumference of the egg. We tie the fabric, and dip the eggs into the prepared broth with onion peel. Cook for 10 minutes, wash the eggs under running cold water and remove the stocking or gauze and grains. After the eggs have cooled down a bit, rub them with vegetable oil.

Coloring eggs with natural dyes
I already wrote that it is fundamentally against chemistry and coloring eggs with paints. Yes, it is beautiful and brighter, but health is more important. Moreover, there is a good replacement in the form of natural and harmless dyes from natural ingredients. Of course, these are all kinds of juices - beetroot, blueberry juice, red cabbage juice, spinach juice and others. From the juice of cranberries, raspberries and beets you get a pink color, from the juice of blueberries, pomegranate or blackcurrant - purple, and if you want to get blue or blue, then use the juice of red cabbage. Turmeric gives you a rich yellow color, while black tea or coffee gives you brown hues. After boiling the bark and branches of the cherry, you get reddish-raspberry eggs. I want to warn you that bright colors are not always obtained in this way. To make the color brighter, after boiling the eggs, you need to keep them in the broth for at least 4 hours, and it is better to leave them overnight.
Coloring eggs with beets
If you want to get the pink color of eggs, then beetroot juice is suitable for this coloring method. Dyeing eggs in a natural way takes a little more tinkering than regular paints, but if you care about your health, then this work will pay off handsomely.

Beets need to be prepared in such a way that more juice is obtained. To do this, grate the beets, pour water and cook for 5-7 minutes. You can boil eggs in the same broth. Then we wipe the beets through a strainer, we get a rich burgundy juice. Pour eggs with this juice in a separate bowl, pour 1 tbsp. l. vinegar and leave for 4-8 hours.

Coloring eggs with red cabbage juice
Red cabbage will give the eggs a blue color.

The coloring method is similar to the previous one. We cut the cabbage into large pieces, fill it with water, cook for 5-7 minutes together with the eggs, decant the hot broth into a separate bowl. Add 1 tbsp. l. vinegar and keep eggs in this broth for 4-8 hours.

How to dye eggs with turmeric
Turmeric gives perhaps the most intense color of all natural dyes. Eggs are beautiful, bright yellow.

For such painting, pour a bag of turmeric (15 gr.) into boiling water, stir and add 1 tsp. salt. We put eggs in this solution and cook for 10 minutes. In order for the paint to be brighter, leave the eggs in this solution for several hours. For shine, rub with sunflower oil.

Coloring eggs with coffee or tea
I want to warn you right away that with the help of coffee or tea, you get a not very saturated, but delicate beige color of eggs.

You can use both natural and instant coffee or black tea. For coloring, we prepare a solution - put 4-5 tbsp in boiling water. l. coffee in 0.5 liters of water. If you use tea, you will also need 4-5 tbsp. l. black tea for brewing. Cook for 5 minutes, add 1 tsp. salt and omit the eggs. Cook for another 7 minutes. And as always for natural dyes, it is advisable to keep it in the solution longer, at least 5 hours.
How to dye eggs with blueberry juice
The blueberry coloring method is similar to the previous ones. The eggs come out a beautiful purple color.

For 1 liter of water you will need 2.5-3 cups of frozen blueberries. Berries need to be boiled a little (5 minutes), pour 1 tsp. salt and omit the eggs. You can rub the blueberries through a strainer after cooking, get pure juice without berries. But I don’t bother, I just boil eggs with berries. Cook for another 3-4 minutes, pour 1 tbsp. l. vinegar to fix the color. You can leave the eggs in the pot overnight.
Decoupage Easter eggs
I learned about this method of decorating eggs quite recently, a couple of years ago, and it has become my favorite. After all, there are a lot of napkins with a variety of beautiful patterns in our stores now, you need to choose the brighter one, and then you get very beautiful and original eggs.
- Napkins for decoupage should be chosen with a medium-sized pattern to fit on the egg.
- We select white eggs for decoupage.
- It is better to choose napkins on a white background, then the pattern will not have to be cut very carefully with scissors.
- The best way to stick napkins is with egg white.
To get beautiful and whole Easter eggs, you need to remember 7 basic rules:
- Before boiling eggs, they need to be removed from the refrigerator a few hours in advance. Eggs should not be cold!
- Eggs should be boiled over low heat, avoiding cracking.
- So that the eggs do not burst, you need to put in water with eggs 1 tbsp. l. salt.
- To fix the pigment in the paint, pour 1 tsp into the coloring solution. vinegar, the color will become brighter.
- If you want a more intense color when coloring eggs with natural dyes, leave the eggs in the broth overnight.
- Wipe the dyed eggs gently with a paper towel.
- For shine and beauty, wipe the cooled eggs with sunflower oil.
I wish you a beautiful and delicious holiday. After all, Easter personifies the resurrection of life, nature, bright feelings. May this light come into every home and fill hearts with joy.
Multi-colored Easter eggs (glazing in dyes)
Recently I bought very good food liquid dyes for Easter eggs produced by “Top Product” (not Chinese, but ours, located near Moscow, they are made in the Orekhovo-Zuevsky district). There are 3 dyes in total: “pink”, “yellow” and “blue”, but there are 15 shades (from blue-violet-to pink-red-yellow-green-and again blue, they are all shown on the package).
I was struck not so much by the good quality of the dye as by the instructions - short and very sensible. Obviously, it was written by a reasonable person who took care of those who will use this product, thought through and warned about all the nuances and features of dyeing eggs using liquid dyes. Thank him very much!

Liquid food coloring for Easter eggs
Coloring eggs by applying layers (glazing)
Glazing is a technique of painting with paints by applying thin translucent layers of the same color (or different) to each other. Layering either enhances the depth of the original color or, when different colors are layered on top of each other, gives rise to a new shade or color. Glazing is often used in watercolor painting. Yes, and you probably tried this technique in drawing lessons.
And so, having read the instructions for dyes and remembering my school years, I decided to paint each egg in several colors by applying color layers - by repeatedly immersing the egg in a colored solution, turning it with different barrels. I advise you to make the initial color of the solution less intense (pour 2-3 times less dye than according to the instructions) and then layer it up to the one you want to get. Weak color at the intersection of paint layers is enhanced, denser colors appear (darker shades of the same color). And just as you dip the egg, turning it in a new way each time, you will get an intricate geometric pattern (both rings and rhombuses). There is a lot of room for creativity here. I only did a test run.
Beautiful multicolor painted eggs
And if you want to get a multi-colored egg and experiment with getting new colors, then you need to immerse it in different colors. In a place where one color will be superimposed on another, you get a third.
For example: dip one barrel of a white egg into yellow, and the second into blue, but so that part of the blue paint lies on the already painted yellow part. You will get a yellow-blue egg with a green zone, which will appear when yellow and blue are combined.

Such multi-colored eggs are obtained, dipped in different food colors. You just need to know what colors you get when you mix them.
What determines the degree of staining
A more delicate weak shade of color is obtained with a short stay in the coloring solution. Or the solution itself may be with less dye.
Deeper colors (dark and thick) are obtained when the egg is in the dye for a long time or when it is repeatedly immersed in it (and, as a result, numerous layers and color intersections appear). The more layers of the same color, the thicker and darker it is.
egg coloring methods
Most importantly, read the manufacturer's instructions. They advise what proportions are optimal for applying this particular paint (how much water to use and how much dye). As a rule, to fix the paint on the egg, the solution is acidified (table vinegar is added).
Eggs boiled in salt water should be rinsed before dyeing. And then the paint will stick badly.
The instruction, the text of which is given below, can be opened in a separate window in a larger size.

Instruction text - how to color eggs with Top Product liquid dyes

Preparing to color Easter eggs with liquid food coloring
How much water to pour into a glass for staining
The amount of water depends on the size and shape of the glass and the size of the egg. Pour 1/4 first, then add more if needed (usually 1/4 to 1/2 cup of water).
Practice by checking how much liquid you need in a glass for coloring eggs, it is better to first use plain water. Pour, put an egg in it and check if it is enough, if it overflows. And then add dye.
Methods for staining in a glass
- You can immerse the egg in the paint not completely, but only half. Then dry the painted part (so that you can take it with your hands) and dip the white part of the shell into the second paint.
- You can quickly dip the whole egg (so that its entire surface is slightly stained). To do this, there should be enough water in the glass (so that it covers the entire egg). And then you need to pour off half the water and put the egg there to finish painting (then the water level will be lower and only half of the egg will be in the paint. And then you can take it out, dry it, immerse it again in the same color or another, depending on what color and pattern you want to receive.
- At the next staining, you can add more dye (make the original color darker, more intense). For example - from soft pink to dark pink-crimson. Or drip paint of a different color: mix the original pink with blue. You will get a purple or lilac solution.
How to paint an egg in several colors
Remember the simple rules for mixing paints when drawing. The same goes for liquid food coloring. However, it should be borne in mind that not all dyes are mixed according to the principle of ordinary paints. But this particular manufacturer, by offering a color layout on the packaging, shows what colors can be obtained from the original ones. I checked, it is.

What color will you get if you mix
For more information on how to get orange, purple, green and shades of color - in. Remember that you do not have white, but you have a white eggshell. And if you apply a thin layer of color on it, you can get a shade that usually comes out when mixing the base color with white.
How to make eggs shiny
Dyed eggs should be dried on napkins or paper towels. And to give them shine - put a little vegetable oil on the palm of your hand and rub the shell with wet oily hands.